¶ What is the maximum build volume of Neptune 4 Max?
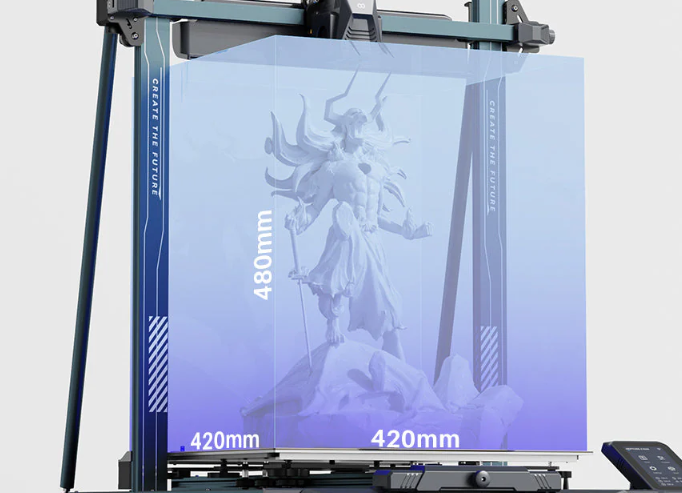
The maximum build volume of Neptune 4 Max is 420 × 420 × 480 mm³.
¶ What is the nozzle diameter of Neptune 4 Max?
Neptune 4 Max comes standard with a 0.4 mm nozzle.
The nozzle used on Neptune 4 Max features a customized design and is not compatible with nozzles of other specifications.
If you need to purchase a replacement nozzle, please click the link below:
¶ What is the maximum printing speed of Neptune 4 Max?
The printing speed range of Neptune 4 Max is 30–500 mm/s.
The recommended printing speed is approximately 250 mm/s.
¶ What are the maximum temperatures of the nozzle and heated bed?
The maximum nozzle temperature of Neptune 4 Max is 300°C.
The maximum heated bed temperature is 85°C.
To reach the maximum temperature, the printer should be operated in an environment with an ambient temperature of approximately 25°C.
¶ What file formats does Neptune 4 Max support?
Neptune 4 Max supports importing STL and OBJ model files.
The model files need to be sliced using slicing software and exported as G-code files before printing.
¶ What connection methods does Neptune 4 Max support?
Neptune 4 Max supports:
- USB device printing
- LAN connection
- Wi-Fi connection
¶ What firmware does Neptune 4 Max use?
Neptune 4 Max uses a customized version of Klipper firmware.
You can download the Neptune 4 Max firmware from our official website:
https://www.elegoo.com/pages/download
Note:
Please select the correct firmware according to your printer version.
The firmware for the Ribbon Cable version and the Type-C version are different and cannot be used interchangeably.
¶ Can Neptune 4 Max Install Non-ELEGOO Official Klipper Firmware?
No.
Neptune 4 Max uses an ELEGOO customized version of Klipper firmware. Installing Klipper firmware from unofficial sources may cause system malfunctions, prevent the printer from booting, or even brick the printer.
Please only install firmware officially released by ELEGOO and ensure that the firmware version matches the hardware version of your printer.
¶ What safety precautions should be taken before using Neptune 4 Max?
Before use, please place the printer on a stable, flat surface that is not prone to vibration.
During printing:
- Do not touch the nozzle, heated bed, or high-speed moving parts.
- Children must use the printer under adult supervision.
- If the printer will not be used for an extended period, turn off the power and unplug the power cable.
- In case of emergency, disconnect the power immediately.
¶ What should be checked before leveling?
Before leveling, please confirm that the PEI build plate is correctly installed on the heated bed.
The leveling sensor of Neptune 4 Max detects the metal build plate.
If the PEI build plate is not installed or is replaced with a non-metal platform, the sensor may fail to detect the surface correctly, which may cause the nozzle to collide with the build plate.
For leveling instructions, please refer to our official Wiki page:
First Layer Print Quality Issues
If the issue persists, please contact ELEGOO Support for further assistance.
Email: 3dp@elegoo.com
¶ Why does Neptune 4 Max need leveling before first use?
During initial setup or after moving the printer, the distance between the nozzle and the build plate may change.
Leveling ensures the proper distance between the nozzle and the build plate, allowing the first layer filament to be evenly deposited on the surface of the build plate, improving model adhesion and printing success rate.
¶ How can I determine whether the first layer height is correct?
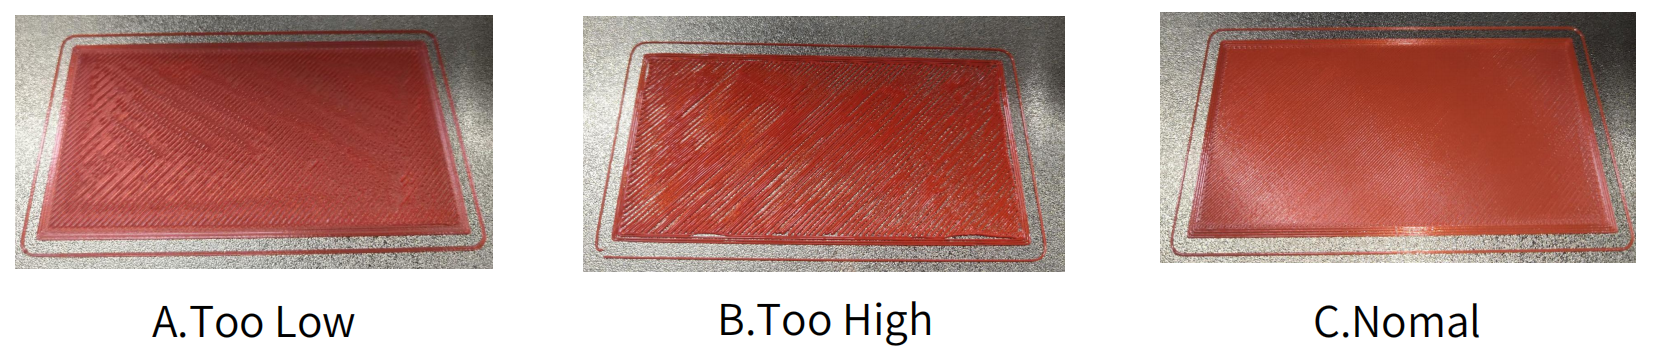
When the first layer height is properly adjusted:
- Filament adheres evenly to the build plate.
- The printed lines are continuous and smooth.
- The nozzle does not excessively press against the build plate.
If the nozzle is too close:
- Filament extrusion may become insufficient.
- The first layer lines may become too thin.
- The nozzle may scrape the build plate.
If the nozzle is too far:
- The first layer lines may appear loose.
- Adhesion may be insufficient.
- The model may detach during printing.
¶ Can the nozzle height be adjusted during printing?
Yes.
If the first layer height is too high or too low during printing, you can fine-tune the Z offset through the touch screen.
It is recommended to adjust using small increments such as 0.01 mm or 0.1 mm.
Avoid making large adjustments at once, as this may cause the nozzle to scratch the build plate or cause the filament to fail to adhere properly.
¶ What should I do if the model does not stick to the build plate or warping occurs?
Please check the first layer condition first.
If the nozzle is too far from the build plate, the first layer adhesion will be significantly reduced.
It is recommended to perform leveling again and adjust the Z offset to ensure the first layer is properly compressed against the build plate.
You can also enable the Brim adhesion setting in the slicing software to improve edge stability and reduce the risk of warping.
For troubleshooting steps, please refer to our official Wiki page:
First Layer Print Quality Issues
If the issue persists, please contact ELEGOO Support for further assistance.
Email: 3dp@elegoo.com
¶ How do I perform a filament loading test before printing?
Pass the filament through the filament runout sensor and insert it into the print head.
On the touch screen, select:
Prepare > Extruder > Load
The nozzle will automatically heat up to approximately 200°C.
After the temperature reaches the target value, start the filament loading process and confirm that the filament can be extruded smoothly from the nozzle.
Before printing, please remove any residual filament from the nozzle and PEI build plate.
¶ Can the extrusion force be adjusted?
Yes.
Different types of filament require different Extruder Kit clamping forces.
You can adjust the Extruder Kit spring tension using a 2.0 mm or smaller hex wrench.
- Turn counterclockwise to increase extrusion force.
- Turn clockwise to reduce extrusion force.
Make small adjustments only.
Excessive clamping force may deform the filament, while insufficient force may cause filament slipping.
¶ What should I observe when printing a test model?
When printing a test model, pay special attention to the first layer condition.
If the first layer lines are even and adhere firmly to the build plate, the distance between the nozzle and the build plate is appropriate, and printing can continue.
If the first layer is too thin, overly pressed, or extrusion is unstable, increase the Z offset slightly.
If the first layer lines appear loose and do not stick to the build plate, decrease the Z offset.
¶ Does Neptune 4 Max support power loss recovery?
Yes.
If the printer loses power or shuts down unexpectedly during printing, you can select Resume after power is restored to continue printing.
Please note:
If the power interruption lasts for a long time, the temperature of the PEI build plate may decrease, causing the model to loosen or detach.
In this case, even if the power loss recovery function is available, the original print may not be completed successfully.
¶ Does Neptune 4 Max support filament runout detection?
Yes.
When the filament runout sensor detects that no filament is present, the printer will notify the user to replace the filament and continue printing afterward.
To ensure this function works properly:
- Confirm that the filament passes through the filament runout sensor correctly.
- Ensure the sensor cable connection is secure.
¶ Which slicing software is recommended?
ELEGOO Slicer is recommended.
Please download the latest version of ELEGOO Slicer from our official website:
https://github.com/ELEGOO-3D/ElegooSlicer/releases
¶ How do I print models using a USB drive?
First, use slicing software to export the model as a G-code file and save it to a USB drive.
Insert the USB device into the printer's USB port.
On the touch screen, select:
Then select the corresponding G-code file.
After the nozzle and heated bed reach the target temperature, the printer will automatically home and start printing.
¶ How do I use LAN or Wi-Fi for network printing?
Connect the printer to Wi-Fi or a LAN connection.
Check the printer IP address on the touch screen.
Make sure the computer and printer are connected to the same local network.
Enter the printer IP address in the browser address bar to access the printer's web interface.
If the page cannot be accessed, please check:
- Network connection.
- Printer IP address.
- Whether the computer and printer are connected to the same network.
For LAN or Wi-Fi printing instructions, please refer to our official Wiki page:
Remote Printing Operation Guide
¶ What modes are available for the rear cooling fan of Neptune 4 Max?
The rear part cooling fan provides three modes:
- Silent
- Normal
- Sport
Each mode corresponds to different fan speeds.
- Silent mode: The rear part cooling fan will stop or reduce speed to minimize noise.
- Normal and Sport modes: Suitable for printing scenarios requiring stronger cooling performance.
Select the appropriate mode according to:
- Filament type.
- Model structure.
- Cooling requirements.
¶ When is input shaping calibration recommended?
It is recommended to perform input shaping calibration:
- Before first use.
- After moving the printer.
- After replacing motion-related components.
This function detects the X-axis and Y-axis separately.
During the detection process:
- Do not shake or move the printer.
- Wait until the test is completed.
This helps improve surface quality during high-speed printing.
¶ What should I do if the X/Y/Z axis motor does not move or makes abnormal noise during homing?
First, check whether the corresponding axis motor cable is loose or disconnected.
Then check:
- Whether the limit switch can be triggered properly.
- Whether there is any obstruction in the motion path.
If the X/Y axis belt is too loose, it may also cause abnormal movement or noise.
You can adjust the belt tension using the belt tension knob.
For troubleshooting steps, please refer to our official Wiki page:
If the issue persists, please contact ELEGOO Support for further assistance.
Email: 3dp@elegoo.com
¶ What should I do if the extrusion is abnormal or the nozzle is clogged?
First, check:
- Whether the Extruder Kit motor cable is loose.
- Whether the Extruder Kit gear fixing screw is secure.
- Whether the hotend cooling fan is working properly.
If the nozzle is suspected to be clogged:
- Heat the nozzle to approximately 230°C.
- Try manually pushing the filament through.
- Alternatively, use a fine needle to clean the nozzle opening while heated.
Please take proper high-temperature safety precautions to avoid burns.
For troubleshooting steps, please refer to our official Wiki page:
If the issue persists, please contact ELEGOO Support.
Email: 3dp@elegoo.com
¶ What should I do if layer shifting occurs during printing?
Layer shifting is usually related to:
- Excessive printing speed.
- X/Y axis belt being too loose.
- Loose timing pulley fixing screws.
- Abnormal motor drive current.
It is recommended to:
- Reduce the printing speed first.
- Check the X/Y axis belt tension.
- Check whether the timing pulley fixing screws are secure.
For troubleshooting steps, please refer to our official Wiki page:
If the issue persists, please contact ELEGOO Support for further assistance.
Email: 3dp@elegoo.com
¶ What should I do if stringing or ringing occurs during printing?
If obvious stringing appears on the model:
- Increase the retraction distance in the slicing software.
- Increase the retraction speed.
- Check whether Z Hop needs to be enabled.
An excessively high printing temperature may also cause the filament to become overly fluid, resulting in stringing.
You can slightly reduce the nozzle temperature according to the filament type.
If vibration patterns appear:
- Check the printing speed.
- Check the acceleration settings.
- Ensure the printer is placed on a stable surface.
- Perform resonance optimization.
For troubleshooting steps, please refer to our official Wiki page:
If the issue persists, please contact ELEGOO Support for further assistance.
Email: 3dp@elegoo.com
¶ What should I do if the build plate or print head has slight movement?
During transportation, the POM wheels or eccentric nuts may become slightly loose.
If the build plate or print head has noticeable movement:
Use an open-end wrench to slowly adjust the corresponding eccentric nuts until the build plate or print head can move smoothly without excessive looseness.
Adjust gradually.
Over-tightening may increase motion resistance and affect printing performance.
¶ What should I pay attention to during daily maintenance?
Regularly clean dust and residual filament from the printer surface while the printer is powered off.
After printing:
- Use the remaining heat from the nozzle and appropriate tools to remove residual filament.
- Do not touch the nozzle directly with your hands.
Keep the build plate clean.
Oil, dust, or filament debris on the surface may affect first layer adhesion.
¶ What should I do if I encounter an issue not covered in the manual?
If you encounter an issue that is not covered in the manual, please contact ELEGOO Support and provide the following information:
- Printer model.
- Serial number.
- Fault description.
- Photos or videos.
- Slicing parameters.
- Printing files.
Providing complete information helps the support team identify the cause and provide a solution more efficiently.
¶ What is the printing accuracy of Neptune 4 Max?
Printing accuracy depends on factors such as:
- Nozzle diameter.
- Layer height.
- Model settings.
The typical layer height range is 0.1–0.3 mm.
¶ Does Neptune 4 Max support Cura / OrcaSlicer?
Yes.
Neptune 4 Max supports mainstream slicing software, including:
- Cura.
- OrcaSlicer.
However, ELEGOO Slicer is recommended for optimized official printing profiles.
Please download the latest version of ELEGOO Slicer from our official website:
https://github.com/ELEGOO-3D/ElegooSlicer/releases
¶ What materials does Neptune 4 Max support?
Neptune 4 Max supports:
- PLA.
- PLA+.
- TPU.
- PETG.
¶ How often should the nozzle be replaced?
The service life of the nozzle depends on the filament type.
- PLA: Longer service life.
- PETG / Carbon fiber reinforced filament: Faster wear.
It is generally recommended to inspect the nozzle every 1–3 months and replace it if necessary.
¶ How often should the belt be checked?
It is recommended to check the belt tension every 1–2 months, especially for users who frequently perform high-speed printing.
¶ What should I pay attention to when upgrading firmware?
Please ensure:
- Use the official firmware package.
- The USB drive is formatted as FAT32.
- The firmware files are placed in the correct location.
- Do not disconnect power during the firmware update process.
¶ Do I need to apply glue before printing?
Usually, no.
The PEI build plate can normally be used for direct printing.
Only when adhesion is insufficient is it recommended to apply an additional adhesion aid such as glue.
¶ What should I do if the model is difficult to remove after printing?
You can:
- Wait until the build plate cools down before removing the model.
- Slightly bend the PEI build plate to help release the model.
Avoid using sharp tools, as they may damage the build plate.
¶ Will printing data be lost after a power outage?
No.
Neptune 4 Max supports power loss recovery.
However, after power is restored, please resume printing promptly to improve the chance of successful recovery.
¶ Can I change filament during printing?
Yes.
You can pause the print, manually replace the filament, and then resume printing.
¶ Is it normal for the print head to make noise while moving?
Slight operating noise is normal.
The noise may become more noticeable during high-speed printing.
¶ Do I need to monitor the printer during long prints?
It is not necessary to watch the printer throughout the entire printing process.
However, it is recommended to check that the first few layers are printing normally before leaving the printer unattended.