¶ Issue Description
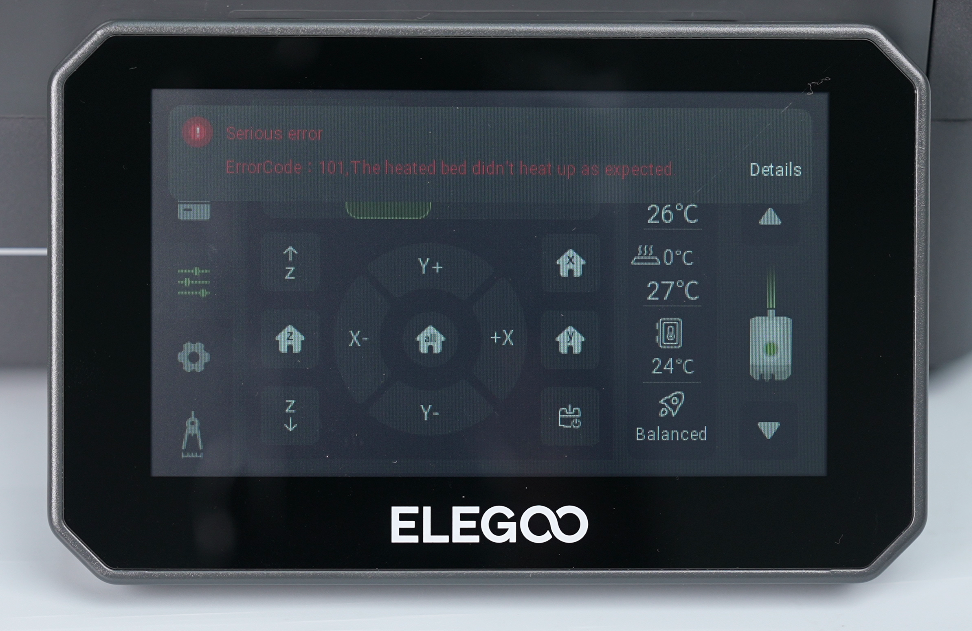
The touchscreen displays the following error:
Serious Error: Error Code: 101 The heated bed did not heat up as expected.
¶ Possible Causes
- The ambient temperature around the printer is too low.
- The heated bed thermistor or its wiring is faulty.
- The heated bed heater is faulty.
- The cable between the mainboard and the heated bed control board is loose or damaged.
- The mainboard or heated bed control board is faulty.
¶ Tools Required
- A 2.0 mm hex key
- A Phillips screwdriver
- A multimeter
¶ Troubleshooting Steps
Electrical Safety Warning
The heated bed control board contains mains-voltage circuits. Before removing the bottom cover, reconnecting cables, measuring resistance, or tightening terminals, power off the printer and unplug the power cord.
When performing a powered indicator-light inspection, observe the indicator lights only. Do not touch any electronic component, terminal, or cable while the printer is powered on.
¶ Check the Ambient Temperature
The recommended operating ambient temperature for the Centauri Carbon is 5–40°C (41–104°F).
- If the temperature around the printer is outside this range, move the printer to an environment that meets the operating temperature requirements. Allow the printer to reach room temperature before testing it again.
- If the ambient temperature is within the recommended range, continue with the following steps.
¶ Compare Heated Bed Operation at 60°C and 90°C
-
On the touchscreen, set the heated bed temperature to 60°C and wait for the heated bed to heat up.
-
Check whether the heated bed can reach 60°C and whether Error Code 101 appears during heating.
- If Error Code 101 appears, proceed to
Measure the Heated Bed Heater Resistanceand complete the subsequent troubleshooting steps. - If no error appears, power off the printer and allow the heated bed to cool to room temperature. This may take more than 20 minutes.
- If Error Code 101 appears, proceed to
-
Power on the printer and set the heated bed temperature to 90°C.
-
Check whether the heated bed can reach 90°C and whether Error Code 101 appears while heating from room temperature.
- If Error Code 101 appears, proceed to
Measure the Heated Bed Heater Resistanceand complete the subsequent troubleshooting steps.
- If Error Code 101 appears, proceed to
Temporary workaround: If Error Code 101 occurs only when heating the bed above 60°C, first heat the bed to 60°C. After the temperature reaches and stabilizes at 60°C, increase the target temperature to 90°C or the required temperature.
¶ Measure the Heated Bed Heater Resistance
This procedure requires experience using a multimeter. If you do not have a multimeter and the issue remains unresolved, skip the electrical measurements and provide the information requested at the end of this article to Technical Support.
- Confirm that the printer is powered off and the power cord is unplugged.
- Wait until all indicator lights are off.
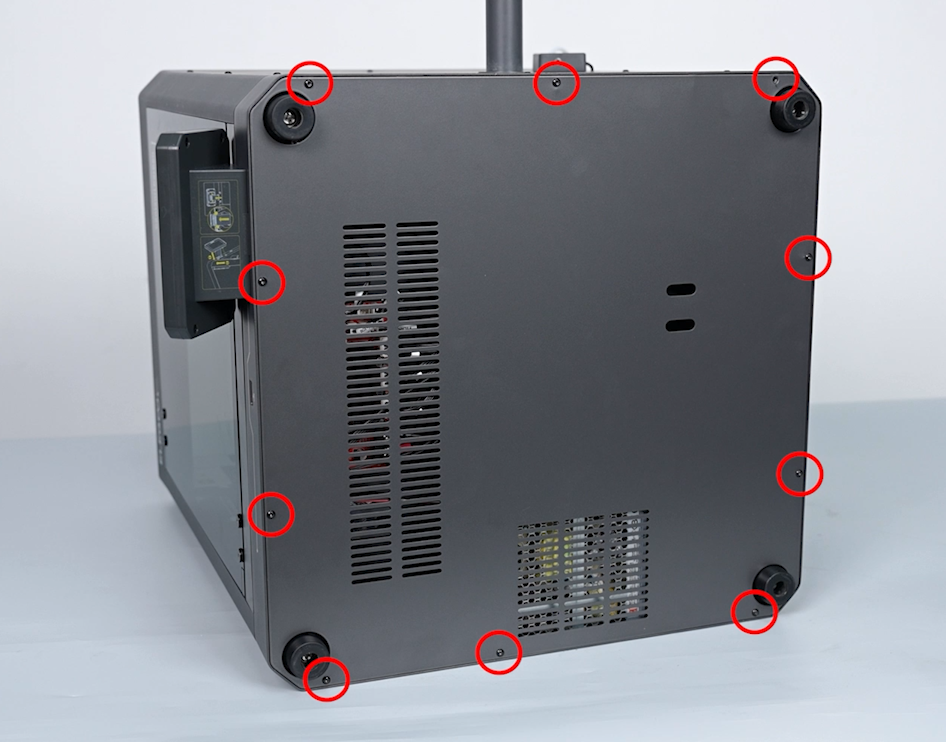
- Use a 2.0 mm hex key to remove the ten screws securing the printer bottom cover.
- Set the multimeter to resistance mode
(Ω). - Measure the resistance across the two heated bed heater leads connected to the
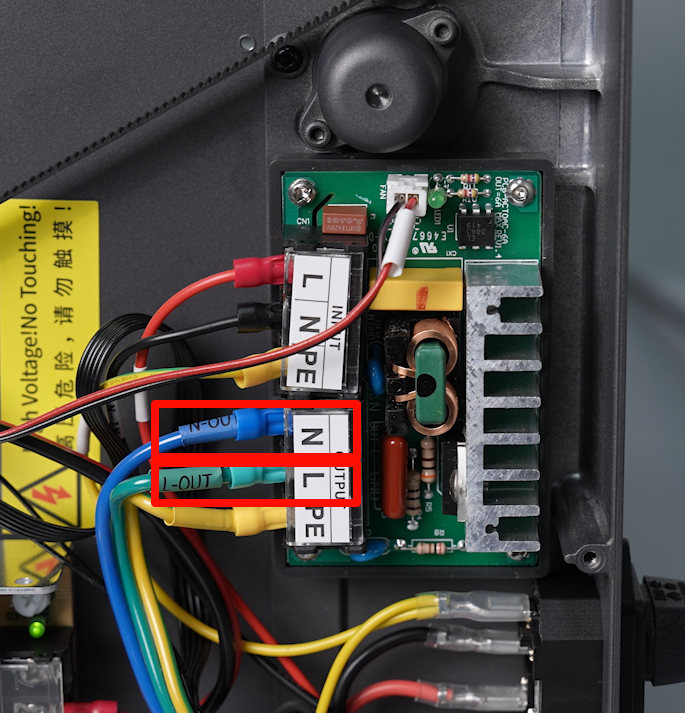
NandLpositions of theOUTPUTterminal.
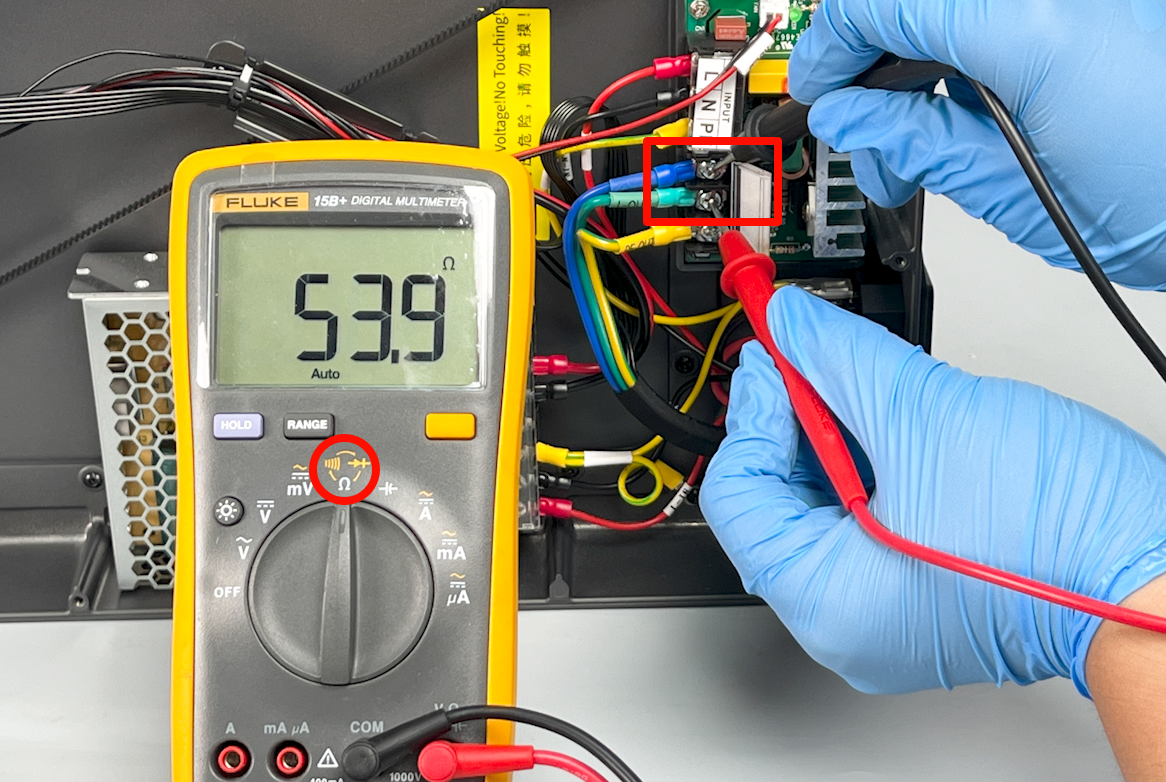
The normal resistance is 40–60 Ω.
- If the multimeter displays an open circuit, an unstable reading, or a value outside the normal range, the heated bed heater or its wiring may be faulty. Replace the heated bed assembly.How to Replace the Heated Bed Assembly
- If the measured resistance is within the normal range, continue with the following steps.
¶ Inspect and Reconnect the Mainboard and Heated Bed Control Board connecting cable plug
-
Power off the printer and unplug the power cord.
-
Wait until all indicator lights are off.
-
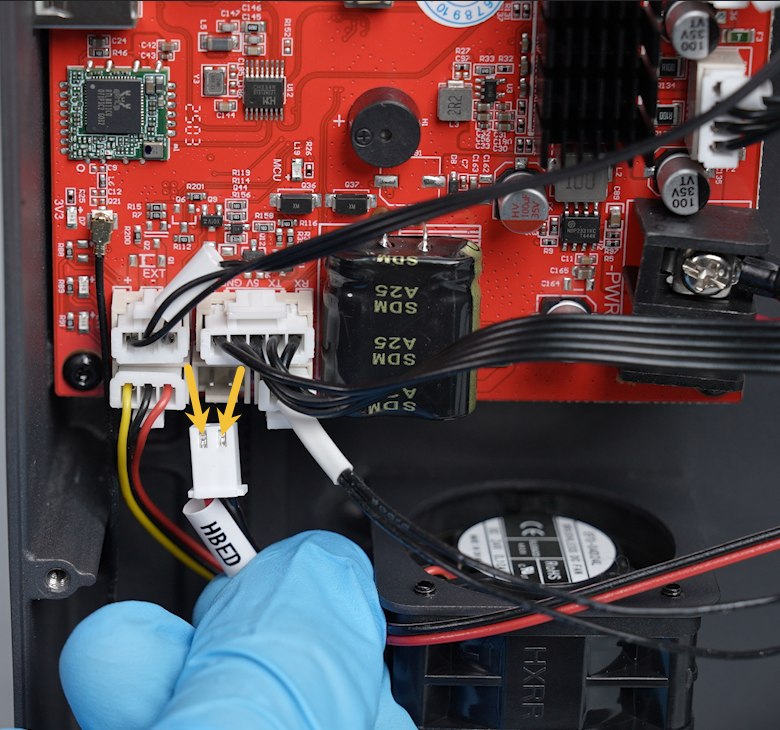
Disconnect and reconnect the cable connected to the
HBEDport on the mainboard. -
Check that the connector is fully seated and that its pins are not bent, loose, discolored, or damaged.
-
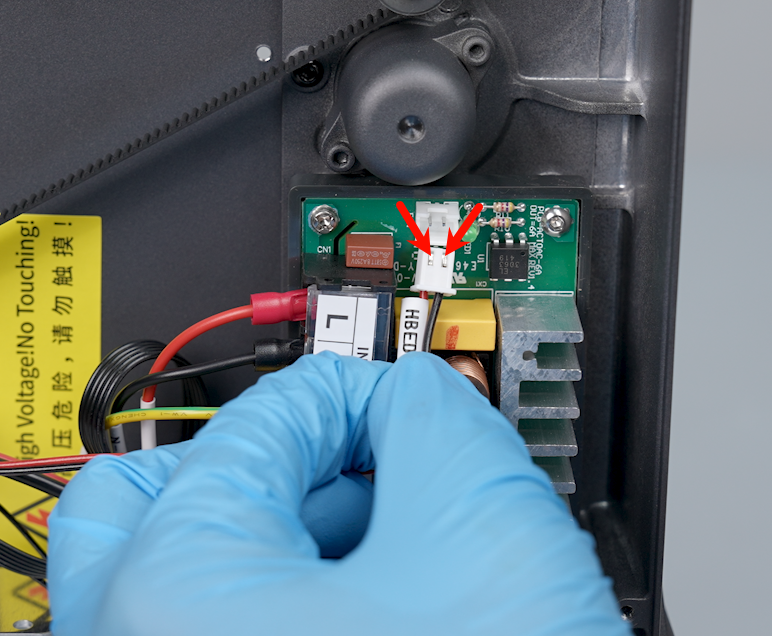
Disconnect and reconnect the cable connected to the
HBEDport on the heated bed control board. -
Check that the connector is fully seated and that its pins are not bent, loose, discolored, or damaged.
-
Use a Phillips screwdriver to check and retighten the
NandLwires connected to theOUTPUTterminal on the heated bed control board.
Do not overtighten the terminal screws. Confirm that no bare conductor is exposed outside the terminal and that the wires cannot be pulled out easily.
¶ Check the Mainboard and Heated Bed Control Board Indicators
Keep the bottom cover removed for this visual inspection.
- Confirm that no tools, screws, or loose wires are touching the electronic components.
- Make sure that all connectors and terminal wires are securely installed.
- Power on the printer.
- Set the heated bed temperature to 60°C.
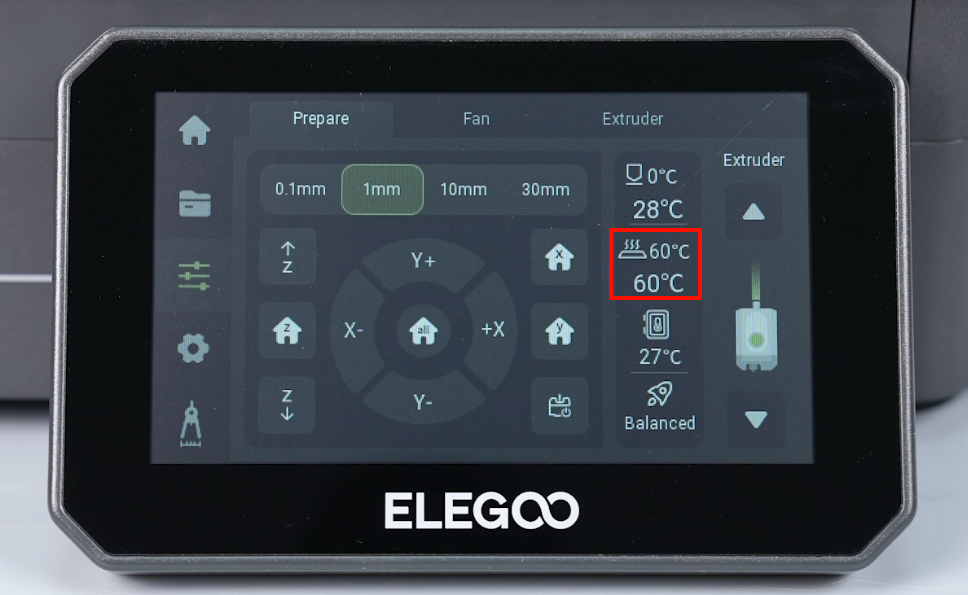
- Observe the mainboard heated bed indicator and the heated bed control board indicator while heating is active.
Observe the indicator lights only. Do not touch any electronic component, connector, terminal, or cable while the printer is powered on.
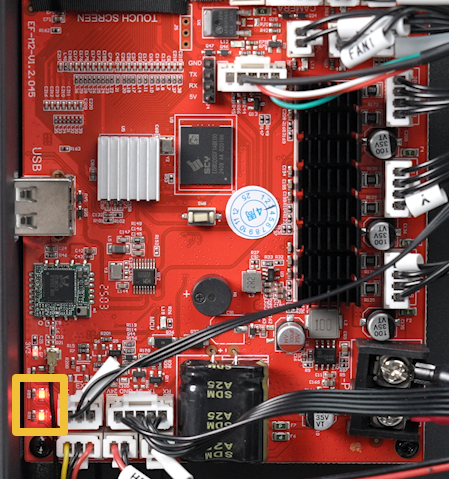
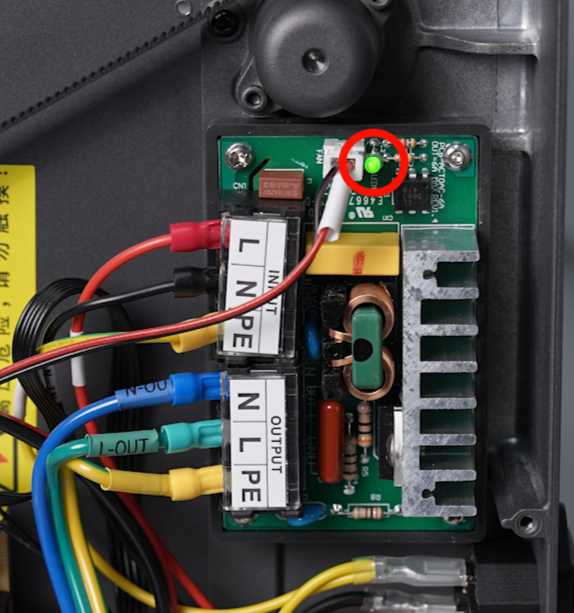
When heated bed heating is activated, the relevant indicator should change state as shown in the reference images.
- If the mainboard heated bed indicator does not respond, the mainboard output or control circuit may be faulty.
- If the mainboard indicator responds but the heated bed control board indicator does not respond, the communication cable or heated bed control board may be faulty.
- If both indicators respond but the heated bed does not heat, the heated bed control board output, heated bed power wiring, or heated bed heater may be faulty.
Power off the printer and unplug the power cord before replacing any part or touching any internal component.
¶ Still Having Issues?
Contact Technical Support at 3dp@elegoo.com and provide the following information:
- Your country and local mains voltage
- The ambient temperature around the printer
- Test result — Does the error occur when the heated bed is set to 60°C?
- Test result — Does this error occur when the heated bed temperature is set to 90°C?
- Test result — Do the mainboard and heated bed control board indicators respond while the heated bed is heating?
- Measurement result — What is the resistance of the heated bed heater circuit?
Skip this item if you do not have a multimeter. - Inspection result — Are any heated bed connectors loose, discolored, burned, deformed, or damaged?
- Printer serial number
- Current firmware version
¶ Help Us Improve
If you have suggestions for improving this wiki article, submit them through the ELEGOO Official Feedback Channel.