¶ Arduino Serial Monitor (Windows, Mac, Linux)
The Arduino Integrated Development Environment (IDE) is the software side of the Arduino platform. And, because using a terminal is such a big part of working with Arduinos and other microcontrollers, they decided to include a serial terminal with the software. Within the Arduino environment, this is called the Serial Monitor.
¶ Making a Connection
Serial monitor comes with any and all version of the Arduino IDE. To open it, simply click the Serial Monitor icon.
.png)
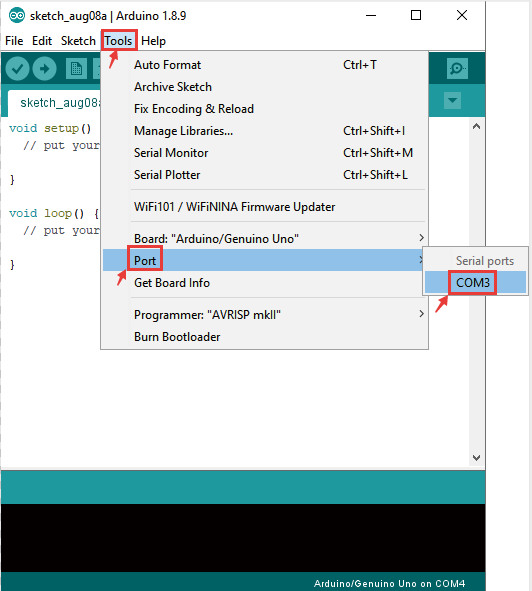
Selecting which port to open in the Serial Monitor is the same as selecting a port for uploading Arduino code. Go to Tools ->Port, and select the correct port.
Tips: Choose the same COM port that you have in Device Manager.
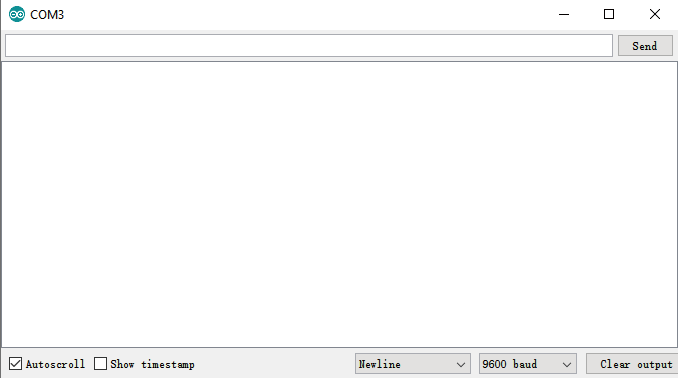
Once open, you should see something like this:
¶ Settings
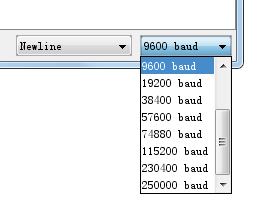
The Serial Monitor has limited settings, but enough to handle most of your serial communication needs. The first setting you can alter is the baud rate. Click on the baud rate drop-down menu to select the correct baud rate. (9600 baud)
Last, you can set the terminal to Autoscroll or not by checking the box in the bottom left corner.

¶ Pros
The Serial Monitor is a great quick and easy way to establish a serial connection with your Arduino. If you’re already working in the Arduino IDE, there’s really no need to open up a separate terminal to display data.
¶ Cons
The lack of settings leaves much to be desired in the
Serial Monitor, and, for advanced serial communications, it may not do the trick.
¶ Serial Functions (Arduino Framework)
¶ 1. Serial Initialization (Mandatory)
Serial.begin(baudRate, [config], rxPin, txPin);
-
Parameter Explanation:
-
baudRate: Baud rate (commonly 9600, 115200; must match the serial monitor, e.g., 115200 in your code); -
[config](Optional): Serial data format, defaultSERIAL_8N1(8 data bits + 1 stop bit + no parity bit), no modification needed; -
rxPin/txPin(Optional): Custom serial pins (UNO supports multiple serial ports; default Hardware Serial 0 corresponds to pins 1(TX)/3(RX). No customization in your code, so default pins are used directly).
-
-
Example (already used in your code):
Serial.begin(115200); // Initialize serial port with baud rate 115200
¶ 2. Data Transmission Functions
| Function | Description | Example |
|---|---|---|
Serial.print(data) |
Transmit data (no automatic line break; supports strings, numbers) | Serial.print("Measured Capacitance: "); |
Serial.println(data) |
Transmit data with automatic line break | Serial.println("100.2 nF"); |
Serial.write(byte) |
Transmit binary byte data (for sensor raw data) | Serial.write(0x55); (Transmit hex 55) |
¶ 3. Data Reception Functions
| Function | Description | Example |
|---|---|---|
Serial.available() |
Return the number of bytes pending in the serial buffer (judge if data exists) | if(Serial.available() > 0){...} |
Serial.read() |
Read 1 byte of data (returns int; -1 if no data) | int data = Serial.read(); |
¶ 4. Example Code
void setup() {
// 1. Initialize serial port with baud rate 115200
Serial.begin(115200);
// Wait for serial port to connect (required for some boards)
while (!Serial);// 2. Send welcome message
Serial.println(" Simple Serial Program ");
Serial.println("Commands:");
Serial.println(" on - Turn on LED");
Serial.println(" off - Turn off LED");
Serial.println(" status - Check LED status");
Serial.println("====================================");
}
void loop()
{
}