¶ DisplayString
This sample program demonstrates the basic text display function of the TFT LCD screen. It can display text strings, floating-point numbers, and hexadecimal numbers on the screen in different colors and font sizes.
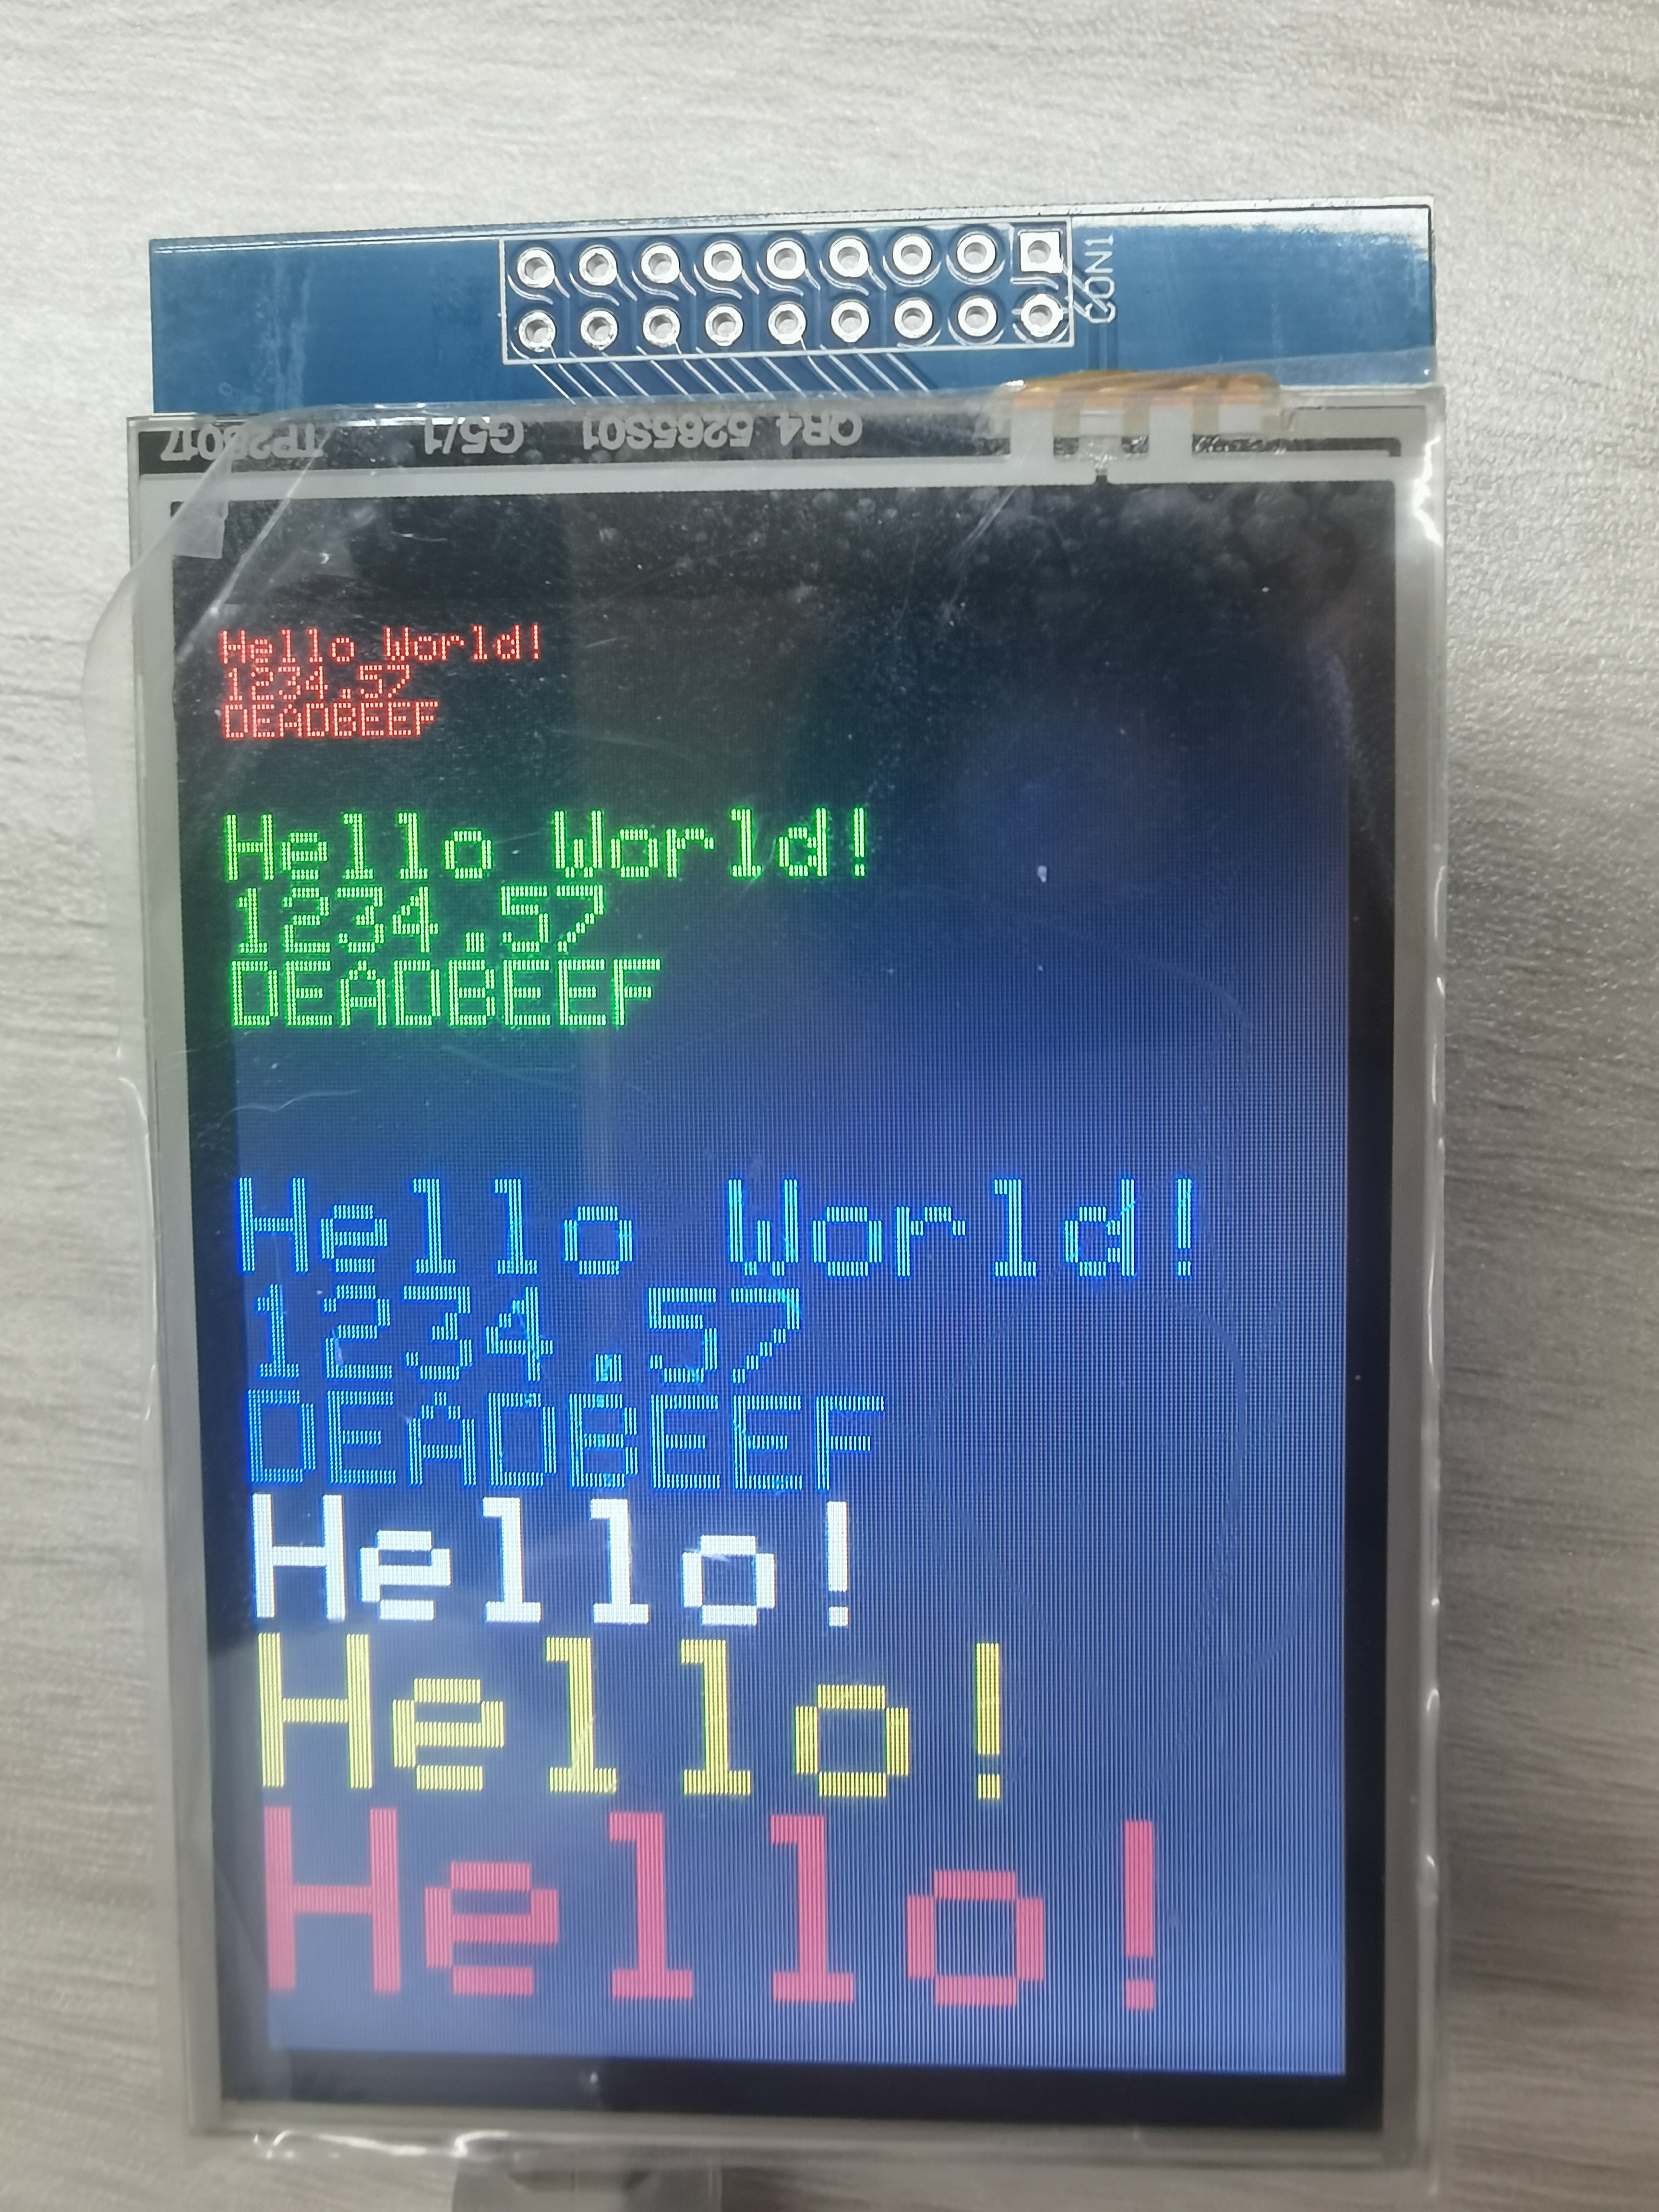
¶ Code Explanation
The sample code demonstrated here is based on Arduino UNO R3. The operation logic of other microcontrollers is roughly the same, with only minor differences in the code for Arduino UNO R4.
¶ Library Introduction
This program relies on two core libraries to realize TFT LCD display functions:
#include <Elegoo_GFX.h>    // Core graphics library
#include <Elegoo_TFTLCD.h> // Hardware-specific library
- Elegoo_GFX.h: The core graphics library provides basic functions for drawing graphics, text, and shapes. It is the foundation of all display operations.
- Elegoo_TFTLCD.h: The hardware-specific driver library is responsible for low-level communication with the LCD screen, including data transmission and command control.
¶ Pin Definition Description
The control pins of the LCD screen are assigned to analog pins. This design allows the pins to be shared with the touch screen function:
#define LCD_CS A3  // Chip Select goes to Analog 3
#define LCD_CD A2  // Command/Data goes to Analog 2
#define LCD_WR A1  // LCD Write goes to Analog 1
#define LCD_RD A0  // LCD Read goes to Analog 0
#define LCD_RESET A4 // Can alternately just connect to Arduino's reset pin
¶ Pin Function Description
The core functions of each control pin are described as follows:
- LCD_CS: Chip select enable pin, used to activate and select the current display device. Low level selects the chip.
- LCD_CD: Command/Data selection pin, used to switch the screen's working mode. Low level indicates command mode, high level indicates data mode.
- LCD_WR: Data write trigger pin, which triggers the screen to perform data write operations when pulled low.
- LCD_RD: Data read trigger pin, which triggers the screen to perform data read operations when pulled low.
- LCD_RESET: Display reset pin, used to perform hardware reset on the display screen.
¶ Color Definition Description
The program defines 8 common 16-bit RGB565 color values for easy reference in the code:
#define BLACK   0x0000
#define BLUE    0x001F
#define RED     0xF800
#define GREEN   0x07E0
#define CYAN    0x07FF
#define MAGENTA 0xF81F
#define YELLOW  0xFFE0
#define WHITE   0xFFFF
¶ RGB565 Color Format Principle
The TFT LCD screen adopts the 16-bit RGB565 color format, where:
- The high 5 bits represent the red component (R), with a value range of 0~31
- The middle 6 bits represent the green component (G), with a value range of 0~63
- The low 5 bits represent the blue component (B), with a value range of 0~31
Example:
RED = 0xF800: Binary11111000 00000000, red is full, green and blue are 0WHITE = 0xFFFF: All color channels are full
¶ Object Instantiation
Create an instance of the Elegoo_TFTLCD class to operate the LCD screen:
Elegoo_TFTLCD tft(LCD_CS, LCD_CD, LCD_WR, LCD_RD, LCD_RESET);
All subsequent screen operations are performed through this tft object. The constructor accepts five control pin parameters to establish the connection between the Arduino and the LCD screen.
¶ Detailed Explanation of setup() Function
The setup() function completes the initialization of the serial port and LCD screen. It runs only once when the Arduino is powered on or reset.
void setup(void) {
  Serial.begin(9600);
  Serial.println(F("TFT LCD test"));
  Serial.println(F("Elegoo 2.8\" TFT Screen"));

  Serial.print("TFT size is "); Serial.print(tft.width()); Serial.print("x"); Serial.println(tft.height());

  tft.reset();

  uint16_t identifier = tft.readID();
  if(identifier == 0x9325) {
    Serial.println(F("Found ILI9325 LCD driver"));
  } else if(identifier == 0x9328) {
    Serial.println(F("Found ILI9328 LCD driver"));
  } else if(identifier == 0x4535) {
    Serial.println(F("Found LGDP4535 LCD driver"));
  }else if(identifier == 0x7575) {
    Serial.println(F("Found HX8347G LCD driver"));
  } else if(identifier == 0x9341) {
    Serial.println(F("Found ILI9341 LCD driver"));
  } else if(identifier == 0x8357) {
    Serial.println(F("Found HX8357D LCD driver"));
  } else if(identifier==0x0101) {
    identifier=0x9341;
    Serial.println(F("Found 0x9341 LCD driver"));
  } else if(identifier==0x1111) {
    identifier=0x9328;
    Serial.println(F("Found 0x9328 LCD driver"));
  } else {
    Serial.print(F("Unknown LCD driver chip: "));
    Serial.println(identifier, HEX);
    identifier=0x9341;
  }
  tft.begin(identifier);
}
¶ Serial Port Initialization
Serial.begin(9600);
Serial.println(F("TFT LCD test"));
Serial.begin(9600): Set the serial baud rate to 9600 for debugging information outputF()macro: Store strings in Flash memory to save RAM resources. Arduino has limited RAM, and using theF()macro for constant strings is a common optimization technique.
¶ Screen Size Detection
Serial.print("TFT size is "); Serial.print(tft.width()); Serial.print("x"); Serial.println(tft.height());
Call tft.width() and tft.height() to obtain the screen resolution and print it to the serial port for verification.
¶ LCD Reset
tft.reset();
Send a reset signal to the LCD screen to restore it to the initial state.
¶ LCD Driver Chip Identification
This is the core part of the initialization process. The code identifies the LCD driver chip model through the following steps:
-
Read Driver ID:
uint16_t identifier = tft.readID();
Call thereadID()method to read the ID of the LCD driver chip. Different driver chips have different ID values. -
Driver Model Matching:
The code uses multipleif-else ifstatements to match the read ID with known driver models:0x9325: ILI9325 driver0x9328: ILI9328 driver0x4535: LGDP4535 driver0x7575: HX8347G driver0x9341: ILI9341 driver (the most common driver)0x8357: HX8357D driver
-
Special ID Correction:
Some LCD screens may return incorrect ID values due to hardware compatibility issues:- When the read ID is
0x0101, it is corrected to0x9341(ILI9341) - When the read ID is
0x1111, it is corrected to0x9328(ILI9328)
- When the read ID is
-
Default Driver Setting:
} else { Serial.print(F("Unknown LCD driver chip: ")); Serial.println(identifier, HEX); identifier=0x9341; }If the driver ID cannot be recognized, the code defaults to using the ILI9341 driver, which is the most widely used driver model and has good compatibility.
-
Screen Initialization:
tft.begin(identifier);Call the
begin()method with the identified driver ID to initialize the LCD screen. The initialization process includes configuring screen parameters such as display mode, color format, and refresh rate.
¶ Detailed Explanation of loop() Function
The loop() function is the main loop of the Arduino program, which runs repeatedly after the setup() function is executed. It is responsible for displaying text on the screen.
void loop(void) {
  tft.fillScreen(BLACK);
  unsigned long start = micros();
  tft.setCursor(0, 0);

  tft.setTextColor(RED);  tft.setTextSize(1);
  tft.println("Hello World!");
  tft.println(01234.56789);
  tft.println(0xDEADBEEF, HEX);
  tft.println();
  tft.println();
  tft.setTextColor(GREEN); tft.setTextSize(2);
  tft.println("Hello World!");
  tft.println(01234.56789);
  tft.println(0xDEADBEEF, HEX);
  tft.println();
  tft.println();

  tft.setTextColor(BLUE);    tft.setTextSize(3);
  tft.println("Hello World!");
  tft.println(01234.56789);
  tft.println(0xDEADBEEF, HEX);

  tft.setTextColor(WHITE);    tft.setTextSize(4);
  tft.println("Hello!");
  tft.setTextColor(YELLOW);    tft.setTextSize(5);
  tft.println("Hello!");
  tft.setTextColor(RED);    tft.setTextSize(6);
  tft.println("Hello!");
  tft.println();
  tft.println();
  delay(1000);delay(1000);delay(1000);delay(1000);delay(1000);
}
¶ Screen Clearing
tft.fillScreen(BLACK);
Call the fillScreen() method to fill the entire screen with black color, clearing all previous display content and preparing for new content display.
¶ Cursor Position Setting
tft.setCursor(0, 0);
Call the setCursor() method to move the text cursor to the top-left corner of the screen (coordinate x=0, y=0). All subsequent text will start displaying from this position.
¶ Text Display with Different Styles
The program demonstrates text display in different colors and font sizes:
¶ Font Size 1, Red
tft.setTextColor(RED);  tft.setTextSize(1);
tft.println("Hello World!");
tft.println(01234.56789);
tft.println(0xDEADBEEF, HEX);
setTextColor(RED): Set the text color to redsetTextSize(1): Set the font size to 1 (the smallest size)println("Hello World!"): Display the string "Hello World!" and automatically wrap to the next lineprintln(01234.56789): Display the floating-point number 1234.56789println(0xDEADBEEF, HEX): Display the hexadecimal number0xDEADBEEFin hexadecimal format. This is a commonly used test value in programming.
¶ Font Size 2, Green
tft.setTextColor(GREEN); tft.setTextSize(2);
tft.println("Hello World!");
tft.println(01234.56789);
tft.println(0xDEADBEEF, HEX);
Same content as above, but displayed in green with font size 2.
¶ Font Size 3, Blue
tft.setTextColor(BLUE);    tft.setTextSize(3);
tft.println("Hello World!");
tft.println(01234.56789);
tft.println(0xDEADBEEF, HEX);
Same content as above, but displayed in blue with font size 3.
¶ Font Sizes 4-6, Different Colors
tft.setTextColor(WHITE);    tft.setTextSize(4);
tft.println("Hello!");
tft.setTextColor(YELLOW);    tft.setTextSize(5);
tft.println("Hello!");
tft.setTextColor(RED);    tft.setTextSize(6);
tft.println("Hello!");
Display "Hello!" in white (size 4), yellow (size 5), and red (size 6) respectively, demonstrating the effect of larger font sizes.
¶ Delay
delay(1000);delay(1000);delay(1000);delay(1000);delay(1000);
Delay for a total of 5 seconds (5 * 1000ms). After the delay, the loop() function restarts, clearing the screen and re-displaying all content.
¶ Summary
This sample program demonstrates the basic text display function of the TFT LCD screen through the following steps:
- Initialization: Introduce libraries, define pins and colors, create an LCD object, and identify and initialize the driver chip.
- Text Display: Clear the screen, set the cursor position, and display text in different colors and font sizes.
- Loop Execution: After a 5-second delay, the screen is cleared and the display content is refreshed, creating a continuous display effect.
The key functions used in the program include:
tft.reset(): Reset the LCD screentft.readID(): Read the driver chip IDtft.begin(): Initialize the LCD screentft.fillScreen(): Fill the entire screen with a specified colortft.setCursor(): Set the text cursor positiontft.setTextColor(): Set the text colortft.setTextSize(): Set the font sizetft.println(): Display text and automatically wrap to the next line
¶ Modification Instructions
If you need to modify the code display effect, you can refer to the following aspects for adjustment:
-
Modify Display Text Content:
- Modify the string content in
tft.println("Hello World!")to change the displayed text - Modify the number in
tft.println(01234.56789)to change the displayed numeric value - Modify the hexadecimal number in
tft.println(0xDEADBEEF, HEX)to change the displayed hexadecimal value
- Modify the string content in
-
Modify Text Color:
- Modify the color parameter in
tft.setTextColor(RED). Available colors include: BLACK, BLUE, RED, GREEN, CYAN, MAGENTA, YELLOW, WHITE - You can also customize a 16-bit RGB565 color value, for example
tft.setTextColor(0xF800)represents red
- Modify the color parameter in
-
Modify Font Size:
- Modify the numeric parameter in
tft.setTextSize(1), ranging from 1 to 6. Larger numbers mean larger font sizes - Note: Larger font sizes display fewer characters
- Modify the numeric parameter in
-
Modify Cursor Position:
- Modify the coordinate parameters in
tft.setCursor(0, 0)to change the starting display position of the text - The first parameter is the X coordinate (horizontal direction), and the second parameter is the Y coordinate (vertical direction)
- Modify the coordinate parameters in
-
Modify Background Color:
- Modify the color parameter in
tft.fillScreen(BLACK)to change the screen background color
- Modify the color parameter in
-
Modify Delay Time:
- Modify the value in
delay(1000)(in milliseconds) to change the duration of each display - The current code calls
delay(1000)five times in succession, totaling 5 seconds of delay
- Modify the value in
-
Add New Display Content:
- Add new
tft.setTextColor(),tft.setTextSize(), andtft.println()statements in theloop()function to add new display lines
- Add new