¶ IoT WIFI Control System
¶ Background Knowledge
¶ What is an IoT Control System?
IoT (Internet of Things) is a technology that connects various devices through a network, enabling them to communicate and be controlled remotely. This project is a typical IoT application:
- Perception Layer: DHT11 sensor collects temperature and humidity data
- Transport Layer: WiFi module uploads data to the network
- Application Layer: Remotely view data and control devices via a phone web page
Simple analogy: It's like using your phone to remotely control an air conditioner at home — the phone is the remote, the AC is the controlled device, and WiFi is the "phone line" between them.
¶ Project Architecture (Multi-file Modular Design)
This project uses a multi-file modular code structure, which is a more professional approach than single-file programming. Each file is responsible for a specific function, making it easier to maintain and extend.
| File Name | Module | Core Functions |
|---|---|---|
Internet of Things WIFI Control System.ino |
Main Program | Initialization, main loop, integrates all modules |
NTPTime.h / NTPTime.cpp |
NTP Time Module | Connects to WiFi, retrieves network time |
DHTSensor.h / DHTSensor.cpp |
Temperature & Humidity Sensor Module | Reads DHT11 sensor data |
OLEDDisplay.h / OLEDDisplay.cpp |
OLED Display Module | Controls OLED screen display |
WebServer.h / WebServer.cpp |
Web Server Module | Creates AP hotspot, handles web requests |
Module Relationship Diagram:
Main Program (.ino)
    ├── NTPTime Module (get network time)
    ├── DHTSensor Module (read temperature & humidity)
    ├── OLEDDisplay Module (display information)
    └── WebServer Module (create hotspot and web page)
¶ Why Use Modular Design?
| Advantage | Description |
|---|---|
| Easy Maintenance | Modify a function by editing only the corresponding file |
| Easy Reuse | Other projects can directly copy a module |
| Clear Code | Each file has a single responsibility, clear logic |
| Team Collaboration | Multiple people can develop different modules simultaneously |
¶ DHT11 Temperature & Humidity Sensor
DHT11 is a commonly used digital temperature and humidity sensor with the following features:
- Low cost, compact size
- Measurement range: Temperature 0-50°C, Humidity 20-90%
- Accuracy: Temperature ±2°C, Humidity ±5%
- Single-wire communication, only requires one pin
Simple analogy: DHT11 is like a "thermometer + hygrometer" that tells you both how hot and how humid the air is.
¶ OLED Display
OLED (Organic Light-Emitting Diode) is a self-emissive display technology:
- This project uses a 128×64 resolution monochrome OLED
- Communicates via I2C interface, only needs SDA and SCL two wires
- Clear display, suitable for text and simple graphics
Simple analogy: OLED is like a mini TV screen that can display time, temperature, humidity, and other information.
¶ Buzzer and Motor Control
Buzzer:
- Emits sound when powered
- Used in this project as the alarm ringer
- Uses PWM (Pulse Width Modulation) to control ringing rhythm
Motor:
- DC motor, rotates when powered
- Remotely controlled via web page in this project
- Can be extended to control fans, water pumps, and other devices
¶ NTP Network Time Protocol
NTP (Network Time Protocol) is used to obtain accurate time from the internet:
- After Arduino connects to WiFi, it requests time from an NTP server
- After obtaining the time, it disconnects WiFi and switches to AP mode
- Then uses the
millis()function for local timekeeping
¶ Library Installation Guide
This project uses multiple libraries that need to be installed manually:
¶ Required Libraries List
| Library Name | Source | Installation Method |
|---|---|---|
WiFiS3 |
Built into Arduino IDE | Included with board core, no extra installation needed |
WiFiUdp |
Built into Arduino IDE | Included with board core, no extra installation needed |
Wire |
Built into Arduino IDE | I2C communication library, no extra installation needed |
NTPClient |
Arduino Library Manager | Manual installation required |
Adafruit GFX Library |
Arduino Library Manager | Manual installation required |
Adafruit SSD1306 |
Arduino Library Manager | Manual installation required |
dht_nonblocking |
Arduino Library Manager | Manual installation required |
¶ Installation Steps
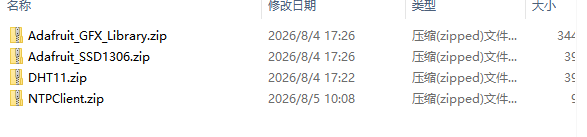
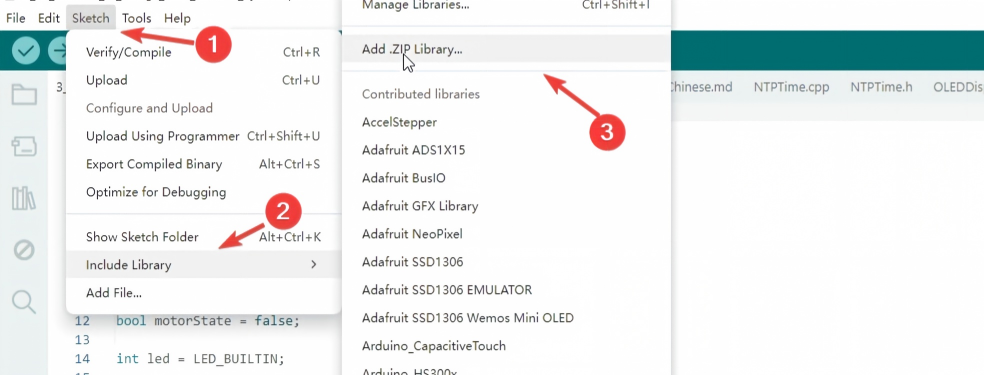
The provided resource package contains the libraries folder. You can load the libraries locally using the method shown in the figure below.
¶ Connection Schematic
¶ Wiring diagram
¶ Key Functions Reference
¶ NTP Time Functions
| Function/Variable | Description | Role in This Project |
|---|---|---|
WiFiUDP ntpUDP |
Creates UDP object | NTP communication requires UDP protocol |
NTPClient timeClient(...) |
Creates NTP client | Configures NTP server and timezone |
getNetTime() |
Connects WiFi and gets network time | Syncs time at startup |
timeClient.begin() |
Starts NTP client | Begins NTP communication |
timeClient.update() |
Gets time from NTP server | Syncs network time |
timeClient.getEpochTime() |
Gets Unix timestamp | Gets current seconds count |
timeClient.end() |
Stops NTP client | Releases NTP resources |
¶ WiFi Functions
| Function | Description | Role in This Project |
|---|---|---|
WiFi.begin(ssid, pass) |
Starts STA mode | Connects to router to get time |
WiFi.status() |
Checks connection status | Confirms successful connection |
WiFi.end() |
Completely turns off WiFi | Prepares for mode switching |
WiFi.beginAP(ssid, pass) |
Starts AP mode | Creates WiFi hotspot |
WiFi.localIP() |
Gets device IP | Views IP in AP mode |
¶ DHT11 Sensor Functions
| Function | Description | Role in This Project |
|---|---|---|
DHT_nonblocking dht_sensor(...) |
Creates sensor instance | Configures pin and type |
dht_sensor.measure(&temp, &hum) |
Reads temperature & humidity | Gets sensor data |
measureEnvironment(temp, hum) |
Wrapped measurement function | Measures every 3 seconds |
¶ OLED Display Functions
| Function | Description | Role in This Project |
|---|---|---|
Adafruit_SSD1306 display(...) |
Creates OLED instance | Configures screen parameters |
oledInit() |
Initializes OLED | Sets display parameters |
updateOLED(...) |
Updates display content | Shows time, alarm, temperature & humidity |
¶ Web Server Functions
| Function | Description | Role in This Project |
|---|---|---|
WiFiServer server(80) |
Creates web server | Listens for HTTP requests |
server.begin() |
Starts the server | Begins accepting client connections |
server.accept() |
Accepts new connection | Gets client object |
client.readStringUntil('\r') |
Reads HTTP request | Parses control commands |
handleWebRequest(...) |
Handles web requests | Parses commands and returns web page |
¶ Time and Alarm Functions
| Function/Variable | Description | Role in This Project |
|---|---|---|
millis() |
Returns milliseconds since boot | Used to check time intervals |
currentUnixTime++ |
Timestamp +1 | Updates time every second |
alarmHour / alarmMin |
Alarm time | Stores alarm setting |
alarmOn |
Alarm switch | Controls whether alarm is active |
alarmRing |
Alarm ringing flag | Triggers buzzer ringing |
¶ HTTP Request Routing Table
| Request Path | Function | Corresponding Action |
|---|---|---|
GET /H |
Turn on LED | Web page LED ON button |
GET /L |
Turn off LED | Web page LED OFF button |
GET /MOTOR_ON |
Turn on motor | Web page Motor ON button |
GET /MOTOR_OFF |
Turn off motor | Web page Motor OFF button |
GET /ALARM?h=08&m=30 |
Set alarm | Sets alarm at 08:30 |
GET /ALARM_OFF |
Turn off alarm | Stops ringing and resets |
¶ Complete Code Analysis
¶ Main Program File (.ino)
The main program is the entry point of the entire project, responsible for initializing all modules and running the main loop.
¶ 1. Header Includes and Pin Definitions
#include <WiFiS3.h>      // WiFi functionality
#include <Wire.h>        // I2C communication (OLED)
#include "OLEDDisplay.h" // OLED display module
#include "WebServer.h"   // Web server module
#include "NTPTime.h"     // NTP time module
#include "DHTSensor.h"   // Temperature & humidity sensor module

// Pin definitions
#define BUZZER_PIN 6    // Buzzer pin
#define MOTOR_PIN 7     // Motor pin

int led = LED_BUILTIN;  // Onboard LED

// Global variables
unsigned long currentUnixTime = 0;  // Current timestamp
unsigned long lastUpdateTime  = 0;  // Last update time

// Alarm variables
int alarmHour   = 0;
int alarmMin    = 0;
bool alarmOn    = false;
bool alarmRing  = false;

// Temperature & humidity variables
float temperature = 0.0;
float humidity = 0.0;
Code Notes:
- Includes all required libraries and modules
- Defines pin numbers for buzzer and motor
- Declares global variables for timestamp, alarm, temperature & humidity
¶ 2. setup() Initialization Function
void setup() {
  // Initialize serial
  Serial.begin(115200);
  while (!Serial);
  delay(1000);

  // Initialize pins
  pinMode(led, OUTPUT);
  pinMode(led, );  // WARNING: This line is missing the second parameter, should be removed
  pinMode(BUZZER_PIN, OUTPUT);
  pinMode(MOTOR_PIN, OUTPUT);

  // Initial state: LOW
  digitalWrite(led, LOW);
  digitalWrite(BUZZER_PIN, LOW);
  digitalWrite(MOTOR_PIN, LOW);

  // OLED initialization
  oledInit();

  // Step 1: Get network time
  getNetTime(currentUnixTime);

  // Step 2: Switch to AP mode
  startAPMode();

  // Step 3: Start web server
  server.begin();

  // Step 4: Record time starting point
  lastUpdateTime = millis();
}
Step Breakdown:
- Serial initialization: Set baud rate to 115200 for debug output
- Pin configuration: Set LED, buzzer, and motor pins to output mode
- OLED initialization: Call
oledInit()to initialize the display - Get network time: Call
getNetTime()to connect to router via STA mode - Start AP mode: Call
startAPMode()to create a WiFi hotspot - Start web server: Begin listening for HTTP requests
- Record time base: Save current
millis()value as timing starting point
¶ 3. loop() Main Loop Function
void loop() {
  // ====== Core 1: Automatic Timekeeping ======
  if (millis() - lastUpdateTime >= 1000) {
    lastUpdateTime = millis();
    currentUnixTime++;

    // Calculate hours, minutes, seconds
    int h = (currentUnixTime % 86400L) / 3600;
    int m = (currentUnixTime % 3600) / 60;
    int s = currentUnixTime % 60;

    // Print time to serial
    Serial.print("Time: ");
    if(h<10) Serial.print("0"); Serial.print(h);
    Serial.print(":");
    if(m<10) Serial.print("0"); Serial.print(m);
    Serial.print(":");
    if(s<10) Serial.print("0"); Serial.println(s);

    // Measure temperature & humidity
    if(measureEnvironment(temperature, humidity)) {
      Serial.print("T = ");
      Serial.print(temperature, 1);
      Serial.print(" deg. C, H = ");
      Serial.print(humidity, 1);
      Serial.println("%");
    }

    // Update OLED display
    updateOLED(h, m, s, alarmHour, alarmMin, alarmOn, temperature, humidity);

    // Alarm trigger check
    if(alarmOn && h == alarmHour && m == alarmMin && s == 0){
      alarmRing = true;
    }
  }

  // ====== Core 2: Handle Web Requests ======
  handleWebRequest(currentUnixTime, alarmHour, alarmMin, alarmOn, alarmRing, BUZZER_PIN, temperature, humidity, motorState);

  // ====== Core 3: Alarm Ringing (Non-blocking) ======
  static unsigned long lastBuzzerTime = 0;
  if(alarmRing){
    if(millis() - lastBuzzerTime >= 40){
      lastBuzzerTime = millis();
      static bool buzzerState = false;
      buzzerState = !buzzerState;
      digitalWrite(BUZZER_PIN, buzzerState);
    }
  } else {
    digitalWrite(BUZZER_PIN, LOW);
  }

  // ====== Core 4: Motor Control ======
  static bool lastMotorState = false;
  if(motorState != lastMotorState) {
    lastMotorState = motorState;
    digitalWrite(MOTOR_PIN, motorState ? HIGH : LOW);
    Serial.print("Motor state updated: ");
    Serial.println(motorState ? "ON" : "OFF");
  }
}
Core Function Analysis:
Core 1: Automatic Timekeeping
Uses millis() for non-blocking 1-second timing. Each loop() checks whether 1000ms have elapsed since the last update before executing the update:
if (millis() - lastUpdateTime >= 1000) {
  lastUpdateTime = millis();
  currentUnixTime++;        // Timestamp +1
Then splits the Unix timestamp into hours, minutes, and seconds using modulo operations:
int h = (currentUnixTime % 86400L) / 3600;  // 86400 = seconds in a day
int m = (currentUnixTime % 3600) / 60;       // 3600 = seconds in an hour
int s = currentUnixTime % 60;
After updating the time, it also measures temperature & humidity, refreshes the OLED, and triggers the alarm at the 0th second of the target minute:
if(alarmOn && h == alarmHour && m == alarmMin && s == 0){
  alarmRing = true;   // Triggers only once at the 0th second of the target minute
}
Core 2: Web Request Handling
Each loop() calls handleWebRequest() to check for new connections. The function uses server.accept() to get a client, readStringUntil('\r') to read the first line of the HTTP request, then indexOf() to match URL paths and execute corresponding actions:
WiFiClient client = server.accept();
if (client) {
  String req = client.readStringUntil('\r');
  if (req.indexOf("GET /H") != -1)        { digitalWrite(LED_BUILTIN, HIGH); }
  if (req.indexOf("GET /MOTOR_ON") != -1) { motorState = true; }
  // ... parse other commands
}
After processing the request, the function sends an HTML web page to the client and disconnects.
Core 3: Alarm Ringing
Uses a non-blocking approach to control the buzzer, avoiding delay() which would block the main loop. Uses static variables to remember the last toggle time, flipping the pin level every 40ms to produce a buzzing sound:
static unsigned long lastBuzzerTime = 0;
if(alarmRing){
  if(millis() - lastBuzzerTime >= 40){
    lastBuzzerTime = millis();
    static bool buzzerState = false;
    buzzerState = !buzzerState;          // Toggle level
    digitalWrite(BUZZER_PIN, buzzerState);
  }
} else {
  digitalWrite(BUZZER_PIN, LOW);         // Keep LOW when not ringing
}
The static keyword ensures lastBuzzerTime and buzzerState are not reset between loop() calls.
Core 4: Motor Control
Detects state changes by comparing motorState with lastMotorState, only operating the pin when a change occurs, avoiding redundant writes every loop:
static bool lastMotorState = false;
if(motorState != lastMotorState) {
  lastMotorState = motorState;
  digitalWrite(MOTOR_PIN, motorState ? HIGH : LOW);
  Serial.print("Motor state updated: ");
  Serial.println(motorState ? "ON" : "OFF");
}
This "edge detection" approach reduces unnecessary I/O operations and makes it easy to observe state transitions in the serial monitor.
¶ NTP Time Module (NTPTime.cpp)
This module is responsible for connecting to WiFi at startup to obtain accurate time, providing the initial time reference for the system.
¶ Function Description
The NTP (Network Time Protocol) concept and STA connection flow were introduced earlier. Here we only describe the module's role in the system:
- Time sync at startup:
getNetTime()is called duringsetup(), connecting to the home router via STA mode and retrieving the current Unix timestamp from an NTP server - Disconnect immediately after: After time sync completes, the STA connection is released to free up WiFi resources for the subsequent AP mode startup
- Local timekeeping: The obtained timestamp serves as the starting point; thereafter the
loop()maintains time by incrementing it every second, eliminating the need for constant internet connectivity
// NTP server and timezone configuration
const char* ntpServer = "ntp.ntsc.ac.cn";  // China National Time Service Center
const long gmtOffset_sec = 8 * 3600;        // UTC+8 (Beijing Time)
Configuration Notes:
ntpServer: Choose a stable and reliable NTP server. Users in China are recommended to usentp.ntsc.ac.cn(National Time Service Center) orntp.aliyun.com(Alibaba Cloud)gmtOffset_sec: Timezone offset, UTC+8 is8 * 3600seconds. Adjust to the corresponding timezone for use in other countries
The getNetTime() function internally encapsulates WiFi connection, NTP request, and retry logic (up to 30 retries, 2-second intervals each). Callers only need to pass the currentUnixTime reference to obtain the synced timestamp. If WiFi connection fails, the timestamp remains 0 and the system can still continue running, starting time from 00:00:00.
¶ DHT11 Sensor Module (DHTSensor.cpp)
This module is responsible for reading temperature and humidity data from the DHT11 sensor, providing environmental monitoring capability for the system.
¶ Sensor Configuration
#define DHT_SENSOR_TYPE DHT_TYPE_11  // DHT11 type
#define DHT_SENSOR_PIN 2             // Data pin is D2
Configuration Notes:
DHT_SENSOR_TYPE: Specifies the sensor model. The DHT series also includes DHT22 (higher accuracy), DHT30, etc. Simply change this macro to switchDHT_SENSOR_PIN: The DHT11 data pin is connected to Arduino's D2, which must support bidirectional communication (required by the DHT11 protocol)- DHT11 communication protocol is single-wire half-duplex: master initiates start signal → sensor responds → transmits 40 bits of data (8 bits humidity integer + 8 bits humidity decimal + 8 bits temperature integer + 8 bits temperature decimal + 8 bits checksum)
¶ measureEnvironment() Function Analysis
bool measureEnvironment(float &temperature, float &humidity) {
  static unsigned long measurement_timestamp = millis();

  // Measure once every 3 seconds
  if (millis() - measurement_timestamp > 3000ul) {
    if (dht_sensor.measure(&temperature, &humidity) == true) {
      measurement_timestamp = millis();
      return true;  // Measurement successful
    }
  }

  return false;  // Not yet time to measure or measurement failed
}
Code Logic Step-by-Step Analysis:
statictimestamp initialization:measurement_timestampis initialized tomillis()on first call, then retains the time of the last measurement- Time interval check:
millis() - measurement_timestamp > 3000ulchecks whether 3 seconds have elapsed since the last measurement. Theulsuffix on3000ulensures unsigned long arithmetic, preventing overflow - Initiate measurement: Calls
dht_sensor.measure()to request data from the sensor. This function internally sends a start signal, receives 40 bits of data, and verifies the checksum - Update timestamp on success: Only updates
measurement_timestampwhen measurement succeeds; on failure, the timestamp is not updated and the next loop will retry immediately - Return status:
trueindicates a new measurement was completed this round;falseindicates no measurement was performed (time not up or measurement failed)
Design Features:
- Non-blocking measurement library: Uses the
DHT_nonblockinglibrary;measure()does not block the main loop. A complete DHT11 communication takes about 20ms, and the non-blocking approach allows other tasks (such as web request handling) to continue while waiting for the sensor response staticvariable for timestamp:measurement_timestampis declared asstatic, preserving its value across multiple function calls without being reset, thereby recording the time of the last measurement. This is the key to implementing "throttling"- 3-second sampling interval: DHT11 officially recommends a sampling interval of at least 1 second. Using 3 seconds meets accuracy requirements while reducing bus usage and avoiding conflicts with OLED's I2C communication. Switching to DHT22 would allow reducing the interval to 2 seconds
- Pass by reference: Temperature and humidity are passed via
float &references, allowing the function to write directly to external variables without extra global variables or struct wrappers. This approach is more efficient than returning a struct, especially in embedded systems - Return value meaning: Returns
truewhen a new measurement is completed; returnsfalsewhen it's not yet time to measure or the measurement hasn't completed, in which case the caller should continue using the last valid data - Polling mechanism: This function is called every second in the main loop, but internally uses the timestamp to decide whether to actually initiate a measurement, implementing a "frequent calls, sparse sampling" design. This design allows callers to not worry about the sampling interval, only needing to check the return value
- Automatic retry on failure: If a measurement fails (e.g., sensor response timeout, checksum error),
measurement_timestampis not updated and the next call will retry immediately without wasting a 3-second wait - Thread safety (single-threaded): Although Arduino is single-threaded, the
staticvariable usage pattern is consistent with the "throttling" pattern in multi-threaded environments, facilitating portability to RTOS environments
¶ OLED Display Module (OLEDDisplay.cpp)
This module is responsible for displaying time, alarm, and temperature & humidity information on the 128×64 OLED screen, serving as the primary human-machine interaction output interface.
¶ Screen and Hardware Parameters
// Configuration in OLEDDisplay.h
#define SCREEN_WIDTH 128     // Screen width: 128 pixels
#define SCREEN_HEIGHT 64     // Screen height: 64 pixels
#define OLED_RESET -1        // No external reset pin
Hardware Notes:
- Screen resolution 128×64, monochrome (white on black or black on white)
- I2C interface communication, only needs SDA (A4) and SCL (A5) two wires
OLED_RESETset to-1means using software reset; some OLED modules have an independent reset pin that can be changed to the corresponding number- Display buffer size is 128×64/8 = 1024 bytes, which is fully covered by Arduino UNO R4's RAM
¶ oledInit() Initialization Function
void oledInit() {
  // Initialize OLED
  if(!display.begin(SSD1306_SWITCHCAPVCC, 0x3C)) {
    Serial.println("OLED initialization failed");
    while(1);  // Dead loop on failure
  }
  display.clearDisplay();
  display.setTextColor(WHITE);
  display.setCursor(0,0);
  display.println("OLED OK");
  display.display();  // Display initialization message
}
Code Logic Step-by-Step Analysis:
display.begin(): Initializes I2C communication and the OLED chip. The parameterSSD1306_SWITCHCAPVCCenables the OLED's internal charge pump, boosting 3.3V to 7.4V to drive the screen;0x3Cis the I2C slave address- Failure detection and protection: If initialization fails (returns
false), prints an error message and enters awhile(1)dead loop to prevent subsequent code from running without a display. Common failure causes: wiring errors, wrong address, insufficient power - Clear buffer:
clearDisplay()clears all 1024 bytes of display memory - Set text color:
setTextColor(WHITE)sets pixels to lit state. SSD1306 only supports monochrome;WHITEmeans pixel lit (white text on black background) - Position cursor and output:
setCursor(0,0)moves cursor to top-left corner;println("OLED OK")outputs the initialization success message - Refresh screen:
display()pushes the buffer content to the OLED hardware — this is the step that actually makes the screen light up
Initialization Notes:
- I2C address
0x3C: The most common factory address for SSD1306. Some modules have address0x3D(determined by the SDO/SA0 pin on the module); if the screen shows nothing, try changing to0x3D SSD1306_SWITCHCAPVCCvsSSD1306_SETCONTRAST: The former uses an internal charge pump and works with 3.3V; the latter requires external 7-15V power. Most modules useSWITCHCAPVCC- Display buffer mechanism: The Adafruit GFX library uses a "draw to memory buffer first, then refresh all at once" double-buffering strategy. All drawing operations (
clearDisplay,drawPixel,print, etc.) only manipulate the buffer in RAM untildisplay()is called, which then pushes the buffer to the screen via I2C. This mechanism avoids display flickering and tearing while(1)dead loop: This is a common "fail-safe" design in embedded systems — when critical hardware initialization fails, the system should not continue running, as this could cause unpredictable behavior
¶ updateOLED() Display Update Function
void updateOLED(int h, int m, int s,
                int alarmHour, int alarmMin,
                bool alarmOn, float temperature, float humidity) {
  display.clearDisplay();

  // Display alarm setting (if enabled)
  if(alarmOn){
    display.setTextSize(1);
    display.setCursor(0, 0);
    display.print("ALARM ");
    display.print(alarmHour);
    display.print(":");
    display.print(alarmMin);
  }

  // Display time (large font)
  display.setTextSize(2);
  display.setCursor(0, 16);
  display.print(h);
  display.print(":");
  display.print(m);

  // Display seconds (small font)
  display.setTextSize(1);
  display.setCursor(65, 20);
  display.print(s);

  // Display temperature & humidity
  display.setCursor(0, 40);
  display.print("T:");
  display.print(temperature, 1);
  display.print("C");

  display.setCursor(60, 40);
  display.print("H:");
  display.print(humidity, 1);
  display.print("%");

  display.display();  // Update screen display
}
Code Logic Analysis:
- Clear buffer:
clearDisplay()clears display memory before each refresh to avoid ghosting. Unlike traditional LCDs, OLED pixels self-emit, so ghosting is less of an issue but still needs attention - Alarm info area (optional): Only when
alarmOnistrue, displaysALARM HH:MMat row 0. UsessetTextSize(1)small font to save space - Main time area: Displays hours:minutes in large font starting at row 16.
setTextSize(2)makes each character 2×2 pixels, i.e., 16×16 pixels per character, clear and eye-catching - Seconds area: Displays seconds in small font to the right of the large time (x=65, y=20), right-aligned with the large time on the same row for a compact layout
- Temperature & humidity area: Displays temperature (left, x=0) and humidity (right, x=60) at row 40, using
print(value, 1)to retain 1 decimal place - Unified refresh: After all content is drawn, calls
display()once to push everything to the screen in one go, reducing I2C transfers
Display Layout:
┌──────────────────────────┐
│ ALARM 08:30              │  ← Row 0: Alarm info (shown only when enabled, small font)
│                          │
│ 08:30  25               │  ← Row 16: Large font time:minutes + seconds on right
│                          │
│ T:25.5C        H:60.0%  │  ← Row 40: Temperature (left) + Humidity (right)
└──────────────────────────┘
- Font size selection:
setTextSize(1)is 8×8 pixel characters;setTextSize(2)is 16×16 pixel characters. At 128-pixel width, font size 2 accommodates 8 characters, and font size 1 accommodates 16 characters - Zero-padding: Uses
if(h<10) Serial.print("0")for zero-padding in the main program, ensuring time always displays as08:30instead of8:30. Hours, minutes, and seconds in the OLED display are all zero-padded - Fixed coordinate layout: All element coordinates are hardcoded absolute values. This "absolute positioning" approach is simple and intuitive for small screens. For more flexible layouts, consider using a more advanced graphics library like
u8g2 - I2C refresh overhead:
display()transmits 1024 bytes at once; approximately 80ms in I2C standard mode (100kHz) and 20ms in fast mode (400kHz). UNO R4 defaults to 400kHz, providing sufficient refresh speed
¶ I2C Conflict Between OLED and DHT11
DHT11 uses a single-wire protocol, and OLED uses I2C. The two typically do not conflict, but note:
- DHT11 communication occupies D2 pin for about 20ms
- OLED's
display()operation occupies the I2C bus for about 20ms - In this project, DHT11 measures every 3 seconds and OLED refreshes every second; their timing is staggered and does not conflict
¶ Web Server Module (WebServer.cpp)
This module is responsible for creating the AP hotspot, starting the web server, and handling HTTP requests from phone browsers — it is the core of the system's remote control capability.
¶ WiFi Configuration and Server Instance
STA mode configuration (used to connect to a router for NTP time) was introduced in the NTP module. Here, the AP hotspot parameters and web server instance are declared:
// AP mode configuration (create hotspot)
const char* ap_ssid       = "R4_AP";         // Hotspot name
const char* ap_password   = "12345678";      // Hotspot password (at least 8 characters)

WiFiServer server(80);  // Listen for HTTP requests on port 80
Configuration Notes:
ap_ssid: Hotspot name, visible when phones scan for WiFi. Can be changed to a custom name like "MySmartDevice"ap_password: Hotspot password, at least 8 characters (WPA2 encryption requirement). The more complex the password, the harder it is to crackWiFiServer server(80): Creates a TCP server listening on port 80 (the default HTTP port). When a phone browser accesses192.168.4.1, requests are routed to this server- UNO R4 WiFi supports simultaneous STA and AP modes, but this project uses a sequential "STA first for time, then AP for hotspot" approach to simplify logic
¶ startAPMode() Start Hotspot
void startAPMode() {
  Serial.println("\n Starting AP hotspot: R4_AP");
  WiFi.beginAP(ap_ssid, ap_password);
  delay(3000);
  Serial.print("AP IP address: ");
  Serial.println(WiFi.localIP());  // Default 192.168.4.1
}
Code Logic Analysis:
WiFi.beginAP(): Switches the UNO R4 WiFi to AP (Access Point) mode. The Arduino itself becomes a WiFi hotspot that nearby phones/computers can search for and connect todelay(3000): Waits for AP startup to complete. The WiFi module takes about 2-3 seconds to start AP, during which it cannot accept connections- Print IP address:
WiFi.localIP()returns the Arduino's IP address in AP mode, defaulting to192.168.4.1. After connecting to the hotspot, enter this address in the phone browser to access the web page
AP Mode Notes:
- Difference from STA mode: STA (Station) mode means Arduino connects to a router (joins an existing network); AP mode means Arduino creates its own network (lets others connect to it). This project first uses STA to get time, then switches to AP for phone connections
- Default IP and subnet: In AP mode, Arduino acts as a DHCP server, assigning
192.168.4.xIPs to connected devices. The Arduino itself is fixed at192.168.4.1 - Security: WPA2 encryption protects the hotspot from unauthorized access. Password must be at least 8 characters; a mix of uppercase, lowercase, numbers, and symbols is recommended
- Signal range: Approximately 10-20 meters indoors, 30-50 meters outdoors, depending on environmental interference
¶ handleWebRequest() Handle Web Requests
This is the most critical function, responsible for parsing client requests, executing control operations, and returning the HTML web page.
void handleWebRequest(int currentUnixTime,
                     int& alarmHour, int& alarmMin,
                     bool& alarmOn, bool& alarmRing,
                     int BUZZER_PIN,
                     float temperature, float humidity,
                     bool& motorState) {
  WiFiClient client = server.accept();
  if (!client) return;

  String req = client.readStringUntil('\r');
  client.flush();

  // Parse control commands
  if (req.indexOf("GET /H") != -1) {
    digitalWrite(LED_BUILTIN, HIGH);  // Turn on LED
  }
  if (req.indexOf("GET /L") != -1) {
    digitalWrite(LED_BUILTIN, LOW);   // Turn off LED
  }
  if (req.indexOf("GET /MOTOR_ON") != -1) {
    motorState = true;                // Turn on motor
  }
  if (req.indexOf("GET /MOTOR_OFF") != -1) {
    motorState = false;               // Turn off motor
  }

  // Alarm setting
  if (req.indexOf("GET /ALARM?") != -1) {
    int hIndex = req.indexOf("h=");
    int mIndex = req.indexOf("m=");
    alarmHour = req.substring(hIndex+2, hIndex+4).toInt();
    alarmMin  = req.substring(mIndex+2, mIndex+4).toInt();
    alarmOn   = true;
  }
  if (req.indexOf("GET /ALARM_OFF") != -1) {
    alarmRing = false;
    alarmOn = false;
    digitalWrite(BUZZER_PIN, LOW);
  }

  // Return HTML web page
  // ... (web page code)

  client.stop();
}
Code Logic Analysis:
- Accept connection:
server.accept()attempts to accept a new TCP connection. If a client connects, returns aWiFiClientobject; otherwise returns an empty object, andif (!client) returnreturns immediately without blocking the main loop - Read request:
readStringUntil('\r')reads the first line of the HTTP request. HTTP requests end with\r\n, so reading up to\rcaptures the request line. A typical request isGET /MOTOR_ON HTTP/1.1 - Clear buffer:
client.flush()discards the rest of the request header (such as\nand subsequentHost,User-Agentheaders), preventing residual data from interfering with the response - URL route matching: Uses
indexOf()to search for keywords in the request string, executing the corresponding operation on match.indexOf()is used instead of exact matching because the request line also containsHTTP/1.1and other extra content - Alarm parameter parsing: From URL
GET /ALARM?h=08&m=30, usesindexOf("h=")to locate the parameter,substring(hIndex+2, hIndex+4)to extract two digits, andtoInt()to convert to integer - Generate HTML response: Dynamically generates an HTML page based on current time, temperature, humidity, alarm status, etc., including control buttons and real-time data
- Disconnect:
client.stop()closes the TCP connection after sending is complete, releasing resources
Request Handling Notes:
- Non-blocking nature of
server.accept(): This is the key to the system's non-blocking design. If no client is connected,accept()returns an empty object immediately, the function returns quickly, and the main loop continues with alarm ringing, motor control, and other tasks readStringUntil('\r')vsreadString(): The former returns as soon as the specified character is read, with a shorter timeout; the latter waits until data is available. UsingreadStringUntilhere avoids long blocking- URL Routing Table:
| URL Path | Function | Action |
|---|---|---|
GET /H |
Turn on LED | digitalWrite(LED_BUILTIN, HIGH) |
GET /L |
Turn off LED | digitalWrite(LED_BUILTIN, LOW) |
GET /MOTOR_ON |
Turn on motor | motorState = true |
GET /MOTOR_OFF |
Turn off motor | motorState = false |
GET /ALARM?h=XX&m=XX |
Set alarm | Parse parameters and enable alarm |
GET /ALARM_OFF |
Turn off alarm | Stop ringing and reset alarm |
- HTML response flow: First sends HTTP response headers (
HTTP/1.1 200 OK+Content-Type: text/html+ blank line), then outputs HTML line by line. The browser renders the page after receiving the complete response - HTTP short connection: This project uses HTTP/1.1's default short-connection mode, disconnecting immediately after each request-response cycle. The advantage is simple implementation; the disadvantage is additional connection overhead during frequent operations
Web Interface Functions:
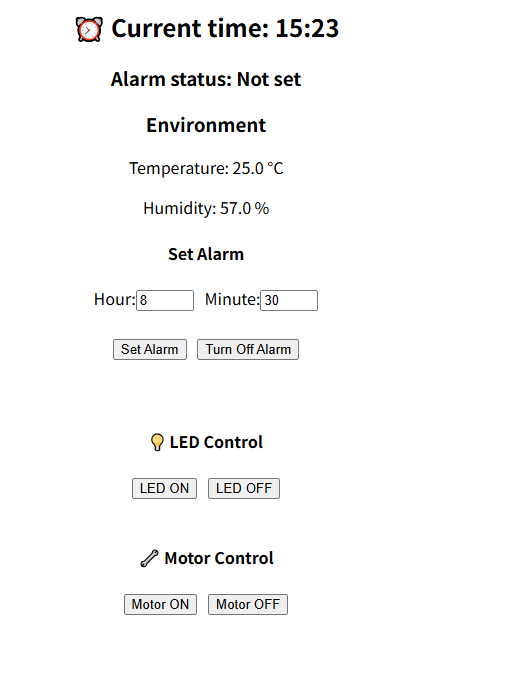
HTML Page Notes:
- The page uses inline CSS for centered layout and button styles
- Form submission uses the
GETmethod; setting an alarm causes the browser to navigate toGET /ALARM?h=XX&m=XX - LED and motor buttons use
<a href>hyperlinks; clicking them causes the browser to automatically request the corresponding URL - The page is dynamically generated on every request, displaying the latest time, temperature, and humidity data
¶ Operation Guide
¶ Step 1: Install All Libraries
¶ Step 2: Connect Hardware
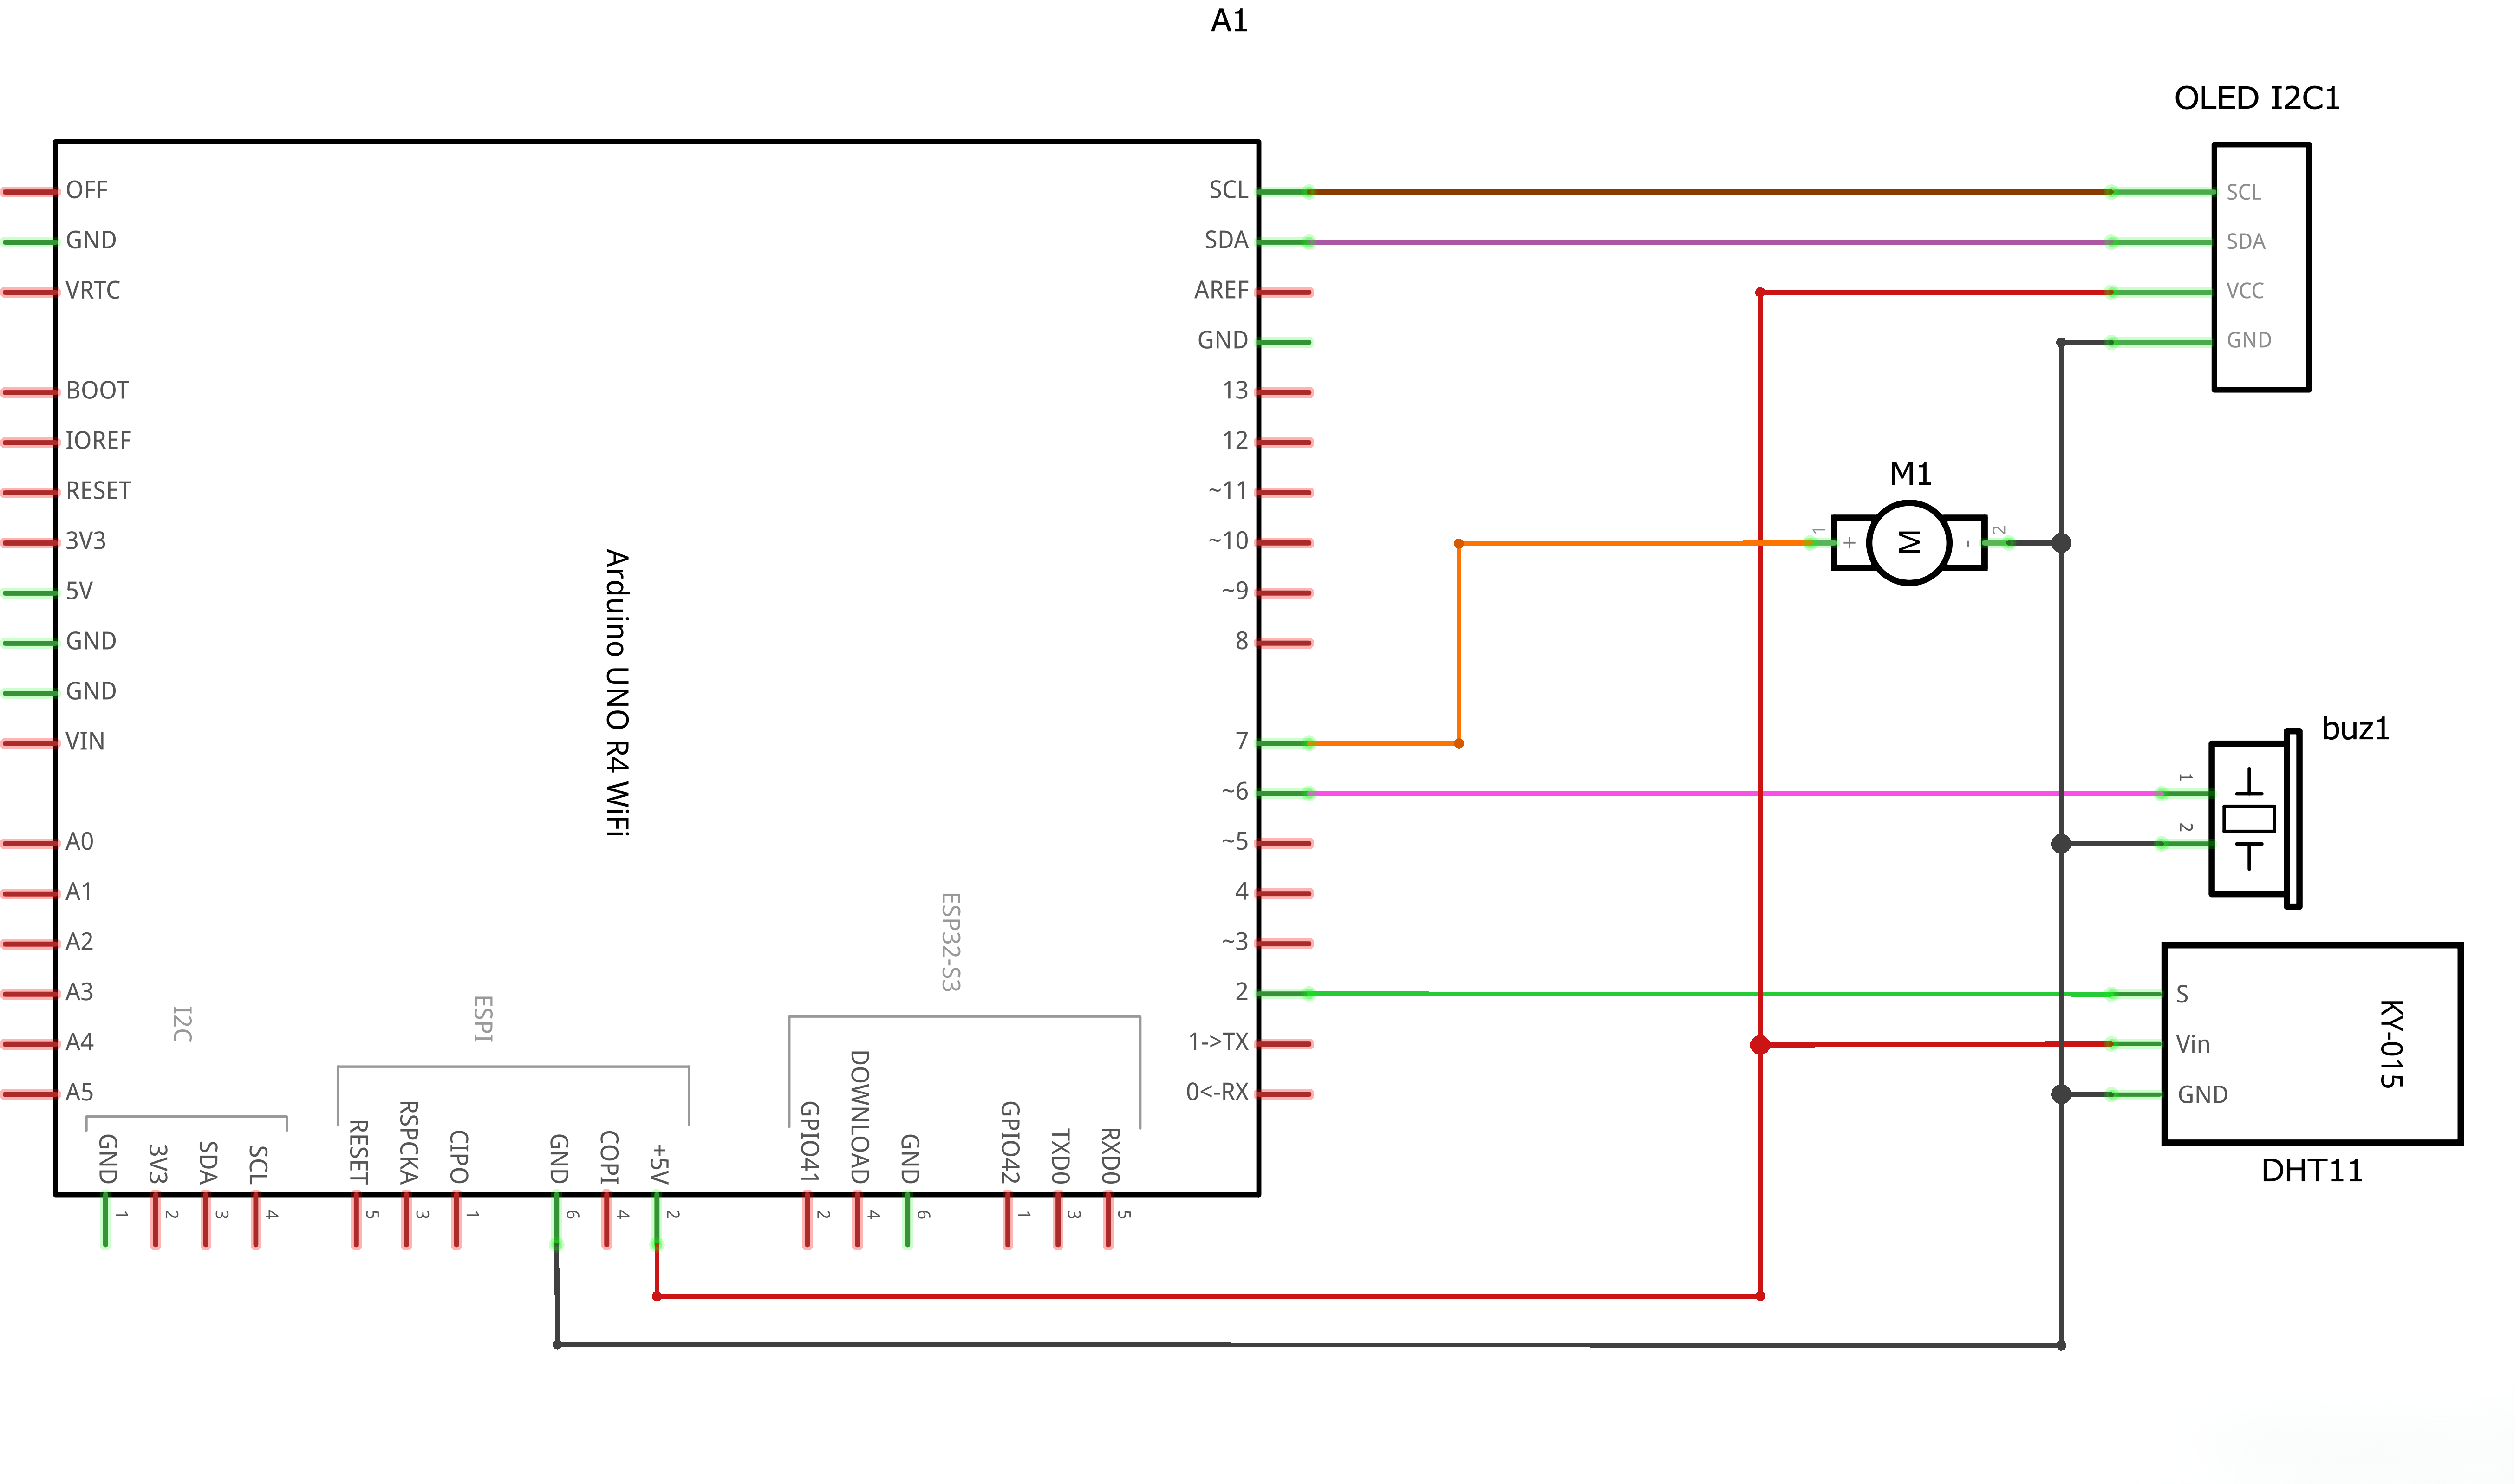
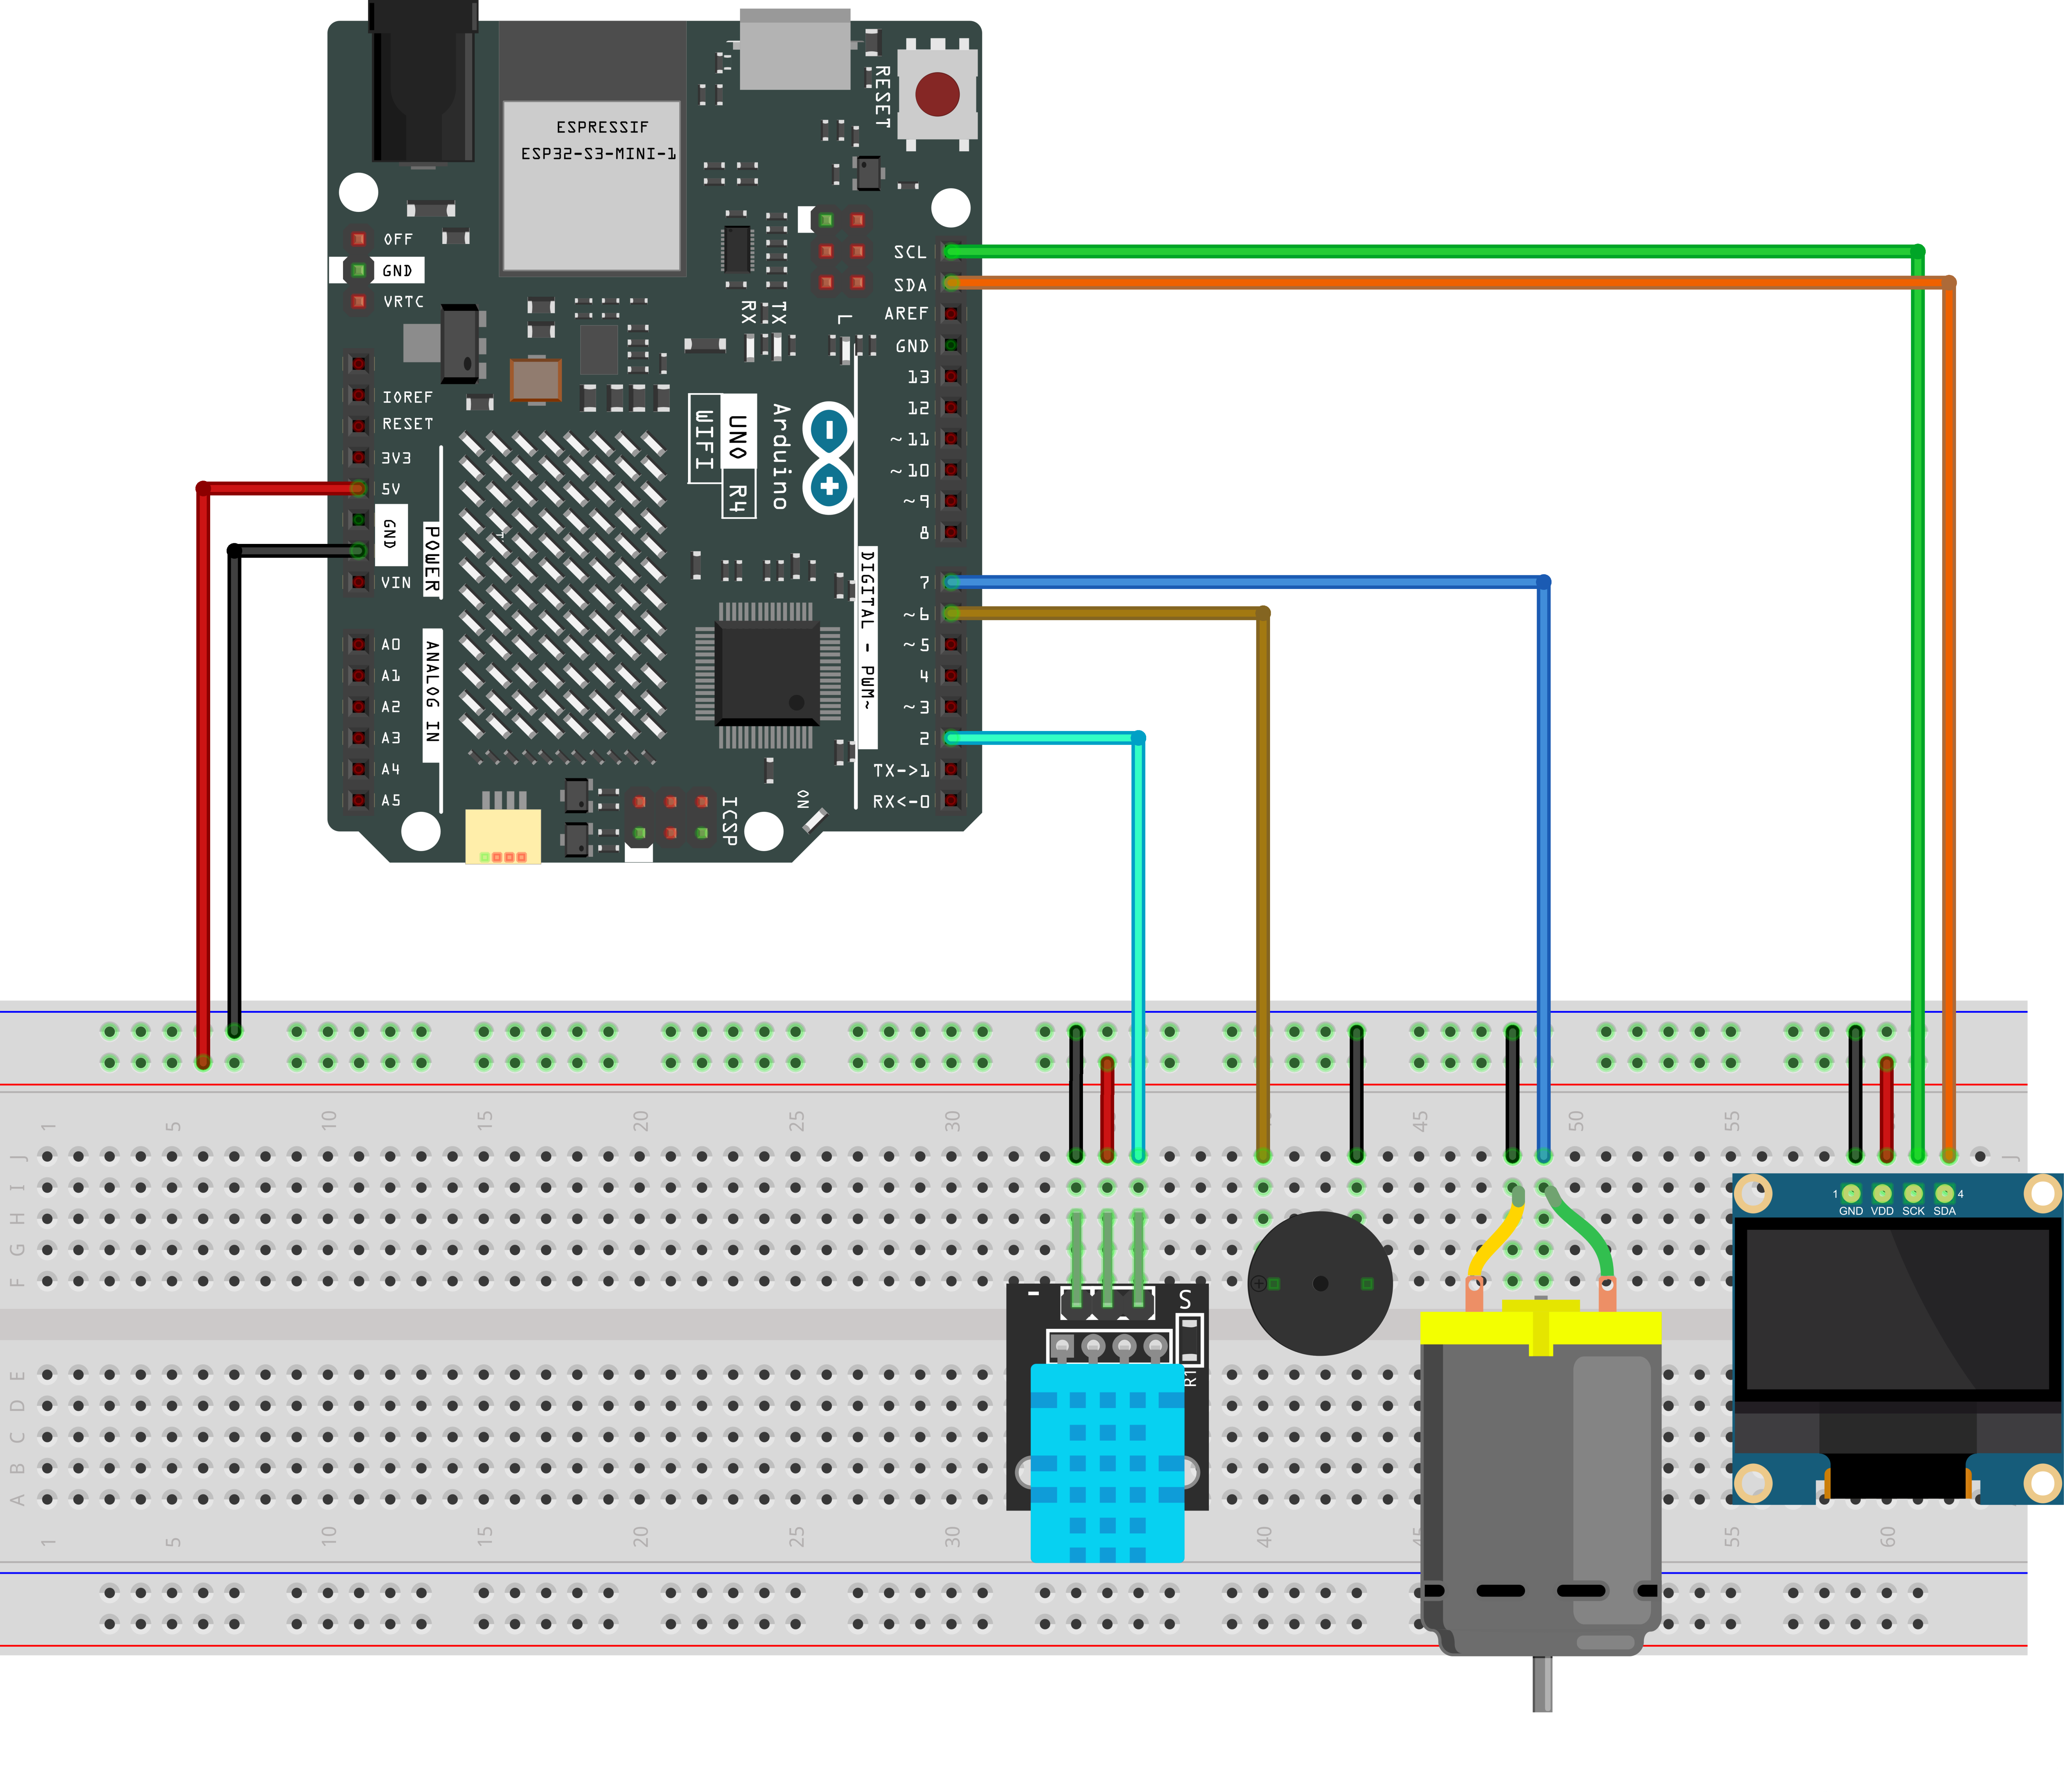
- Connect all components according to the pin wiring table
- Confirm DHT11 is connected to pin D2
- Confirm OLED is connected to I2C pins (A4/A5)
- Confirm buzzer is connected to D6
- Confirm motor driver is connected to D7
¶ Step 3: Modify Configuration Parameters
Open WebServer.cpp and modify the following parameters:
// Change to your WiFi name and password
const char* sta_ssid      = "YourWiFiName";
const char* sta_password  = "YourWiFiPassword";

// Custom hotspot name and password
const char* ap_ssid       = "R4_AP";        // Can be modified
const char* ap_password   = "12345678";     // At least 8 characters
¶ Step 4: Upload Code
- Connect UNO R4 WiFi to your computer
- In Arduino IDE, select:
- Board: Arduino UNO R4 WiFi
- Port: Correct COM port
- Click Upload button to flash the code
¶ Step 5: Observe Startup Process
- Open the Serial Monitor (set baud rate to 115200)
- Observe the output:
- WiFi connection status
- NTP time sync result
- AP mode startup info
¶ Step 6: Connect and Control
- Find the "R4_AP" hotspot in your phone's WiFi settings
- Enter password "12345678" to connect
- Open your phone's browser and visit 192.168.4.1
- Perform control operations on the web page:
- View time and environmental data
- Set alarms
- Control LED and motor
¶ Expected Serial Output
On Successful Startup:
 WiFi connected successfully!
NTP sync attempt 1/30:  Success!
Current time: Thu Aug 04 15:30:25 2026

 Starting AP hotspot: R4_AP
AP IP address: 192.168.4.1

Time: 15:30:26
T = 25.5 deg. C, H = 60.0%
Time: 15:30:27
T = 25.5 deg. C, H = 60.0%
...
On WiFi Connection Failure:
Connecting WiFi: ZNP_2.4G
........................................
 WiFi connection failed, unable to sync NTP time

 Starting AP hotspot: R4_AP
AP IP address: 192.168.4.1

Time: 00:00:01
...
¶ FAQ
¶ Common Questions
Q1: Serial monitor shows garbled characters?
A: Please confirm the serial monitor baud rate is set to 115200.
Q2: WiFi connection failed?
A: Please check:
- Are
sta_ssidandsta_passwordcorrect? - Is the router on the 2.4GHz band (UNO R4 WiFi does not support 5GHz)?
- Is the password correct (case-sensitive)?
- Is the signal strength sufficient?
Q3: OLED shows nothing?
A: Please check:
- Is the OLED correctly connected to I2C pins (A4/SDA, A5/SCL)?
- Is the OLED power supply normal (3.3V)?
- Does the serial monitor show "OLED initialization failed"?
Q4: DHT11 read failure, shows 0.0?
A: Please check:
- Is the DHT11 data line connected to D2?
- Is the wiring correct (VCC, GND)?
- Is the sensor damaged?
Q5: Phone can't find the "R4_AP" hotspot?
A: Please check:
- Was the code successfully uploaded?
- Does the serial monitor show "Starting AP hotspot"?
- Try pressing the board's Reset button to restart
- Hotspot password must be at least 8 characters
Q6: Web page opens but buttons don't respond?
A: Please check:
- Is the phone on the same network?
- Try refreshing the web page
- Check if the serial monitor shows request logs
Q7: Alarm doesn't ring?
A: Please check:
- Is the buzzer correctly connected to D6?
- Is the alarm time set correctly?
- Is the alarm enabled (alarmOn = true)?
- Note: The alarm triggers at the 0th second of the set minute
Q8: Motor doesn't rotate?
A: Please check:
- Is the motor driver module correctly connected?
- Does the motor driver have an external power supply?
- Is the motor connected to the driver module?
- Try turning the motor output shaft by hand. Since the UNO R4 WIFI needs to drive both the DHT11 sensor and OLED display simultaneously, its pins may not supply sufficient starting current for the motor. You can manually assist to start the motor. For better performance, it is recommended to use a relay module for driving.
¶ Troubleshooting Table
| Problem | Possible Cause | Solution |
|---|---|---|
| Serial garbled | Wrong baud rate | Change to 115200 |
| WiFi won't connect | Wrong password/5GHz | Check password, use 2.4GHz |
| OLED blank | Wiring error | Check I2C wiring |
| DHT11 no reading | Wiring error | Check D2 pin |
| Can't find hotspot | Code not uploaded | Re-upload |
| Web page won't open | Wrong IP | Use 192.168.4.1 |
| Alarm doesn't ring | Wiring/settings issue | Check buzzer and alarm settings |
| Motor doesn't move | Driver/power issue | Check driver and external power |
¶ Modification Suggestions
¶ 1. Modify WiFi and Hotspot Configuration
Modify in WebServer.cpp:
const char* sta_ssid      = "YourWiFi";
const char* sta_password  = "YourPassword";
const char* ap_ssid       = "CustomHotspotName";
const char* ap_password   = "AtLeast8CharPassword";
¶ 2. Modify NTP Server
Modify in NTPTime.cpp:
// Change to another country's time service center
const char* ntpServer = "ntp.jst.mfeed.ad.jp";  // Japan

// Modify timezone
const long gmtOffset_sec = 9 * 3600;  // Japan timezone
¶ 3. Add More Sensors
// Add DS18B20 temperature sensor
// Add BH1750 light sensor
// Add MQ-2 gas sensor
¶ 4. Add Multiple Alarms
// Alarm array
int alarmHours[3] = {7, 12, 18};
int alarmMins[3] = {0, 0, 30};
bool alarmEnables[3] = {true, true, true};
¶ 5. Add Temperature Alert Function
// Trigger fan when temperature exceeds threshold
if (temperature > 30.0) {
  digitalWrite(MOTOR_PIN, HIGH);
}
¶ 6. Add Data Logging Function
// Send data to cloud platform
// ThingsBoard, Blynk, Alibaba Cloud IoT, etc.
¶ Known Issues (Code Problems)
¶ Warning 1: Duplicate pinMode Call
Location: 3.12 Internet of Things WIFI Control System.ino line 36
Problem Code:
pinMode(led, OUTPUT);
pinMode(led, );  // WARNING: Missing second parameter
Fix:
// Remove or fix the second line
pinMode(led, OUTPUT);
¶ Warning 2: Parameter Type Mismatch
Location: WebServer.h and WebServer.cpp
Problem Description:
// Function declaration
void handleWebRequest(int currentUnixTime, ...);

// Actual variable type
unsigned long currentUnixTime = 0;
Risk: When the timestamp is large, the int type may not store it correctly, causing data truncation.
Fix:
// Modify function declaration and definition
void handleWebRequest(unsigned long currentUnixTime, ...);
¶ Warning 3: Motor Variable Not Globally Declared
Location: motorState variable used in main program
Problem: motorState is declared in the main program but also used in WebServer.cpp, needs to be passed by reference.
Current Implementation: Already passed by reference through function parameters, implemented correctly.
¶ Future Extensions
¶ 1. Connect to Cloud Platforms
Upload data to cloud platforms for remote monitoring:
- ThingsBoard: Open-source IoT platform
- Blynk: Easy-to-use IoT platform
- NodeMCU: Data storage and analysis
¶ 2. Add Mobile App
Develop a mobile app using MIT App Inventor or Flutter:
- Real-time environmental data viewing
- Receive alarm notifications
- Remote device control
¶ 3. Voice Control
Integrate voice assistants:
- Control via Tmall Genie, Xiaoai
- Use Google Home, Amazon Echo
- Implement voice interaction control
¶ 4. Automation Scenarios
Set up automation rules:
- Auto-start fan when temperature exceeds 30°C
- Auto-start humidifier when humidity drops below 40%
- Auto-turn on LED when light is insufficient
¶ 5. Multi-Device Integration
Expand into a smart home hub:
- Control multiple LED lights
- Control curtains, door locks, and other devices
- Link with other sensors
- Build a complete smart home system
¶ 6. Data Visualization
Display historical data charts on web or app:
- Temperature change curves
- Humidity change curves
- Device switch records
- Daily and weekly reports
¶ 7. Scheduled Tasks
Add scheduling functionality:
- Periodic data sending
- Periodic device status checks
- Periodic triggered actions
- Periodic time synchronization