¶ Fault Symptoms
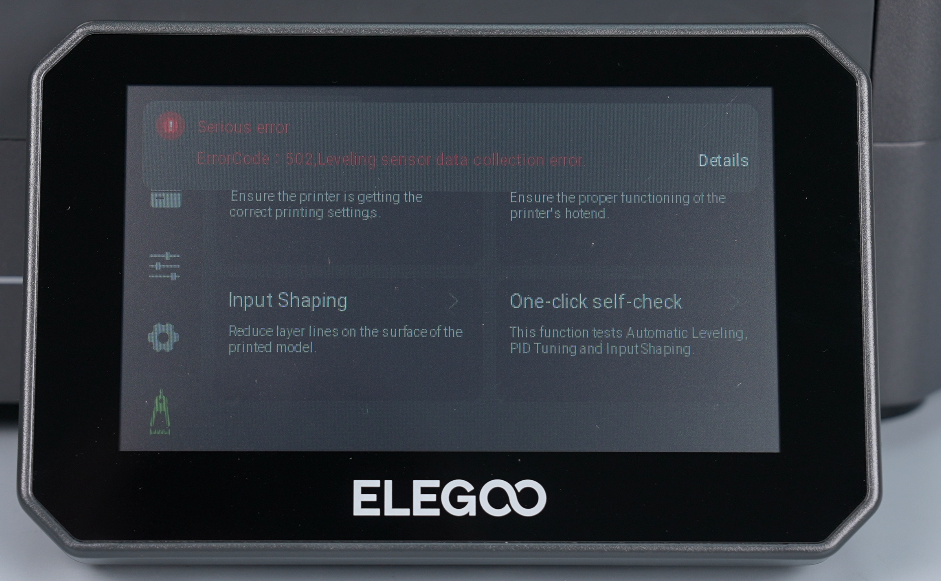
During leveling, the nozzle repeatedly probes the same position or continues moving downward. The touchscreen displays error code 502 with the message “leveling sensor data collection error,” and automatic leveling is interrupted.
¶ Possible Causes
- The printer is placed on an unstable or uneven surface.
- The locking screws are loose.
- The pressure sensor or pressure sensor adapter board is faulty.
¶ Required Tools
- 2.0 mm hex key
- 2.5 mm hex key
- Ruler or vernier caliper
¶ Troubleshooting Steps
¶ 1. Check the Printer Placement
The printer must be placed on a flat, stable surface without any wobbling. All four feet of the printer must remain in full contact with the tabletop.
Do not place the printer on a table with wheels. If you are unsure whether the table is stable, temporarily place the printer on a flat floor and test it again.
- If error code 502 still appears when the printer is placed on the floor, continue with the following troubleshooting steps.
¶ 2. Check the Locking Screws
- Remove the PEI plate.
.png)
- Position a hex key on the upper locking screw.
.png)
- Position another hex key on the lower locking screw.
.png)
- Turn the lower locking screw clockwise to tighten it.
.png)
- Check all four sets of locking screws in sequence.
.png)
- If none of the locking screws are loose, continue with the following troubleshooting steps.
¶ 3. Manually Level the Heated Bed
-
Reinstall the PEI plate.
-
Power on the printer and tap Home on the touchscreen.
-
Use a ruler or vernier caliper to check whether the distances between the three Z-axis mounting blocks and the Z-axis build platform connectors are consistent.
.jpeg)
.png)
- If the distances at the three locations are inconsistent, follow the instructions below to make further adjustments:
How to Adjust a Tilted Heated Bed
- If the distances at all three locations are consistent, continue with the following troubleshooting steps.
¶ 4. Check the Pressure Sensor Connectors
- Follow Steps 1–4 in the instructions below to remove the heated bed:
How to Replace the Pressure Sensor Adapter Board
- Locate the pressure sensor adapter board.
.png)
- Check whether any of the five connectors on the pressure sensor adapter board are loose. Disconnect and reconnect each connector.
.png)
.png)
- After checking the connectors, reassemble the heated bed. Power on the printer and start the automatic leveling calibration again.
- If error code 502 still appears, continue with the following troubleshooting steps.
¶ 5. Identify the Faulty Component
- Follow Steps 1–4 in the instructions below to remove the heated bed:
How to Replace the Pressure Sensor Adapter Board
- Disconnect the four connectors shown in the image.
.png)
- Swap the positions of the connectors within the same row.
Reminder: Do not swap the connectors diagonally or between different rows.
.png)
-
Reassemble the heated bed.
-
Power on the printer and start the automatic leveling calibration again.
- If the position where the nozzle stops or continues pressing down on the build platform changes, the pressure sensor is faulty and must be replaced.
- If the position where the nozzle stops or continues pressing down on the build platform does not change, the strain gauge adapter board must be replaced.
¶ Contact Technical Support
If you have completed Steps 1–5 and the issue remains unresolved, contact ELEGOO Technical Support at Email: 3dp@elegoo.com and provide the following information:
- Please reproduce the issue and record a video showing the error message appearing on the touchscreen, as well as the movements of the printhead and heated bed.
- A photo showing the surface or table on which the printer is placed.
- Photos showing the measured distances between the three Z-axis mounting blocks and the Z-axis connectors.
- Test result: Does error code 502 still appear after disconnecting and reconnecting the pressure sensor connectors?
- Test result: After swapping the pressure sensor connectors, did the position where the nozzle stops or continues pressing down on the build platform change?
¶ Help Us Improve
If you have any suggestions regarding our wiki pages, please let us know through the official ELEGOO feedback channel