¶ WiFi Station Mode TCP Client
This example demonstrates how to implement a TCP client in WiFi Station (STA) mode on ESP32. The program connects to a specified WiFi network, then acts as a TCP client to connect to a server, send and receive data, while displaying connection status and information on the TFT LCD screen.
¶ Operation Steps
¶ Step 1: Obtain the WLAN IP address of your computer
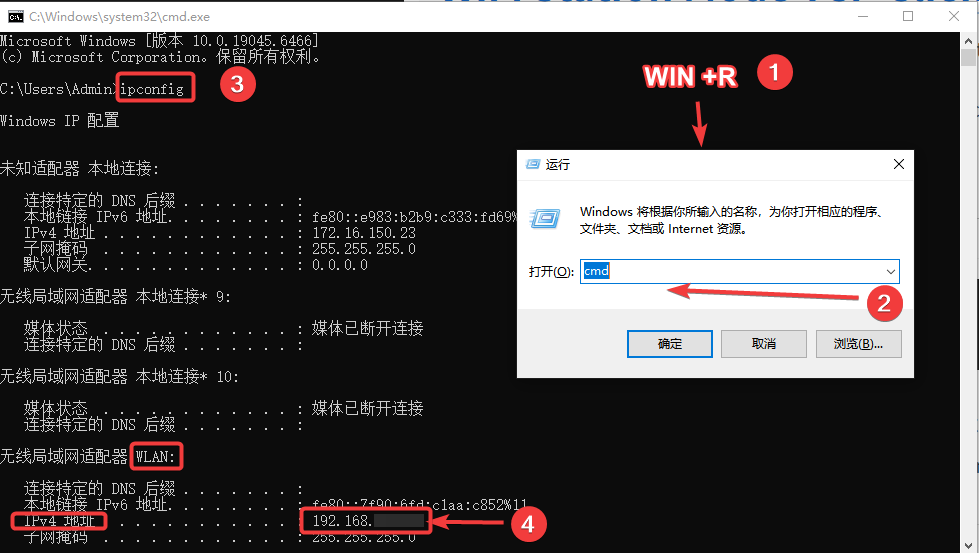
For Windows OS: Press the shortcut key Win+R to open the Run window, enter cmd to launch the Command Prompt.
For Mac OS: Press the shortcut key Command+R to open the Terminal.
Type the command ipconfig in the terminal to check the IPv4 address of your WLAN. See the figure below for reference.:
¶ Step 2: Upload the Program
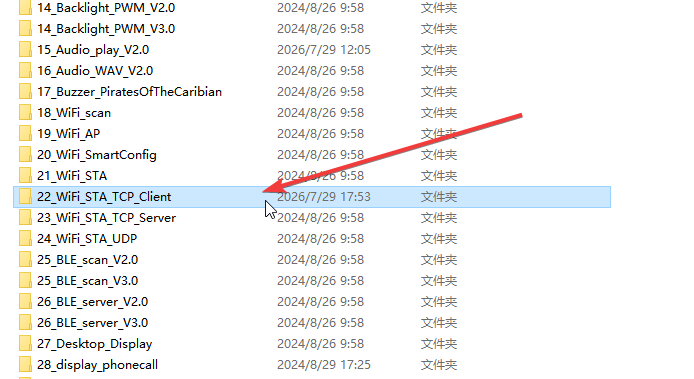
Before uploading the program, you need to edit the WiFi SSID, WiFi password and server IP address in the code in advance. Connection will fail without these modifications.
Set the server IP address to the IPv4 address acquired on your computer in Step 1.
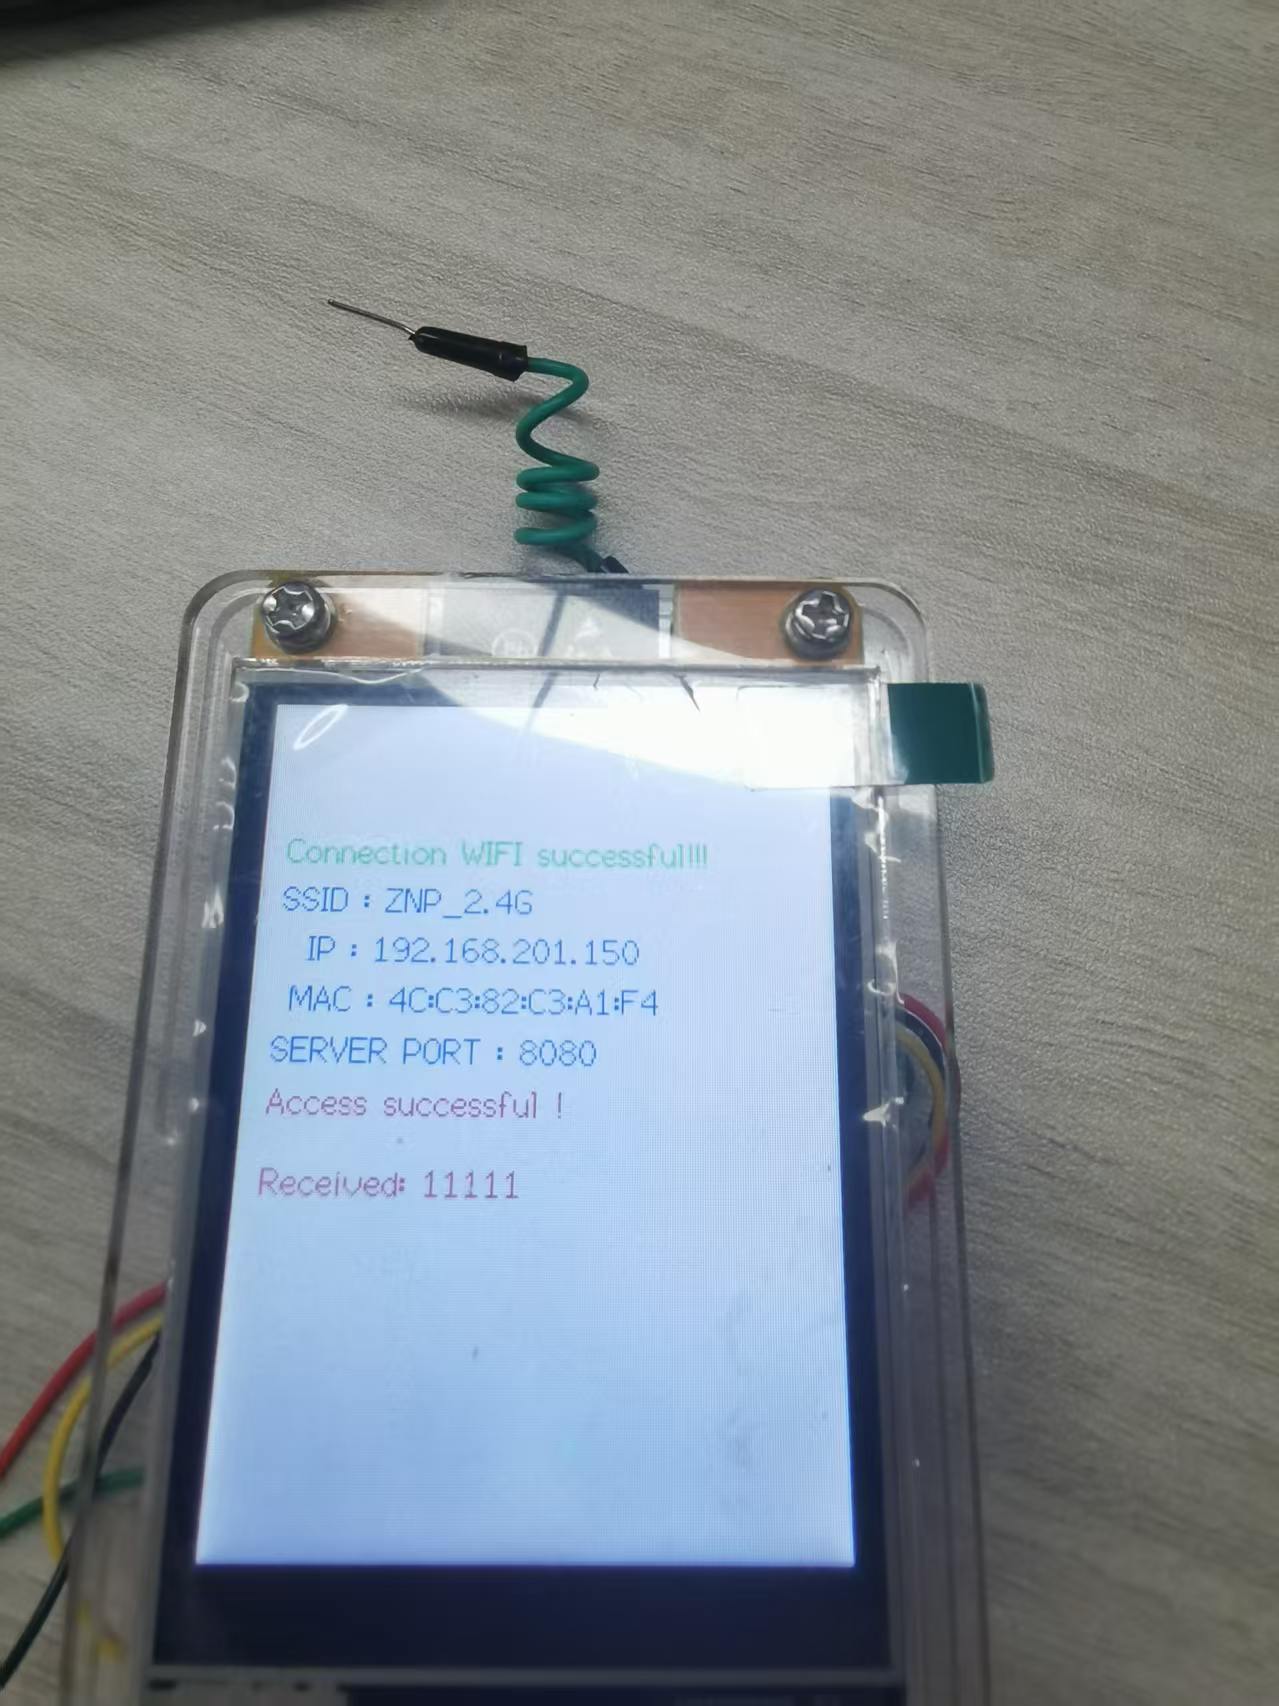
Once the program is uploaded, the ESP32 screen will display its own IP address. Please note this IP down for subsequent operations.


¶ Step 3: Create a TCP Server
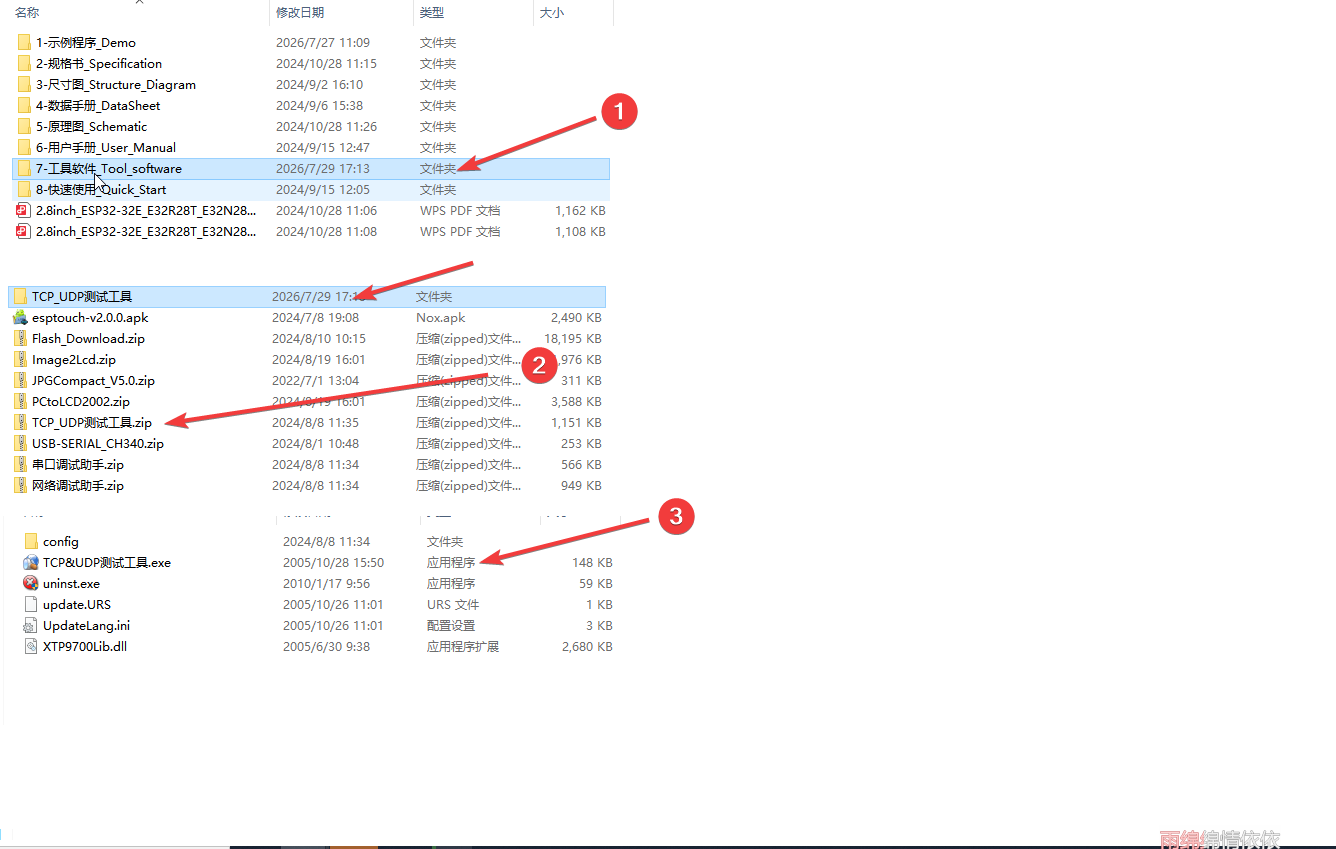
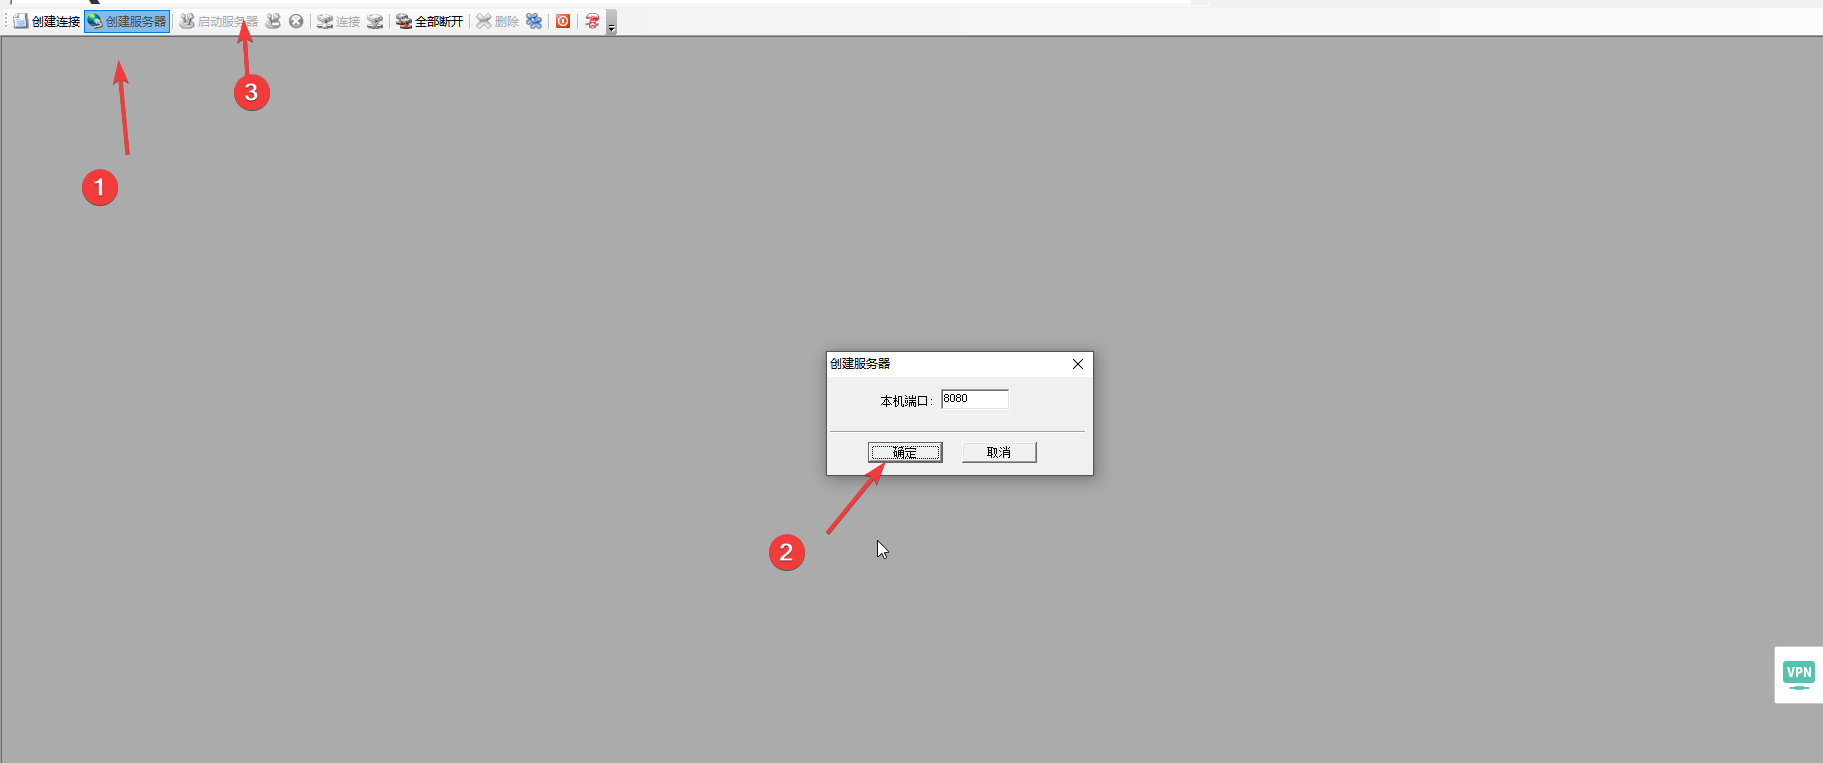
Open the resource package and run the executable file named "TCP&UDP 测试工具.exe". Refer to the figure below for the exact file path.

¶ Code Explanation
¶ Library Inclusion
#include <TFT_eSPI.h>
#include <WiFi.h>
- TFT_eSPI.h: TFT screen driver library for controlling LCD display
- WiFi.h: ESP32 WiFi library, providing WiFi connection and TCP communication functions
¶ Manual Configuration Parameters (Important)
The program requires users to modify the following parameters according to actual conditions:
const char *ssid = "SSID";
const char *password = "PASSWORD";

const IPAddress serverIP(192,168,***,***);
uint16_t serverPort = 8080;
⚠️ Must-Modify Parameters:
- ssid: WiFi network name, needs to be changed to your WiFi name
- password: WiFi password, needs to be changed to the corresponding WiFi password
- serverIP: TCP server IP address, needs to be changed to the actual server IP address
- serverPort: TCP server port, needs to be changed to the actual server port
¶ setup() Function Explanation
The setup() function initializes serial port, screen, and WiFi, and displays connection information.
void setup()
{
    Serial.begin(115200);
    my_lcd.begin();
    my_lcd.setRotation(0);
    my_lcd.fillScreen(TFT_WHITE);
    my_lcd.setTextColor(TFT_RED);
    WiFi.mode(WIFI_STA);
    WiFi.setSleep(false);
    my_lcd.drawString("Start connecting to WiFi ...", 10,55,2);
    WiFi.begin(ssid, password);
    while (WiFi.status() != WL_CONNECTED)
    {
        delay(500);
        Serial.print(".");
    }
    my_lcd.fillRect(10, 55, my_lcd.width()-1, 25,TFT_WHITE);
    my_lcd.setTextColor(TFT_GREEN);
    my_lcd.drawString("Connection WIFI successful!!!", 10,55,2);
    my_lcd.setTextColor(TFT_BLUE);
    sprintf(t_buf, "SSID : %s", ssid);
    my_lcd.drawString(t_buf, 10,75,2);
    sprintf(t_buf, "  IP : %s", WiFi.localIP().toString().c_str());
    my_lcd.drawString(t_buf, 10,95,2);
    sprintf(t_buf, " MAC : %s", WiFi.macAddress().c_str());
    my_lcd.drawString(t_buf, 10,115,2);
    sprintf(t_buf, "SERVER PORT : %d", serverPort);
    my_lcd.drawString(t_buf, 10,135,2);
    my_lcd.setTextColor(TFT_RED);
    my_lcd.drawString("Attempting to access server ...", 10,155,2);
}
¶ Serial Port and Screen Initialization
Serial.begin(115200);
my_lcd.begin();
my_lcd.setRotation(0);
my_lcd.fillScreen(TFT_WHITE);
Serial.begin(115200): Initialize serial communication with baud rate of 115200my_lcd.begin(): Initialize TFT screenmy_lcd.setRotation(0): Set screen rotation angle to 0 degrees (portrait mode)my_lcd.fillScreen(TFT_WHITE): Clear screen with white background
¶ WiFi Mode Configuration
WiFi.mode(WIFI_STA);
WiFi.setSleep(false);
WiFi.mode(WIFI_STA): Set WiFi to Station mode, connecting to router as a clientWiFi.setSleep(false): Disable WiFi sleep mode to maintain stable connection
⚠️ Note:
- In Station mode, ESP32 connects to an existing WiFi network as a client
- If you need to create an AP hotspot, use
WIFI_APorWIFI_AP_STAmode
¶ WiFi Connection Process
WiFi.begin(ssid, password);
while (WiFi.status() != WL_CONNECTED)
{
    delay(500);
    Serial.print(".");
}
WiFi.begin(ssid, password): Start WiFi connection using configured SSID and passwordWiFi.status() != WL_CONNECTED: Loop waiting for successful connectiondelay(500): 500 millisecond interval between checks
⚠️ Important Notes:
- If the WiFi password is incorrect or signal is weak, the program will be stuck in this loop
- You can observe connection status through serial monitor (printing dots indicates connecting)
- It is recommended to add timeout handling mechanism to avoid infinite waiting
¶ Connection Information Display
sprintf(t_buf, "SSID : %s", ssid);
my_lcd.drawString(t_buf, 10,75,2);
sprintf(t_buf, "  IP : %s", WiFi.localIP().toString().c_str());
my_lcd.drawString(t_buf, 10,95,2);
sprintf(t_buf, " MAC : %s", WiFi.macAddress().c_str());
my_lcd.drawString(t_buf, 10,115,2);
sprintf(t_buf, "SERVER PORT : %d", serverPort);
my_lcd.drawString(t_buf, 10,135,2);
The program displays the following information on screen:
- SSID: Connected WiFi name
- IP: IP address assigned to ESP32
- MAC: ESP32's MAC address
- SERVER PORT: Target server port
¶ loop() Function Explanation
The loop() function implements TCP client connection, data sending and receiving functionality.
void loop()
{
    if (client.connect(serverIP, serverPort))
    {
        my_lcd.fillRect(10, 155, my_lcd.width()-1, 25,TFT_WHITE);
        my_lcd.drawString("Access successful !", 10,155,2);
        client.print("Hello, this is client!");
        while (client.connected() || client.available())
        {
            if (client.available())
            {
                String line = client.readStringUntil('\n');
                my_lcd.fillRect(10, 175, my_lcd.width()-1, 25,TFT_WHITE);
                my_lcd.drawString("Received: " + line, 10,185,2);
                client.write(line.c_str());
            }
        }
        my_lcd.fillRect(10, 155, my_lcd.width()-1, 25,TFT_WHITE);
        my_lcd.drawString("Close current connection.", 10,155,2);
        client.stop();
    }
    else
    {
        my_lcd.fillRect(10, 155, my_lcd.width()-1, 25,TFT_WHITE);
        my_lcd.drawString("Access failed, Close client !", 10,155,2);
        client.stop();
    }
    delay(5000);
}
¶ TCP Connection Establishment
if (client.connect(serverIP, serverPort))
{
    my_lcd.drawString("Access successful !", 10,155,2);
    client.print("Hello, this is client!");
    ...
}
client.connect(serverIP, serverPort): Attempt to connect to specified server IP and portclient.print("Hello, this is client!"): Send welcome message to server after successful connection
⚠️ Important Notes:
- Before connecting, ensure the server is started and listening on the specified port
- If connection fails, it will be handled in the else branch, displaying failure message
- It is recommended to add reconnection mechanism in actual applications
¶ Data Reception and Echo
while (client.connected() || client.available())
{
    if (client.available())
    {
        String line = client.readStringUntil('\n');
        my_lcd.drawString("Received: " + line, 10,185,2);
        client.write(line.c_str());
    }
}
client.connected(): Check if TCP connection is still establishedclient.available(): Check if there is readable dataclient.readStringUntil('\n'): Read data until newline characterclient.write(line.c_str()): Echo received data back to server
⚠️ Important Notes:
- This example uses newline character ('\n') as data end marker, ensure server sends data containing newline
- Echo function is for testing communication
- In actual applications, handle received data according to requirements
¶ Connection Closure and Retry
my_lcd.drawString("Close current connection.", 10,155,2);
client.stop();
...
delay(5000);
client.stop(): Close TCP connection and release resourcesdelay(5000): Wait 5 seconds before retrying connection
⚠️ Important Notes:
- Each loop re-establishes connection, suitable for testing scenarios
- In actual applications, may need to maintain persistent connection or optimize reconnection logic
- Delay time can be adjusted according to actual needs
¶ Summary
This example program implements ESP32 WiFi TCP client functionality through the following steps:
- Initialization: Configure serial port, TFT screen, WiFi mode
- WiFi Connection: Connect to specified WiFi network and display connection information
- TCP Communication: Loop to attempt server connection, send and receive data
- Status Display: Real-time display of connection status and received data on screen
Key functions used in the program include:
WiFi.mode(): Set WiFi operating modeWiFi.begin(): Start WiFi connectionWiFi.status(): Get WiFi connection statusWiFi.localIP(): Get local IP addressWiFi.macAddress(): Get MAC addressclient.connect(): Establish TCP connectionclient.print(): Send dataclient.available(): Check if there is readable dataclient.readStringUntil(): Read data until specified characterclient.write(): Send dataclient.stop(): Close connectionmy_lcd.drawString(): Display text on screenmy_lcd.fillRect(): Fill rectangular area
¶ Modification Instructions
If you need to modify the code for different application scenarios, you can refer to the following aspects for adjustment:
¶ 1. WiFi Network Configuration (Must Modify)
const char *ssid = "your_wifi_name";        // Change to your WiFi name
const char *password = "your_wifi_password"; // Change to your WiFi password
¶ 2. Server Address Configuration (Must Modify)
const IPAddress serverIP(192,168,1,100);    // Change to actual server IP
uint16_t serverPort = 8080;                 // Change to actual server port
¶ 3. Modify Data Content to Send
client.print("Your custom message here"); // Change to data you want to send
¶ 4. Modify Data Reception Method
String line = client.readStringUntil('\r'); // Change end marker, e.g., use carriage return
// or
String line = client.readString();          // Read all available data
¶ 5. Add Timeout Handling
unsigned long startTime = millis();
while (WiFi.status() != WL_CONNECTED)
{
    delay(500);
    Serial.print(".");
    if (millis() - startTime > 10000) // 10 second timeout
    {
        Serial.println("Connection timeout!");
        break;
    }
}
¶ 6. Modify Reconnection Interval
delay(10000); // Change to 10 second reconnection interval
¶ 7. Add Error Handling and Retry Logic
int retryCount = 0;
while (!client.connect(serverIP, serverPort) && retryCount < 3)
{
    retryCount++;
    delay(1000);
}
¶ 8. Modify Screen Display Content
You can add more status information or adjust display position as needed:
my_lcd.drawString("Custom info", x, y, font_size);
¶ Common Issues Troubleshooting
-
WiFi Connection Failed
- Check if SSID and password are correct
- Confirm if WiFi signal strength is sufficient
- Check if router supports 2.4GHz band (ESP32 does not support 5GHz)
-
TCP Connection Failed
- Confirm if server IP address and port are correct
- Check if server is started and listening on specified port
- Confirm if firewall allows communication on this port
- Check if server and ESP32 are on the same network
-
Screen Display Abnormal
- Check if pin connections are correct
- Confirm if TFT_eSPI library configuration is correct
- Check if screen backlight is turned on
-
Data Reception Abnormal
- Confirm if data format contains newline character ('\n')
- Check if buffer size is sufficient
- Confirm if data sender is sending data correctly