¶ AP Mode
¶ Background Knowledge
¶ What is AP Mode?
In previous lessons, we learned how to connect the Arduino to a home WiFi router for internet access. That's called STA (Station) mode, where the board acts as a "client" and depends on the router for communication.
In this section, we'll learn AP (Access Point) mode — making the Arduino itself become a mini WiFi router! It creates a WiFi hotspot that phones or computers can connect to, just like connecting to your home WiFi.
Simple analogy:
- STA mode = Phone connects to home WiFi (depends on router)
- AP mode = Phone connects to Arduino's WiFi (Arduino is the router)
¶ AP Mode vs STA Mode
| Aspect | STA Mode | AP Mode |
|---|---|---|
| Who is the "client" | Arduino | Phone/Computer |
| Who is the "server" | Home router | Arduino |
| Requires router? | ✅ Yes | ❌ No |
| Communication range | Depends on router | Depends on Arduino (~10-20 meters) |
| Internet access? | ✅ Yes | ❌ No (local network only) |
| Typical use | Upload data to cloud, NTP sync | Local control, router-free scenarios |
¶ Basics of HTTP Protocol
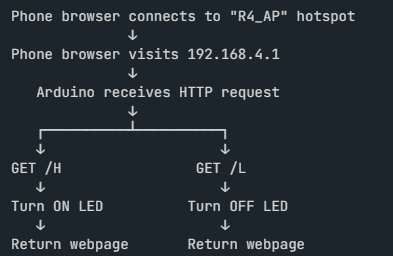
This project controls the LED through HTTP (Hypertext Transfer Protocol). When a phone browser visits the Arduino's webpage, the following happens:
- Phone connects to Arduino's WiFi hotspot
- Phone browser sends an HTTP request to Arduino (e.g.,
GET /Hmeans "turn on LED") - Arduino receives the request and performs the corresponding action
- Arduino returns a webpage to the phone browser for display
The essence of HTTP requests: It's simply a text message telling the server "what I want."
¶ Key Function Reference
¶ WiFi AP Functions
| Function | Description | Role in This Project |
|---|---|---|
WiFi.disconnect() |
Disconnect current WiFi connection | Clear previous state for clean startup |
WiFi.beginAP(ssid, pass) |
Start AP mode, create WiFi hotspot | Make Arduino become a WiFi hotspot |
WiFi.localIP() |
Get the device's IP address | Check default IP in AP mode (usually 192.168.4.1) |
¶ Web Server Functions
| Function | Description | Role in This Project |
|---|---|---|
WiFiServer server(80) |
Create a web server on port 80 | Listen for HTTP requests |
server.begin() |
Start the web server | Begin accepting client connections |
server.accept() |
Accept a new client connection | Get client object |
client.readStringUntil('\r') |
Read HTTP request from client | Parse control commands |
client.println() |
Send data to client | Return HTML webpage |
client.stop() |
Close client connection | Complete communication |
¶ HTTP Request Knowledge
HTTP requests consist of multiple lines of text. The first line tells the server what the client wants. This project uses two types of requests:
| Request Path | Meaning | Corresponding Action |
|---|---|---|
GET /H |
"High" - High voltage | Turn on LED |
GET /L |
"Low" - Low voltage | Turn off LED |
¶ Complete Code Analysis
¶ Full Code
¶ Code Walkthrough
¶ 1. Header File and Global Variables
#include "WiFiS3.h"

char ssid[] = "R4_AP";          // WiFi hotspot name
char pass[] = "12345678";       // WiFi password
int led = LED_BUILTIN;          // Onboard LED pin
WiFiServer server(80);          // Create web server on port 80
Line by line breakdown:
#include "WiFiS3.h": Include the UNO R4 WiFi library, which contains all WiFi functions including AP mode, STA mode, and web serverchar ssid[] = "R4_AP": Define the hotspot name, this is what phones will see when scanning for WiFichar pass[] = "12345678": Define the hotspot password, required when phones connectint led = LED_BUILTIN: Use the onboard LED pin (typically defined on UNO R4 WiFi boards)WiFiServer server(80): Create a web server object that listens on port 80 (the standard HTTP port)
¶ 2. setup() - Initialization
void setup() {
  Serial.begin(9600);
  while (!Serial);

  pinMode(led, OUTPUT);
  digitalWrite(led, LOW);

  WiFi.disconnect();
  delay(1000);

  WiFi.beginAP(ssid, pass);
  delay(3000);

  server.begin();

  Serial.println("=== Access Point Information ===");
  Serial.print("WiFi SSID: "); Serial.println(ssid);
  Serial.print("WiFi Password: "); Serial.println(pass);
  Serial.print("Device IP Address: "); Serial.println(WiFi.localIP());
}
Step by step breakdown:
Step 1: Initialize Serial Communication
Serial.begin(9600);     // Set baud rate to 9600
while (!Serial);        // Wait for serial monitor to connect
This is standard practice — ensures the program doesn't proceed until the serial monitor is ready.
Step 2: Initialize LED
pinMode(led, OUTPUT);   // Set LED pin as output
digitalWrite(led, LOW);  // Initial state: LED off
Step 3: Clear Previous Connections
WiFi.disconnect();      // Disconnect any existing WiFi connections
delay(1000);            // Wait 1 second for disconnect to complete
This is a good habit — ensures a clean start and prevents previous STA mode settings from interfering with AP mode.
Step 4: Start AP Mode
WiFi.beginAP(ssid, pass);  // Create WiFi hotspot
delay(3000);               // Wait 3 seconds for hotspot initialization
WiFi.beginAP() is the core function of this project. It turns the Arduino into a WiFi hotspot. Nearby phones/computers will then be able to see the "R4_AP" WiFi network.
Step 5: Start Web Server and Print Info
server.begin();                              // Start the web server
Serial.println("=== Access Point Information ===");
Serial.print("WiFi SSID: "); Serial.println(ssid);
Serial.print("WiFi Password: "); Serial.println(pass);
Serial.print("Device IP Address: "); Serial.println(WiFi.localIP());
server.begin() makes the Arduino start listening on port 80, waiting for HTTP requests from clients. The serial port prints the hotspot info for verification.
Default IP in AP Mode: Arduino uses 192.168.4.1 by default in AP mode — this is its address as the "router." Phones connecting will automatically get an IP on the same subnet (e.g., 192.168.4.x).
¶ 3. loop() - Main Loop
void loop() {
  WiFiClient client = server.accept();
  if (!client) return;

  String req = client.readStringUntil('\r');
  client.flush();

  if (req.indexOf("GET /H") != -1) {
    digitalWrite(led, HIGH);
  }
  if (req.indexOf("GET /L") != -1) {
    digitalWrite(led, LOW);
  }

  client.println("HTTP/1.1 200 OK");
  client.println("Content-Type: text/html");
  client.println();

  client.println("<!DOCTYPE html><html>");
  client.println("<head><title>UNO R4 AP LED control</title></head>");
  client.println("<body style='text-align:center; margin-top:50px;'>");
  client.println("<h1 style='color:blue;'>UNO R4 AP  LED control</h1>");
  client.println("<a href='/H' style='font-size:20px;margin-right:20px;'>LED ON</a>");
  client.println("<a href='/L' style='font-size:20px; '>LED OFF</a>");
  client.println("</body></html>");

  client.stop();
}
Step by step breakdown:
Step 1: Wait for Client Connection
WiFiClient client = server.accept();  // Try to accept a new connection
if (!client) return;                   // If no client, return and keep waiting
server.accept() returns a WiFiClient object. If no client is currently connected, it returns an empty object, if (!client) evaluates to true, and the program returns immediately without executing the rest of the code. This means when no client is connected, loop() spins quickly, constantly checking for new connections.
Step 2: Read HTTP Request
String req = client.readStringUntil('\r');  // Read until carriage return
client.flush();                              // Clear receive buffer
When a phone browser visits the Arduino's webpage, it sends a piece of HTTP request text. readStringUntil('\r') reads the first line (ending with a carriage return), which contains the request path, such as GET /H HTTP/1.1.
Step 3: Parse Request and Control LED
if (req.indexOf("GET /H") != -1) {     // Request contains "/H" → Turn on LED
  digitalWrite(led, HIGH);
}
if (req.indexOf("GET /L") != -1) {     // Request contains "/L" → Turn off LED
  digitalWrite(led, LOW);
}
Use indexOf() to check if the request string contains a specific path. When the browser clicks "LED ON", it visits /H, the Arduino receives it and turns on the LED; when clicking "LED OFF", it visits /L and turns off the LED.
Note: The two if statements are independent (not if-else), but they won't trigger simultaneously because the browser only visits one link at a time.
Step 4: Send HTTP Response Headers
client.println("HTTP/1.1 200 OK");     // Status line: Request succeeded
client.println("Content-Type: text/html");  // Tell client the content is HTML
client.println();                       // Empty line separates headers and content
This is the standard HTTP response format:
HTTP/1.1 200 OK: Tells the browser the request was processed successfullyContent-Type: text/html: Tells the browser the response is in HTML format- Empty line: Required separator between HTTP headers and content
Step 5: Send HTML Webpage Content
client.println("<!DOCTYPE html><html>");
client.println("<head><title>UNO R4 AP LED control</title></head>");
client.println("<body style='text-align:center; margin-top:50px;'>");
client.println("<h1 style='color:blue;'>UNO R4 AP  LED control</h1>");
client.println("<a href='/H' style='font-size:20px;margin-right:20px;'>LED ON</a>");
client.println("<a href='/L' style='font-size:20px; '>LED OFF</a>");
client.println("</body></html>");
These lines send the HTML webpage to the browser line by line. The page contains two hyperlinks:
<a href='/H'>LED ON</a>: Clicking this makes the browser visit/H, triggering the LED to turn on<a href='/L'>LED OFF</a>: Clicking this makes the browser visit/L, triggering the LED to turn off
The webpage uses simple CSS styles (style='...') to center the title and increase the font size.
Step 6: Close Connection
client.stop(); // Close the connection with the client
The connection must be closed after communication is complete, otherwise the Arduino will keep waiting and waste resources.
¶ Overall Flow Diagram
¶ Expected Serial Monitor Output
At startup:
=== Access Point Information ===
WiFi SSID: R4_AP
WiFi Password: 12345678
Device IP Address: 192.168.4.1
Now connect your phone to the "R4_AP" hotspot (password: 12345678), then visit 192.168.4.1 in your phone's browser
After clicking "LED ON" (LED turns on):
(LED lights up, phone browser displays the webpage with the LED ON link clicked)
After clicking "LED OFF" (LED turns off):
(LED turns off, phone browser displays the webpage with the LED OFF link clicked)
¶ Operation Guide
¶ Step 1: Upload the Code
- Connect UNO R4 WiFi to your computer
- Open Arduino IDE
- Select the correct board (UNO R4 WiFi) and port
- Compile and upload the code
¶ Step 2: Connect to the Hotspot
- Open your phone's WiFi settings
- Find the "R4_AP" hotspot and connect
- Enter password "12345678"
- After successful connection, your phone will show it's connected
¶ Step 3: Control the LED
- Open your phone's browser
- Enter
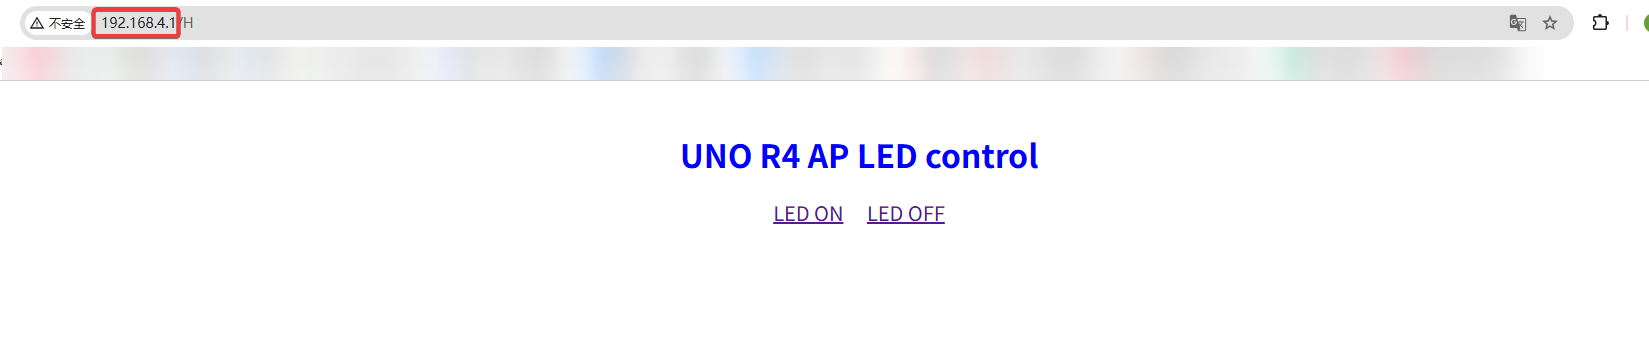
192.168.4.1in the address bar - You'll see the control webpage
- Click "LED ON" to turn on the LED, click "LED OFF" to turn off the LED
¶ Step 4: Verify
- Observe whether the LED on the board changes according to your actions
- Note: The webpage refreshes with each click (because a new webpage is returned)
¶ Q&A
¶ Common Questions
Q1: Can't find the "R4_AP" hotspot on my phone?
A: Check the following:
- Is the code correctly uploaded to the board?
- Is the board properly powered?
- Does the SSID contain Chinese or special characters? (Should use English and numbers)
- Press the Reset button on the board and try again
Q2: Getting "wrong password" when connecting?
A: Confirm the password matches what's defined in pass[]. Pay attention to case sensitivity. If you modified the password, re-upload the code.
Q3: Browser can't open the webpage after connecting?
A: Check the following:
- Confirm your phone is actually connected to the "R4_AP" hotspot
- Enter
192.168.4.1in the browser address bar (this is the default IP in AP mode) - Make sure the phone is not connected to other WiFi networks simultaneously
- Disable "Smart WiFi Switch" or "WiFi Assistant" features on your phone
Q4: LED doesn't respond after clicking the links?
A: Possible reasons:
- Phone browser might have caching, try refreshing the page
- Open the serial monitor to check for errors
Q5: Can I change the password?
A: Yes! But the password must be at least 8 characters. Re-upload the code after making changes.
Q6: Can the phone access the internet while connected?
A: No. In AP mode, the Arduino only provides local network connectivity without internet access. The phone can only access the Arduino's webpage.
¶ Troubleshooting Table
| Problem | Possible Cause | Solution |
|---|---|---|
| Hotspot not found | Code not uploaded / SSID has Chinese chars | Re-upload, use English SSID |
| Wrong password | Incorrect password entered | Ensure at least 8 chars, check case |
| Webpage won't open | Wrong IP address | Use 192.168.4.1 |
| LED not responding | Wrong pin / insufficient power | Verify LED_BUILTIN, use external power |
| Unstable connection | Signal interference | Use closer to the board |
¶ Modification Suggestions
¶ 1. Change Hotspot Name and Password
char ssid[] = "MyArduino";      // Custom hotspot name
char pass[] = "myPassword123";   // Custom password (at least 8 chars)
¶ 2. Use a Different LED Pin
To control an external LED:
int led = 5; // Use pin 5
¶ 3. Add More Control Commands
if (req.indexOf("GET /B") != -1) {     // Blink mode
  for (int i = 0; i < 5; i++) {
    digitalWrite(led, HIGH);
    delay(200);
    digitalWrite(led, LOW);
    delay(200);
  }
}
¶ 4. Print Request Information to Serial
Useful for debugging to see what requests the client sends:
String req = client.readStringUntil('\r');
Serial.println(req);  // Print the received request
client.flush();
¶ 5. Improve the User Interface
Add page refresh and status display:
<meta http-equiv="refresh" content="2"> // Auto-refresh every 2 seconds
¶ 6. Add Password Protection
Verify a password in requests within loop():
if (req.indexOf("GET /H") != -1 && req.indexOf("key=secret") != -1) {
  digitalWrite(led, HIGH);
}
¶ Future Extensions
¶ 1. Add Status Feedback
Display the current LED state on the webpage:
client.print("<p>LED Status: ");
client.print(digitalRead(led) ? "ON" : "OFF");
client.println("</p>");
¶ 2. Multi-LED Control
Control multiple LEDs:
int led1 = 9;
int led2 = 10;

if (req.indexOf("GET /H1") != -1) digitalWrite(led1, HIGH);
if (req.indexOf("GET /L1") != -1) digitalWrite(led1, LOW);
if (req.indexOf("GET /H2") != -1) digitalWrite(led2, HIGH);
if (req.indexOf("GET /L2") != -1) digitalWrite(led2, LOW);
¶ 3. Display Sensor Data
Show sensor readings (like temperature and humidity) on the webpage:
client.print("<p>Temperature: ");
client.print(temperature);
client.println(" °C</p>");
client.print("<p>Humidity: ");
client.print(humidity);
client.println(" %</p>");
¶ 4. Integrate MQTT Protocol
Send control commands through MQTT to support IoT platforms:
// Connect to MQTT broker
// Subscribe to control topics
// Publish status messages
¶ 5. Scheduled Tasks
Let the LED turn on/off automatically (like a timer light):
unsigned long lastBlink = 0;
void loop() {
  if (millis() - lastBlink > 5000) {  // Toggle every 5 seconds
    digitalWrite(led, !digitalRead(led));
    lastBlink = millis();
  }
  // ... HTTP server code
}
¶ 6. Multi-Client Support
Allow multiple users to connect and control the device simultaneously:
// Handle multiple clients in loop()
while (true) {
  WiFiClient client = server.available();
  if (!client) break;
  // Process each client...
}
¶ 7. Integration with Smart Home Systems
Through AP mode, it can serve as an independent control node, connecting to smart home networks:
- Wireless doorbell
- Remote light control
- Sensor data collection
- Device status monitoring