¶ Image Classification
The core idea of image classification is this: first let the model learn the features of various categories (classes). Then, when it encounters an object to identify, the model compares these features one by one, produces a similarity score for each class, and the class with the highest similarity is the most likely result.
¶ Try the Official Image Classification Example in App Lab
Before training your own model, first get familiar with the whole workflow using the official example, and confirm that your environment and the AI service are working properly.
¶ 1. Open the Official Example
- Open Arduino App Lab.
- In the left menu, click
Examples. - Find the
Image classificationexample and open it.
¶ 2. Understand the Project Structure
After opening it, you will see a structure similar to the following:
assets/
--image.jpg        # Test image used for recognition

python/
  --main.py          # Main program

app.yaml           # Application configuration file
The core logic of main.py:
from arduino.app_utils import App
from arduino.app_bricks.image_classification import ImageClassification

image_classification = ImageClassification()

with open("assets/image.jpg", "rb") as f:
    frame = f.read()

out = image_classification.classify(frame)

if out and "classification" in out:
    for i, obj_det in enumerate(out["classification"]):
        detected_object = obj_det.get("class_name", None)
        confidence = obj_det.get("confidence", None)
        print(f"Object Detected! '{detected_object}' with confidence: {confidence}%")

App.run()
¶ 3. Check the Brick Declaration in app.yaml
This is the most critical step in the whole workflow. Open app.yaml and confirm that the bricks field already declares image_classification:
name: Image classification
icon: 📷
description: Image classification
bricks:
  - arduino:image_classification
⚠️ If
bricksis empty (bricks: []), the AI inference service will not start, and you will get aFailed to resolve 'ei-classification-runner'error at runtime.
¶ 4. Run the Example
- Click the
Runbutton in the upper right corner of App Lab. - Switch to the
Pythontab to view the output. - Under normal conditions, you will see a result similar to this:
Object Detected! 'espresso' with confidence: 48.23%
¶ 5. Try It with Your Own Image
Of course, you cannot modify the official example directly. You need to click Copy and Edit App in the upper right corner to create your own new App. The code will be automatically copied into your new App.
After entering your new App, click the Add file button in the upper left corner, select Import from computer, and then select the image you want to recognize.
Note that the image you upload must be located under the assets folder. If it is not, use the left mouse button to click the image and drag it into the assets folder. Then re-run step 5.
-
Replace
assets/image.jpgwith your own image (or place the new image inassets/and modify the filename inmain.py). -
Click
Runagain and observe the recognition result. -
Note: The official example uses an ImageNet pre-trained model, which only recognizes 1000 common categories. If your image is not among them, the recognition result may be inaccurate. This is normal.
-
To make it easier for you to pick images for testing, here are some major categories:
-
Fish: goldfish, great white shark, tiger shark, hammerhead, electric ray, stingray, etc. -
Birds: rooster, hen, ostrich, peacock, parrot, penguin, owl, etc. -
Reptiles and amphibians: python, cobra, lizard, chameleon, crocodile, frog, salamander, etc. -
Mammals: many dog breeds (golden retriever, Labrador, husky, etc.), felines (Persian cat, Siamese cat, lion, tiger, leopard, etc.), bear, elephant, panda, horse, cow, sheep, monkey, etc. -
Insects and invertebrates: butterfly, bee, ant, spider, scorpion, lobster, crab, etc. -
Everyday objects: guitar, backpack, umbrella, clock, bottle, chair, book, computer keyboard, etc. -
Vehicles: car, motorcycle, bicycle, airplane, boat, train, etc.
After the program runs, click the output port below and select the Python button. The output should be similar to the following:
Object Detected! 'American alligator' with confidence: 32.94%
The above is the official fixed training model, which can only recognize categories predefined by the official team. Can we set our own recognition types?
¶ 6. Move on to Custom Training
¶ 1. Create a Project in App Lab and Enter Training
-
Open Arduino App Lab and create a new application.
-
In the left
Brickspanel, findVideo Image Classificationand add it to the project. -
Click the
AI modelstab and clickTrain new AI model.
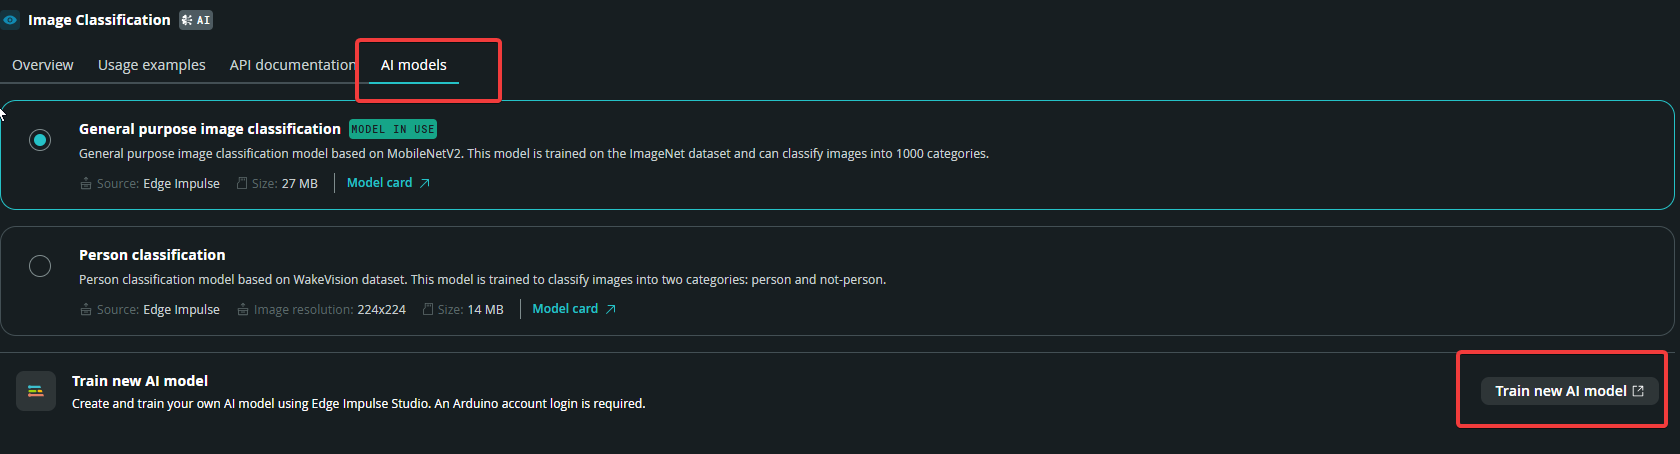
- Here you need to create your own account. Just log in with a Google account or another account.
¶ 2. Train the Model in Edge Impulse
¶ 1. Create a Project
- Create a new project in Edge Impulse.
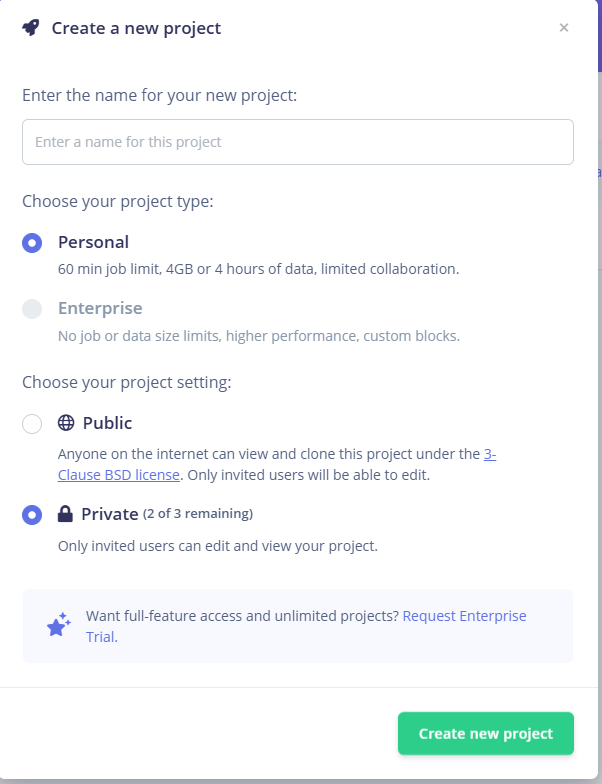
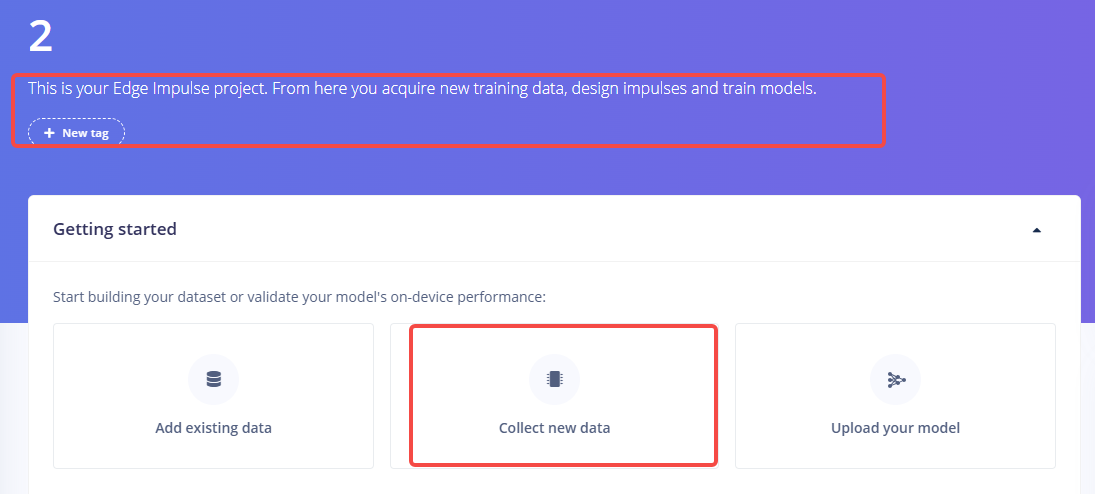
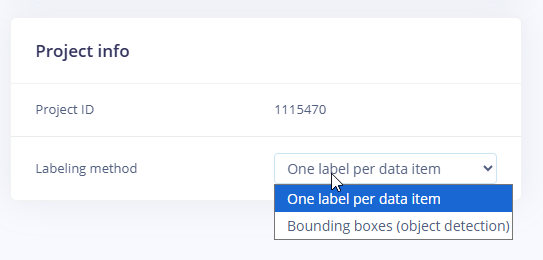
After creating it, the project does not have a property label at this point. You can add a label yourself, but this label is not the project's classification label. After uploading data, a pop-up window will appear, and at that point you need to select the project property, as shown in step 2 below.
¶ 2. Upload Data and Add Labels
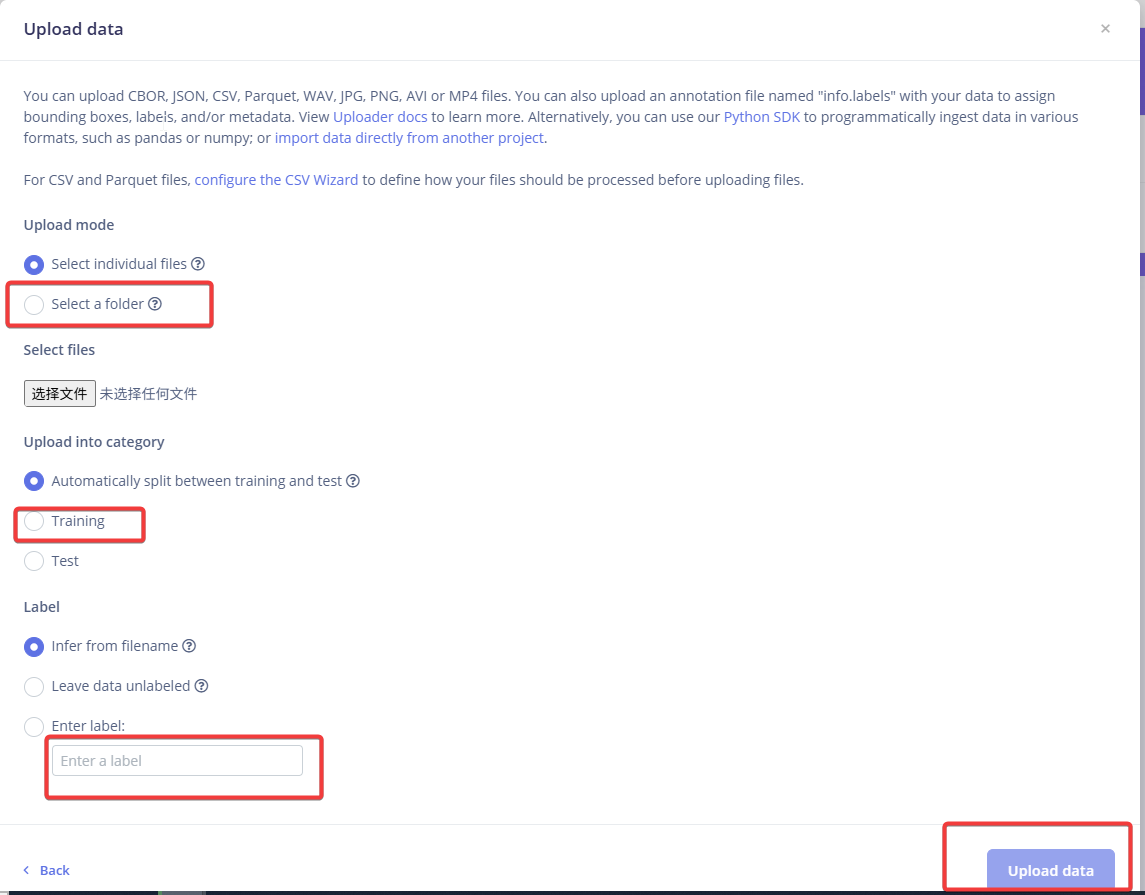
- Go to
Data acquisitionand clickUpload data. A remote upload option will pop up here for you to choose from. You can try it if needed.
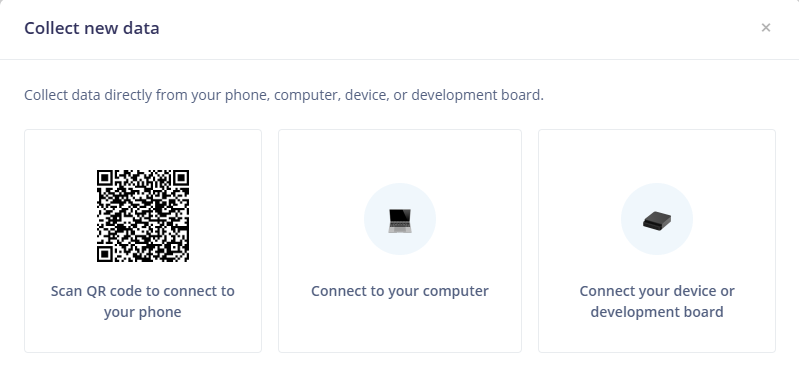
- After selecting files:
- For
Upload into category, selectTraining. - For
Label, selectEnter label, and manually enter the label name (e.g.,apple).
- For
- Click
Upload dataand confirm that theLABELScolumn in the list correctly displays the label.
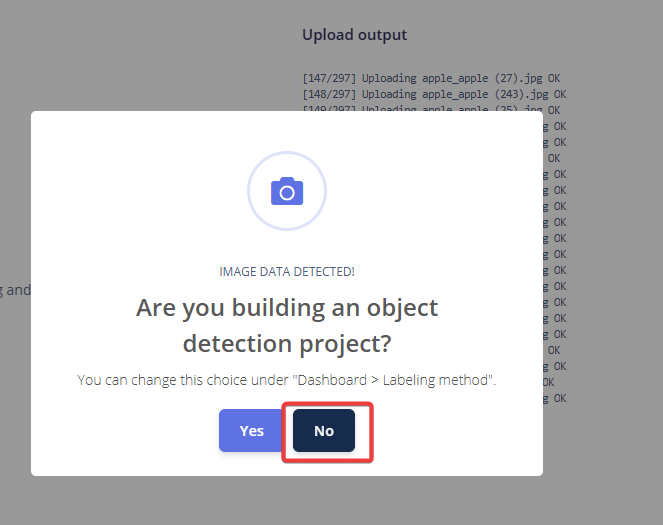
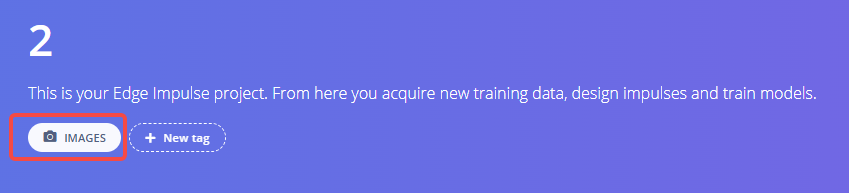
After clicking upload, a pop-up window will appear asking you to choose the project's classification. Please select No. At this point, your project label will change to the img type.
¶ 3. Design the Impulse
- Go to
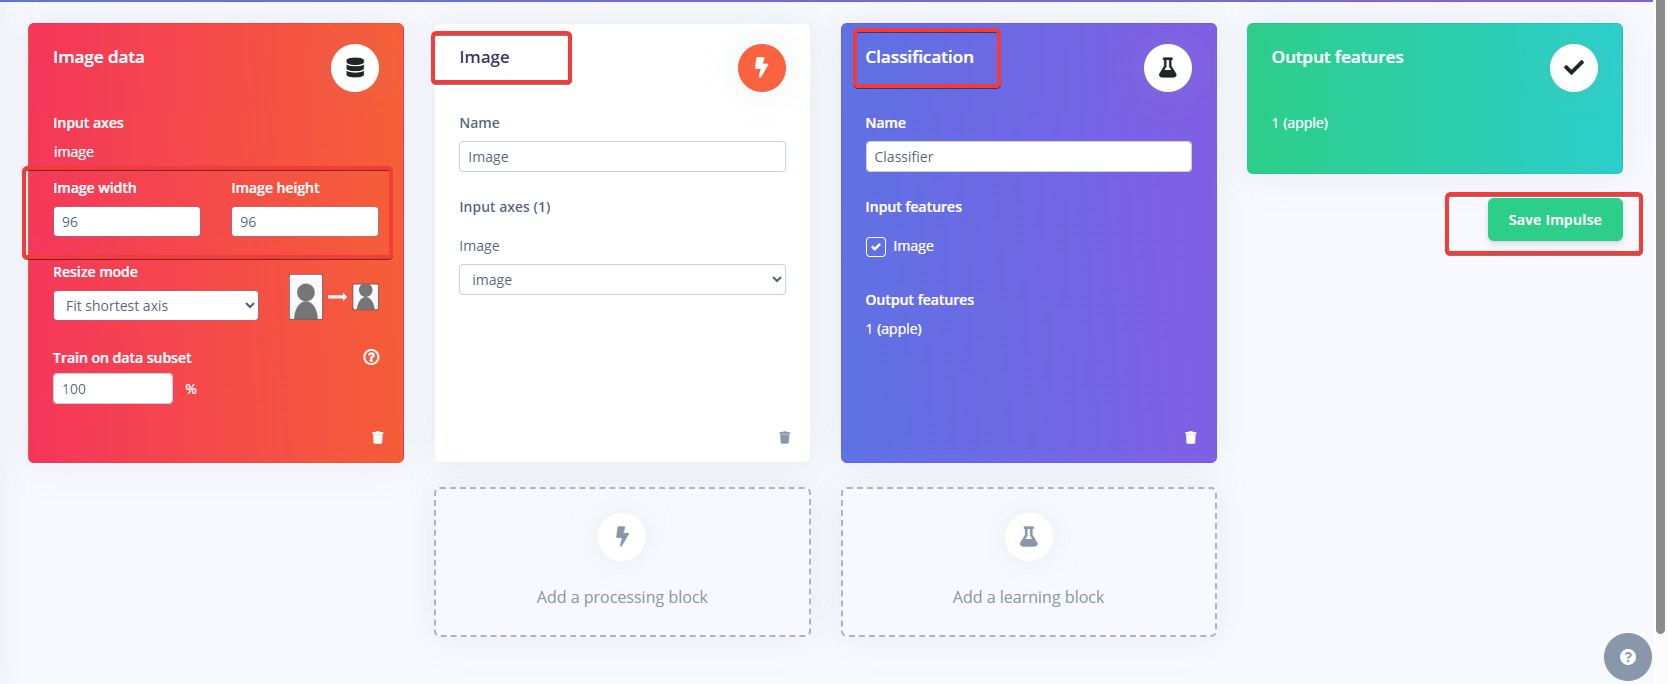
Impulse design→Create impulse. - Add the processing block
Imageand the learning blockTransfer Learning (Images). - It is recommended to set the image size to 96 or 160.
- Click
Save impulse.
¶ 4. Generate Features and Train
- Go to the
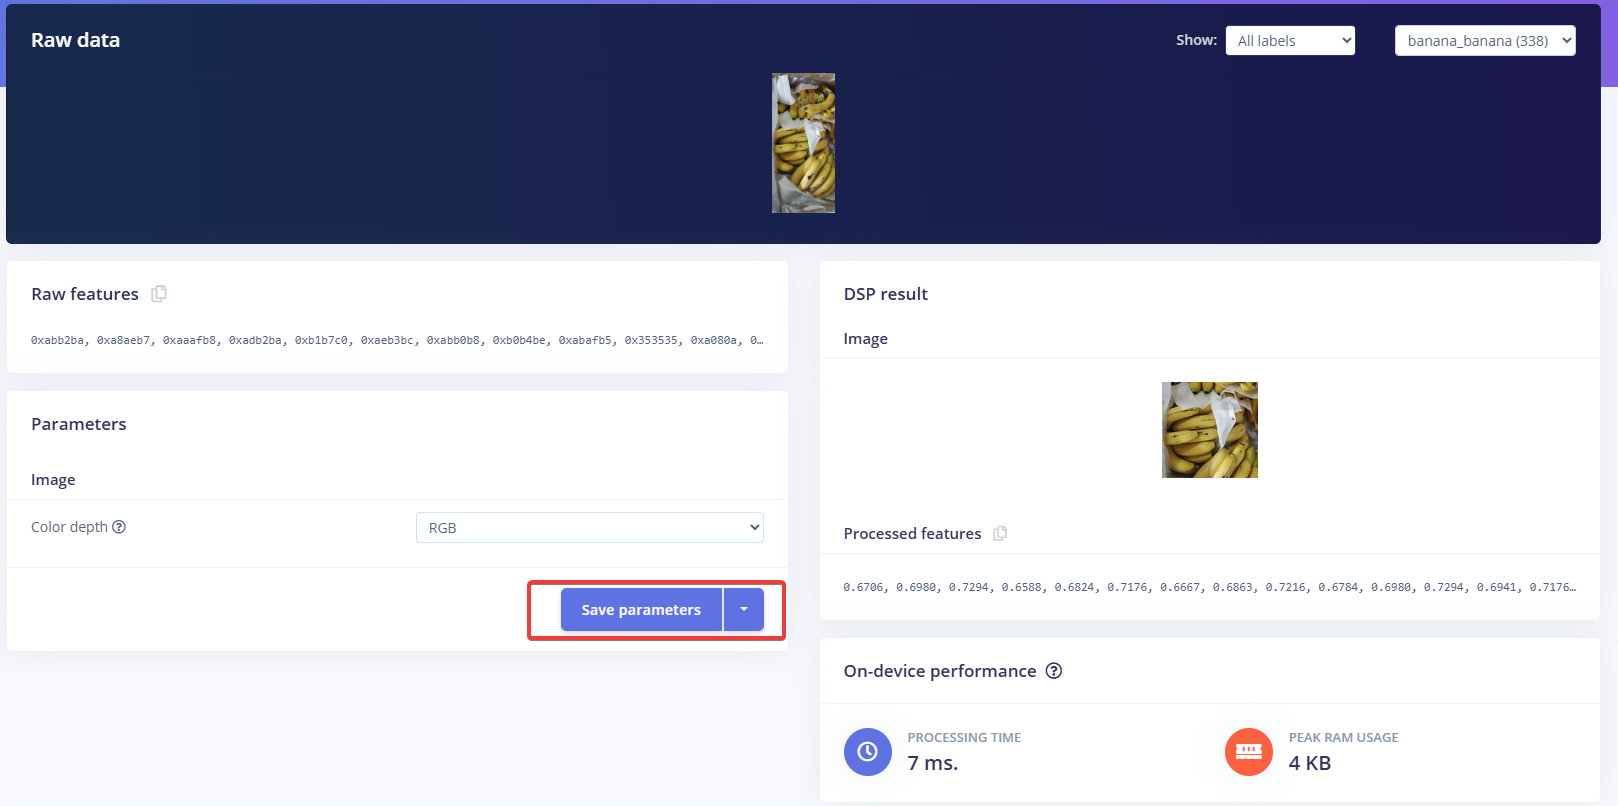
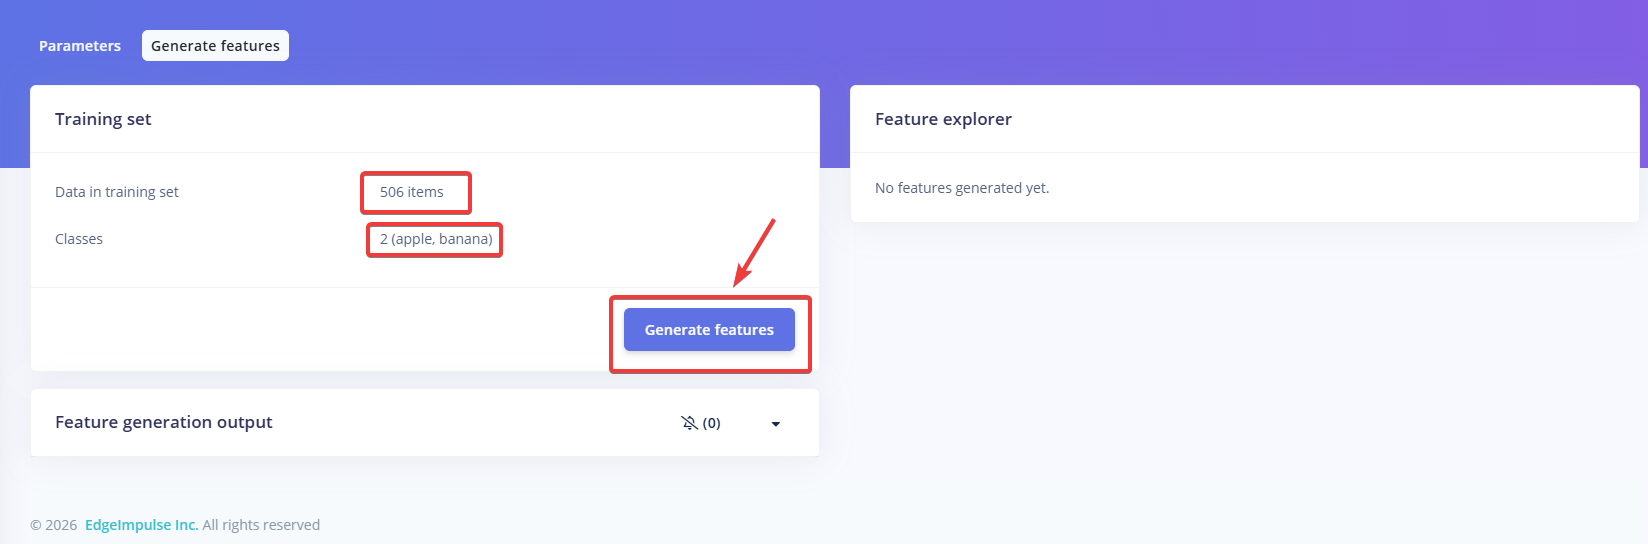
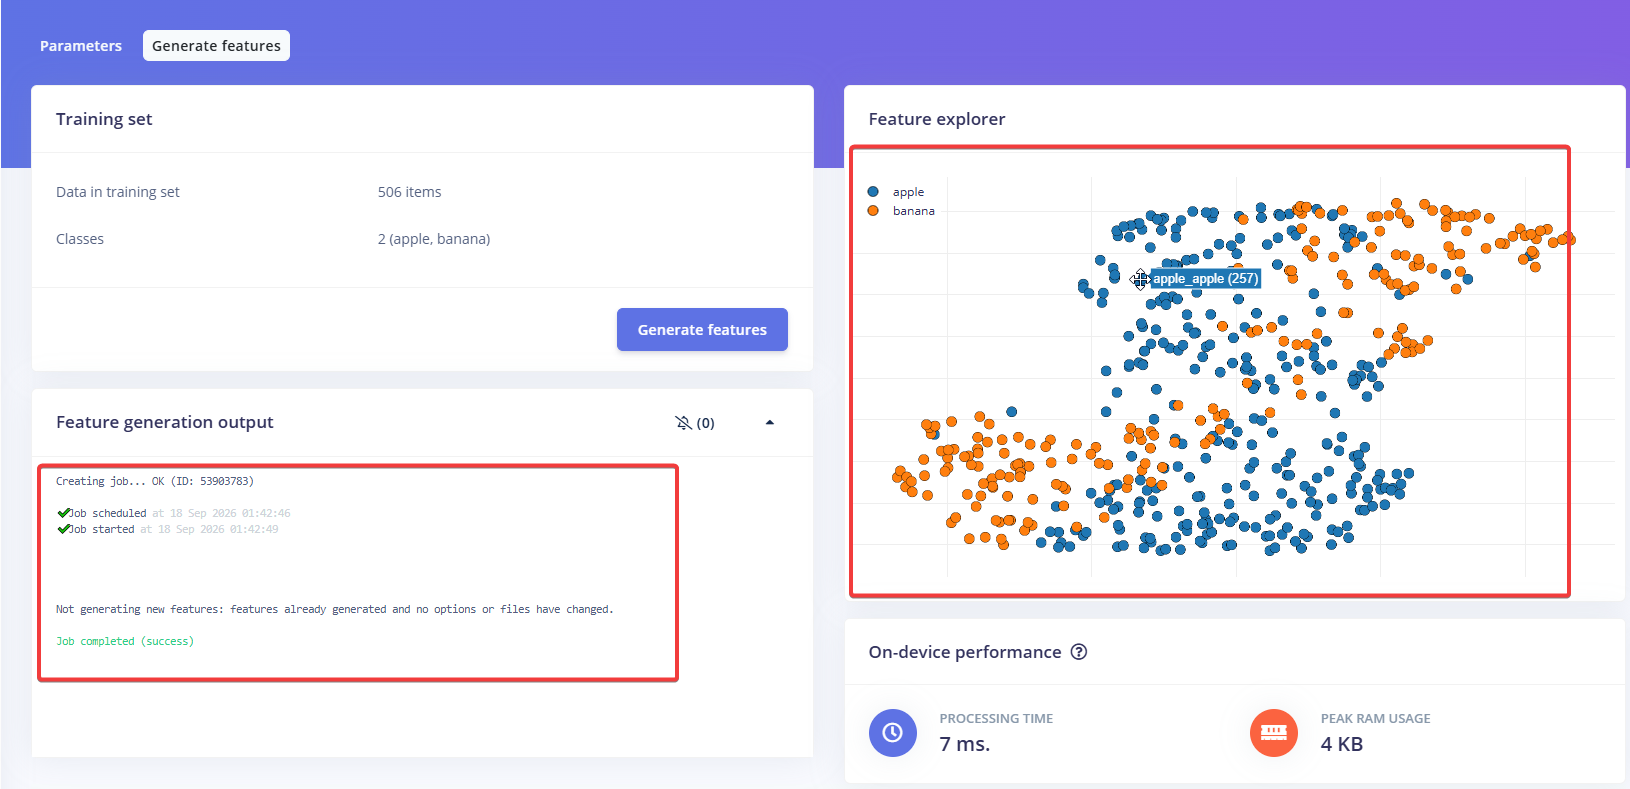
Imagepage, clickSave parameters, then clickGenerate features.
- Click
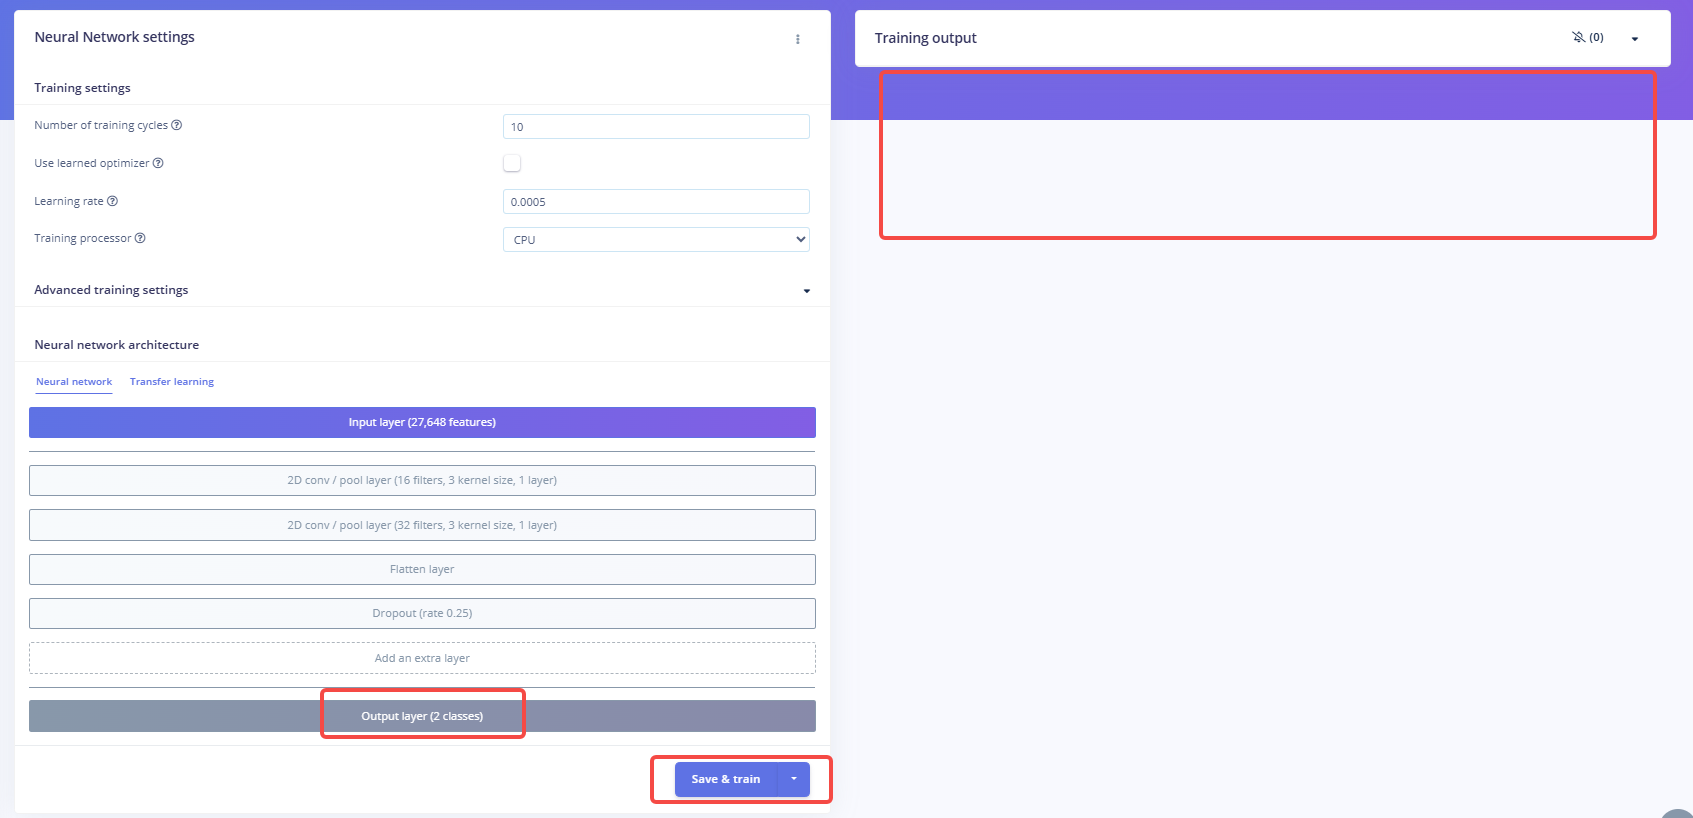
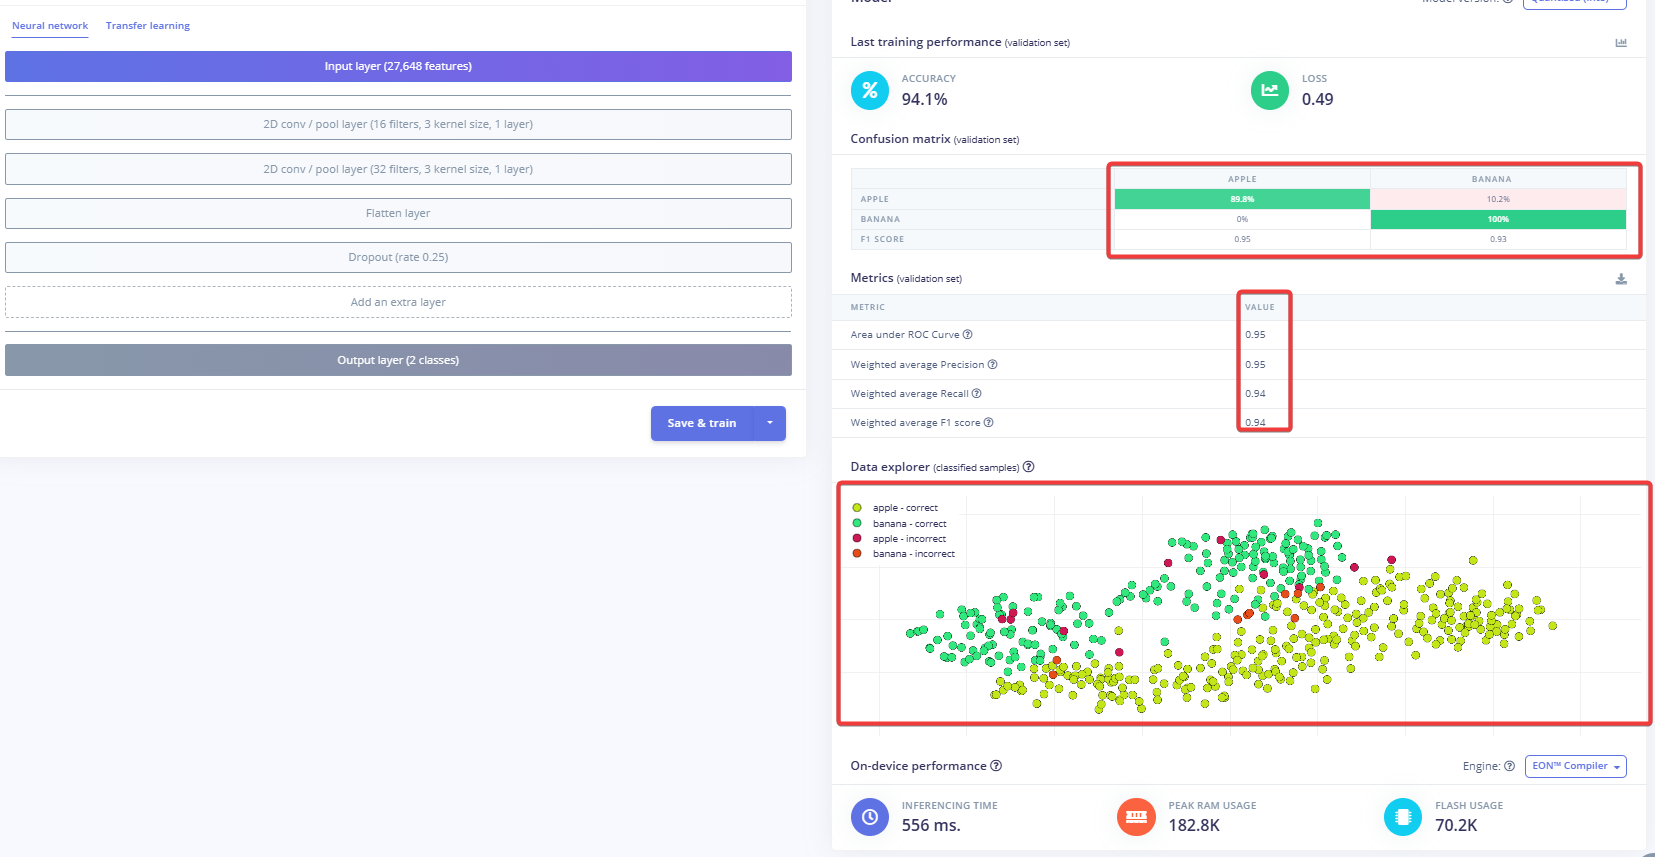
classifierto enter the training interface, and clicksave and train. Here you need to check whether the number of training categories matches the number of image categories you uploaded.
¶ 5. Build and Download the Model
- Go to the
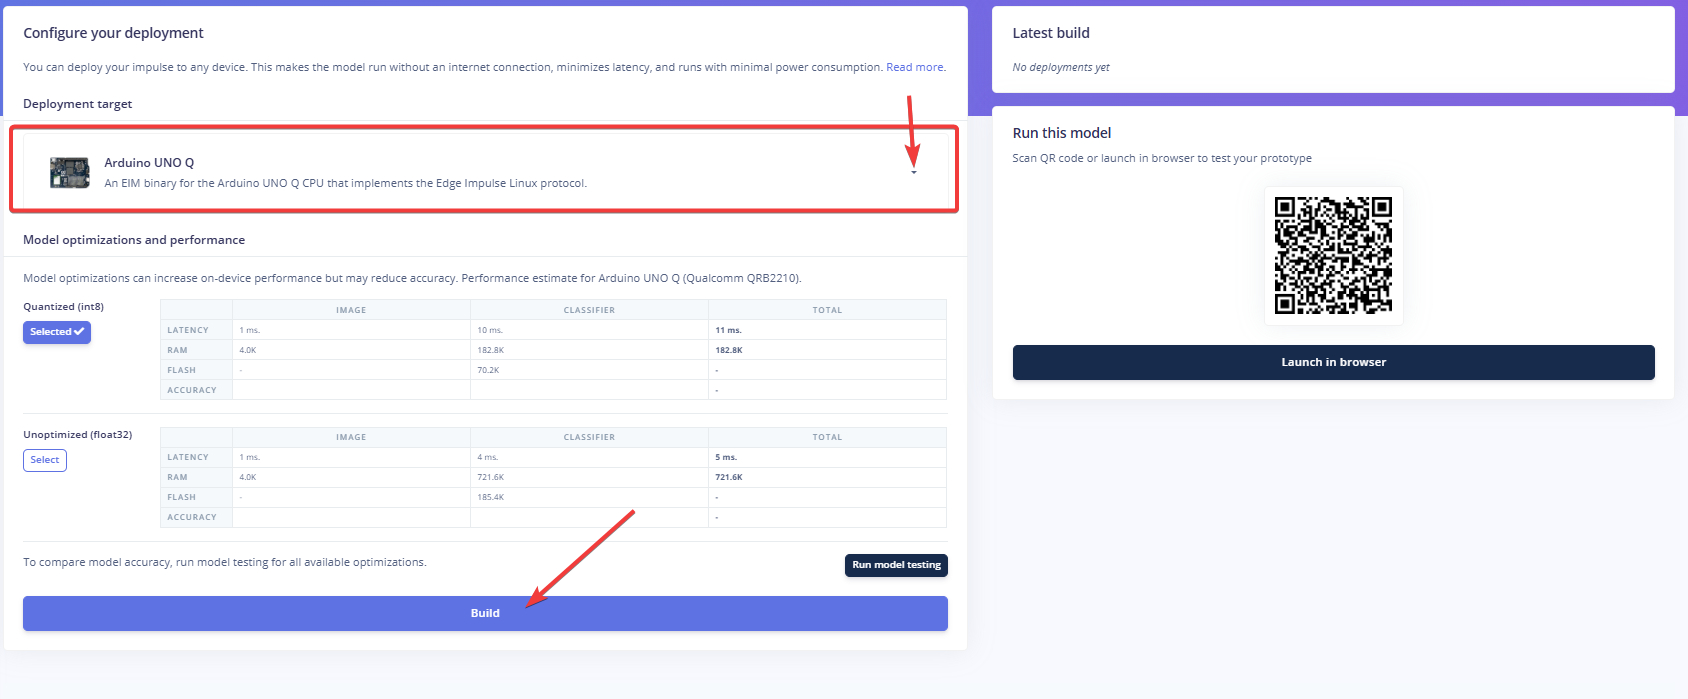
Deploymentpage and selectArduino UNO Qas the deployment target.
-
Click Build and wait for compilation to finish.
-
After successful compilation, a Built Arduino UNO Q model prompt will appear.
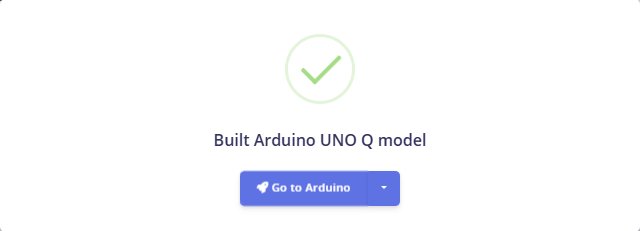
- Clicking Go to Arduino will pop up a webpage that redirects to Arduino App Lab. At this point, the webpage will directly download the generated .eim file to your local machine.

It is currently known that Arduino App Lab version 0.10.0 has a bug: the automatic model push link from the Edge Impulse web page when clicking Go to Arduino (formerly Install to board) is broken. It will only download the eim to your local computer, and will not automatically upload it to the UNO Q board. The model will also not automatically appear in the Bricks drop-down list. After the official fix, one-click import will be possible. As of the date this tutorial was written, this bug has still not been resolved.
¶ 3. Transfer the .eim File to UNO Q
On your computer's terminal (PowerShell or CMD), run:
scp "C:\Users\Admin\Downloads\your-model-file.eim" arduino@192.168.201.187:/home/arduino/
If the path contains spaces or special characters, be sure to wrap it in double quotes.
¶ 4. Install System Dependencies on UNO Q
After logging into UNO Q via SSH, run:
sudo apt update
sudo apt install -y python3-opencv portaudio19-dev unzip
¶ 5. Create a Virtual Environment
cd ~
python3 -m venv ~/ei_venv
source ~/ei_venv/bin/activate
After activation,
(ei_venv)will appear in front of the terminal prompt.
¶ 6. Install Python Packages
In the virtual environment, run:
pip install edge_impulse_linux -i https://pypi.python.org/simple
pip install opencv-python-headless pyaudio six numpy
¶ 7. Get the Official Example Scripts
¶ Option A: git clone directly on UNO Q
cd ~
git clone --depth 1 https://github.com/edgeimpulse/linux-sdk-python.git
--depth 1shallow clone reduces the chance of network interruption.
After cloning, the script is located at~/linux-sdk-python/examples/image-classification/classify-image.py.
If cloning is frequently interrupted, switch to Option B.
¶ Option B: Download the ZIP on your computer and transfer it
¶ B.1 Download the ZIP on your computer
- Visit in your browser:
https://github.com/edgeimpulse/linux-sdk-python - Click the green
Codebutton on the right →Download ZIP - You will get a file such as
C:\Users\Admin\Downloads\linux-sdk-python-master.zip. You can also click the blue button below to download it.
¶ B.2 Transfer to UNO Q
On your computer's terminal, run:
scp "C:\Users\Admin\Downloads\linux-sdk-python-master.zip" arduino@192.168.xxx.xxx:/home/arduino/
¶ B.3 Extract on UNO Q
cd ~
unzip linux-sdk-python-master.zip
mv ~/linux-sdk-python-master ~/linux-sdk-python
¶ B.4 Verify
The file placement hierarchy and filenames here may vary. It is recommended to use the cd + filename and ls commands to check layer by layer until you find the classify-image.py file.

¶ 8. Grant Execute Permission to the .eim File
chmod +x /home/arduino/your-model-file.eim
¶ 9. Run Image Classification Inference
Before running, you need to upload a validation image to UNO Q. You can upload it via SSH.
scp "C:\Users\Admin\Downloads\apple.jpg" arduino@192.168.xxx.xxx:/home/arduino/
cd ~/linux-sdk-python/examples/image-classification/
python3 classify-image.py /home/arduino/your-model-file.eim /home/arduino/test-image.jpg
Expected output:
MODEL: /home/arduino/your-model-file.eim
Loaded runner for "project ID / Impulse ID"
Result (5 ms.) apple: 0.89    banana: 0.11
⚠️ The path must be an absolute path. Do not use
~, otherwise you will get aModel file does not existerror.
¶ 10. Common Errors and Solutions
| Error | Cause | Solution |
|---|---|---|
No module named 'cv2' |
Missing OpenCV | pip install opencv-python-headless |
No module named 'pyaudio' |
Missing audio library | sudo apt install portaudio19-dev then pip install pyaudio |
No module named 'six' |
Missing six library | pip install six |
Model file ... is not executable |
No execute permission | chmod +x model-file.eim |
Model file does not exist |
Path uses ~ |
Use an absolute path /home/arduino/... |
unzip: command not found |
Missing extraction tool | sudo apt install -y unzip |
git clone interrupted |
Unstable network | Switch to Option B: local ZIP download |
Failed to resolve 'ei-classification-runner' |
Brick not declared in app.yaml |
Add arduino:image_classification to the bricks field in app.yaml |
¶ 11. Directory Structure Overview
/home/arduino/
├── ei_venv/                          # Python virtual environment
├── linux-sdk-python/                 # Official example scripts
│   └── examples/
│       └── image-classification/
│           └── classify-image.py
├── linux-sdk-python-master.zip       # Option B archive (optional)
├── your-model-file.eim               # Model file
└── test-image.jpg                    # Test image
¶ 12. Workflow Summary
Try the official Image Classification example in App Lab
   ↓
Create a project in App Lab → Enter Edge Impulse
   ↓
Create an Image Classification project in Edge Impulse
   ↓
Upload data and manually add labels
   ↓
Design Impulse → Generate features → Train model
   ↓
Select UNO Q in Deployment → Build → Download .eim
   ↓
scp transfer .eim to UNO Q
   ↓
apt install python3-opencv + portaudio19-dev + unzip
   ↓
cd ~ → Create venv virtual environment
   ↓
pip install edge_impulse_linux + opencv-python-headless + pyaudio + six + numpy
   ↓
Get the official example scripts (git clone or local ZIP download)
   ↓
chmod +x model file
   ↓
python3 classify-image.py model image (absolute path)
   ↓
Get classification result ✅