¶ Real-Time Camera Recognition
In the previous section, we completed static image classification. But static images can only verify the model's basic capability. The truly practical scenario is using a camera to recognize real objects in real time. This section will transition from static recognition to real-time camera recognition, and address the recognition accuracy and misjudgment issues encountered along the way.
¶ From Static Images to Camera
¶ 1. Review of the Previous Section
In the previous section, we completed:
- Training an image classification model on Edge Impulse
- Exporting the
.eimfile and transferring it to UNO Q - Using
classify-image.pyto classify static images
Static image recognition works normally, which means the model and inference pipeline are both functional.
¶ 2. Why We Need a Camera
Static images are only a verification tool. Real applications require real-time recognition of real objects. A camera can capture dynamic scenes, but it also introduces new problems:
- Lighting variations
- Angle variations
- Background interference
- Image quality differences
These all affect recognition performance. We'll solve them step by step.
¶ 3. Camera Recognition Program
Click the download button to download the code locally, then open the classify_always.py file to examine the code.
¶ 4. Code Configuration Explanation
MODEL_FILE = "/home/arduino/1-linux-aarch64-v9-impulse-#1.eim"
FRAME_WIDTH = 640
FRAME_HEIGHT = 480
FRAME_RATE = 10
DEFAULT_CAMERA_DEVICE = "/dev/video2"
CONFIDENCE_THRESHOLD = 0.80
WINDOW_WIDTH = 480
WINDOW_HEIGHT = 480
MODEL_INPUT_SIZE = 224
The configuration block at the beginning of the program determines the behavior of the model, camera, and recognition. Each item is explained below:
| Config Item | Meaning | Adjustment Suggestion |
|---|---|---|
MODEL_FILE |
Path to the .eim model file |
Must be changed to the actual model file name you transferred to UNO Q |
FRAME_WIDTH / FRAME_HEIGHT |
Camera capture resolution | 640×480 is recommended; too high will slow down inference |
FRAME_RATE |
Target frame rate | 10 is recommended; too high will cause visual delay |
DEFAULT_CAMERA_DEVICE |
Default camera node | The code dynamically detects first, falls back to this if detection fails |
CONFIDENCE_THRESHOLD |
Confidence threshold for outputting recognition results | 0.80 is recommended; too low causes false positives, too high causes misses |
WINDOW_WIDTH / WINDOW_HEIGHT |
Display window size | Only affects display, not recognition |
MODEL_INPUT_SIZE |
Model input size during training | Must match the setting in Edge Impulse (224) |
¶ 5. Upload and Run
Upload the script to UNO Q from your computer's terminal:
scp "C:\Users\Admin\Downloads\classify_always.py" arduino@your_ip:/home/arduino/your_path
Grant execution permission and run on the UNO Q terminal:
chmod +x /home/arduino/classify_always.py
source ~/ei_venv/bin/activate
python3 /home/arduino/classify_always.py
Note: Run the Python code in the UNO Q terminal. Do not use SSH commands, or errors may occur.
This assumes the file is saved in the arduino folder. If not, adjust the path accordingly.
The run command does not need an extra model path argument because the model path is already written in MODEL_FILE at the top of the code. If you want to specify the model at runtime, you can also use:
python3 /home/arduino/classify_always.py /home/arduino/your-model-file.eim
Both approaches work. The first one is recommended—the model path is written directly in the code, which is simpler and less error-prone at runtime.
¶ 6. Low Recognition Accuracy
After running, you'll see that the camera displays images normally and the model is performing inference, but the recognition results are very unstable:
- Recognition results jump around frequently when pointing at objects
- Slightly changing the angle or distance makes recognition fail
- Confidence is generally low, mostly below the 0.80 threshold
This is not a code problem. The model is seeing images that are too different from the training data. Let's go back to Edge Impulse and solve it from the data source.
¶ Adjusting Configuration on Edge Impulse
Before starting camera recognition, we need to go back to Edge Impulse and adjust two key settings.
¶ 1. Modify Input Size
Go to Impulse design → Image page and adjust Image width and Image height to:
- 224×224 (preferred)
- Or 160×160
Do not use excessively small sizes like 90×90, which will lose too much detail and cause low camera recognition accuracy.
¶ 2. Change Resize Mode to Squash
Also on the Image page, change Resize mode to Squash.
Squash means: directly stretch the image to the target size, without cropping or preserving aspect ratio.
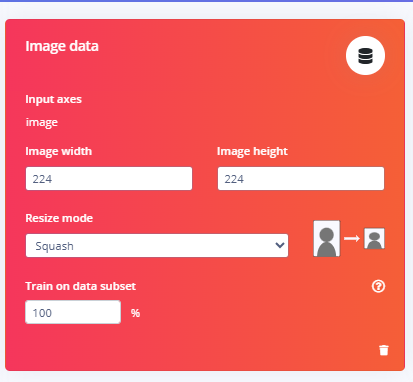
Why change to Squash?
- If using
Fit shortest axis, the image is first scaled by the shorter side and then center-cropped, which may crop out objects at the edges. - The code uses
cv2.resize()to directly stretch to the target size, which is already consistent withSquashprocessing.
¶ 3. Retrain and Export
After modifying, execute the following in order:
- Click
Save parameters - Click
Generate features - Go to the
Transfer LearningorClassifierpage, clickStart training - Go to the
Deploymentpage, selectArduino UNO Q, clickBuild - Download the new
.eimfile - Upload the new version file to UNO Q and grant permission:
chmod +x /home/arduino/your-model-file.eim - Open the program via
nano classify_always.pyand modifyMODEL_FILEto the new model path - Re-run the recognition program
¶ Why Is Recognition Accuracy Still Not High?
After deploying the new model to UNO Q and using the camera for real-time recognition, you may find: training accuracy was over 90%, but camera recognition performs poorly.
¶ 1. Problem Symptoms
- Recognition results are unstable when pointing at objects
- Slightly changing the angle or distance makes recognition fail
- Confidence is generally low
¶ 2. Root Cause
The images used during training differ too much from what the camera actually captures.
Specifically:
| Comparison | Training Images | Camera Images |
|---|---|---|
| Capture Device | Phone | USB Camera |
| Lighting | Bright and even | May be dim or yellowish |
| Background | Clean | Cluttered |
| Distance | Fixed | Varies |
| Angle | Single | Multiple |
The model performs well on the training set because it has "seen" those images. But what the camera captures is something it has never seen, so it cannot recognize it.
¶ 3. Solution Approach
If your dataset is large enough and covers a wide range of scenarios, this situation may not occur. How can you achieve camera recognition with a smaller dataset?
The answer is to use images actually captured by the camera as training data. This way, the model learns the real objects seen by the camera in the actual environment, rather than the "ideal images" from the dataset. This is an effective way to improve recognition accuracy with lower data collection cost.
¶ 4. Using the Camera to Collect Training Data
¶ 1. Collection Script (Run on Computer)
Run the get_image.py on your computer to capture training data with the camera. Before running, make sure your computer has a Python environment:
1. Install Python
Go to python.org to download the installer. During installation, make sure to check Add Python to PATH, otherwise you won't be able to call the python command directly from cmd later.
After installation, open cmd to verify:
python --version
If the version number is displayed, the installation was successful.
2. Install opencv-python
Run in cmd:
pip install opencv-python
3. Run the Collection Script
run it in cmd:
python "your_path\get_image.py"
Or cd to the script directory first and then run:
cd  your_path
python get_image.py
If you prefer using a Python IDE (such as PyCharm, VS Code, or Thonny), you can also open the script directly and run it. The effect is identical to running from cmd.
¶ 2. Key Operation Instructions
| Key | Action |
|---|---|
| a | Enter folder name in terminal, create a new folder (e.g., apple, banana) |
| b | Save current frame as photo, automatically numbered 0001.jpg, 0002.jpg |
| q | Finish current folder collection, ready to create the next one |
| e | Exit the program |
¶ 3. Photography Suggestions
Take 30–50 photos per category, covering different angles, distances, lighting, and backgrounds. If you want to further improve accuracy, you can increase to 150–200 photos:
- Angle: front, side, top-down, oblique
- Distance: close-up, medium shot, long shot
- Lighting: natural light, desk lamp, warm light, cool light
- Background: white paper, wooden desk, fabric, held in hand
After capturing, upload the photos to Edge Impulse as training data for the corresponding categories.
¶ 4. Retrain
Retrain with the newly collected images, export the .eim, and replace it in the recognition program. Camera recognition performance should improve significantly.
¶ 5. New Problem: Misjudgment When There Is No Target
After retraining, camera recognition improves, but you'll notice a new problem:
When the camera is covered or pointed at a blank scene, the model still outputs a category with high confidence.
¶ 1. Root Cause
The model has only learned two categories (e.g., apple, banana), so its output layer always has only these two nodes. When there is neither an apple nor a banana in the frame, the model has no "I don't know" option and can only pick one of the two categories to output.
¶ 2. Solution: Add a background Category
Create a new category in Edge Impulse called background, then:
- Use the camera to take 30–50 photos of scenes without target objects
- Include: pure black frames from covering the lens, blank walls, desktops, hands, other irrelevant objects
- Upload these images as the
backgroundcategory
After retraining, the model becomes a three-class classifier: apple / banana / background. When there is no target object in the frame, the model outputs background instead of forcing a guess between apple and banana.
¶ 6. Another Problem: Background Recognition Is Too Sensitive
After adding the background category, you may also find:
Recognition works when facing or close to objects, but shows background when slightly farther away.
¶ 1. Root Cause
This may be because when photographing target objects, you intentionally adjusted the camera angle to highlight object features while minimizing background in the frame. When photographing background, the frame contains many irrelevant object features. Therefore, during recognition, if the frame contains more background features, the model misjudges it as background.
- Clear object in frame → object category
- Prominent background features in frame → background
¶ 2. Solution: Expose Part of the Background During Photography
When photographing object images, intentionally expose part of the background.
Specifically:
| Category | Photography Method |
|---|---|
| apple | Take close-up, medium, and long shots; expose desktop, paper, or other backgrounds beside the object |
| banana | Same as above |
| background | Besides pure empty scenes, also capture scenes with small distant objects |
This way, the model learns a smoother boundary: if there is an object and also a background, it's still the object category; only when there is truly no target object in the frame is it classified as background. This also improves discrimination for distant or partially occluded scenes, and overall recognition accuracy will improve significantly.
¶ 3. Composition Suggestions
| Composition | Object Proportion | Description |
|---|---|---|
| Close-up | 70–90% | Object almost fills the frame |
| Medium | 40–60% | Object centered, part of background exposed |
| Long shot | 10–30% | Object small, background takes up most of the frame |
The background category should also cover:
- Pure empty scenes
- Small distant objects
- Cluttered backgrounds
- Covered lens
¶ 7. Troubleshooting and Common Questions
During actual operation, you may encounter situations that differ from this document. If you have other unsolvable problems, you can contact the customer service team. Here are some common questions to help you quickly identify issues.
¶ 1. Static Image Recognition Works, but Camera Recognition Is Poor
Cause: Training images differ too much from camera images; the model has never seen the scenes captured by the camera.
Solution: Recollect training data with the camera so that training data and deployment environment are consistent.
¶ 2. Camera Won't Open or Frequently Disconnects
Cause: UNO Q's USB power supply is limited; the camera may have insufficient power; or the device node drifts after plugging/unplugging.
Solution:
- Connect an external power supply to the USB hub
- The code uses
find_camera_device()for dynamic node detection (already implemented in the code) - Lower resolution or frame rate to reduce USB bandwidth pressure
¶ 3. Always Outputs a Category When There Is No Target
Cause: The model has no "unknown" option; the output layer always has only known categories.
Solution: Add a background category and train with images of covered lens, empty scenes, etc.
¶ 4. Distant Objects Are Also Classified as Background After Adding background
Cause: When photographing target objects, only the object was highlighted without showing background parts.
Solution: Expose part of the background when photographing object images; photograph target objects from multiple angles and distances to enrich the object's presentation in the frame.
¶ 5. Model File Cannot Be Executed
Cause: The .eim file lacks execute permission.
Solution:
chmod +x /home/arduino/your-model-file.eim
¶ 6. Code Cannot Find the Device After Changing Cameras
Solution: The code already uses find_camera_device() to dynamically iterate from video0 to video9 and automatically find a device that can read frames. This is already implemented in the code and requires no manual modification.
If the code still reports that no camera can be found, try running the program multiple times. If the problem persists after multiple runs, execute the following command in the UNO Q terminal to check the camera's name and node in the system:
v4l2-ctl --list-devices
The output will display something like:
USB Camera: USB Camera (usb-xhci-hcd.2.auto-1.3):
    /dev/video2
    /dev/video3
Different cameras have different device names. They may also appear as GENERAL / GENERAL - UVC or other names. Just focus on the /dev/videoX line.
After getting the actual node number (e.g., /dev/video2), open classify_always.py and change DEFAULT_CAMERA_DEVICE to the corresponding node:
DEFAULT_CAMERA_DEVICE = "/dev/video2"
Save and re-run the program. If the v4l2-ctl command is not found, you can install it first:
sudo apt install -y v4l-utils
¶ 7. Recognition Results Keep Jumping, Confidence Is Unstable
Cause: Lighting changes, blurry images, or objects being too small can all cause the model to hesitate.
Solution:
- Improve lighting to make objects bright and even
- Make objects occupy a larger proportion of the frame
- Check camera focus
- The code already includes a "best minus second-best ≥ 0.3" check (already implemented in the code) to filter out ambiguous results
¶ 8. Training Accuracy Is 100% but Actual Deployment Performance Is Poor
Cause: The dataset is too small or too similar; the model has "memorized" the training set and has poor generalization ability.
Solution:
- Increase the number of images per category
- Increase diversity in angle, distance, lighting, and background
- Ensure training and test sets come from different batches
¶ 8. Recognition Code Detailed Explanation
To make future maintenance and modifications clearer, here is a section-by-section explanation of the core logic of classify_always.py.
¶ 1. Model Loading
with ImageImpulseRunner(MODEL_FILE) as runner:
    model_info = runner.init()
    labels = model_info['model_parameters']['labels']
ImageImpulseRunner is responsible for loading the .eim file and communicating with the inference engine. init() returns model metadata, where labels are all category names from training, used later when printing recognition results.
¶ 2. Camera Auto Detection
def find_camera_device():
    for cam_id in range(10):
        ...
        if ret:
            return device
    return None
This code iterates from /dev/video0 to /dev/video9, trying to open and read a frame from each. The first device that can read a frame is selected. This way, no matter which USB port the camera is plugged into or which node it is assigned, it can be found.
¶ 3. Frame Rate Control
if next_frame > now():
    time.sleep((next_frame - now()) / 1000)
next_frame = now() + int(1000 / FRAME_RATE)
This logic limits the program's processing frame rate to no more than FRAME_RATE. Without this limit, the camera outputs at maximum frame rate, and UNO Q cannot keep up, causing visual delay to accumulate.
¶ 4. Preprocessing and Inference
frame_resized = cv2.resize(frame, (MODEL_INPUT_SIZE, MODEL_INPUT_SIZE))
img_rgb = cv2.cvtColor(frame_resized, cv2.COLOR_BGR2RGB)
features, cropped = runner.get_features_from_image(img_rgb)
res = runner.classify(features)
First resize the frame to the model input size (aligned with Edge Impulse's Squash), then convert from BGR to RGB. get_features_from_image converts the image into the feature format required by the model, and classify performs inference and returns results.
¶ 5. Result Filtering
if best_score >= CONFIDENCE_THRESHOLD and (best_score - second_score) >= 0.3:
Only when the highest confidence exceeds the threshold and the gap with the second-best is large enough is the recognition result output. This filters out ambiguous results when the model hesitates, reducing false positives.
¶ 6. Drawing on Frame
cv2.putText(display_img, text, (10, 30), ...)
cv2.rectangle(display_img, (x, y), (x + w, y + h), ...)
Classification models draw recognition result text in the upper-left corner; object detection models draw boxes and labels at detection positions.
¶ 7. Exception Recovery
if fail_count >= 30:
    cap.release()
    time.sleep(1)
    cap = open_camera()
    fail_count = 0
After 30 consecutive frame read failures, release the old object and re-detect the camera. This way, even if USB disconnects or the node drifts, the program can automatically recover.