¶ Fault Symptoms
- After the print is completed, there is no cured resin on the build plate/resin tank.
- When performing the LCD screen exposure test separately, the LCD screen cannot display any pattern.
¶ Required Tools
- 2.0 mm hex screwdriver
- Cable tie
- Sealed bag
¶ Troubleshooting Steps
¶ Restore Factory Settings
1.Power cycle the printer and retest LCD exposure.
2.If power cycling does not resolve the issue, perform the following on the touchscreen:
Settings → App Settings → Restore Settings to Factory Version
¶ Update Firmware
1.On the touchscreen, navigate to:Settings → Version Upgrade → Check for updates
2.Power cycle the printer, confirm the firmware update is successful, then retest LCD exposure.
¶ Inspect LCD Ribbon Cable Connector – Mainboard Side
1.Power off the printer and unplug the power cord.
2.Use the 2.0 mm hex screwdriver to remove the five screws securing the right side panel and remove the panel.
.png)
3.Remove the tape securing the LCD ribbon cable.
.png)
4.Release the latch and reseat the LCD ribbon cable.
.png)
.png)
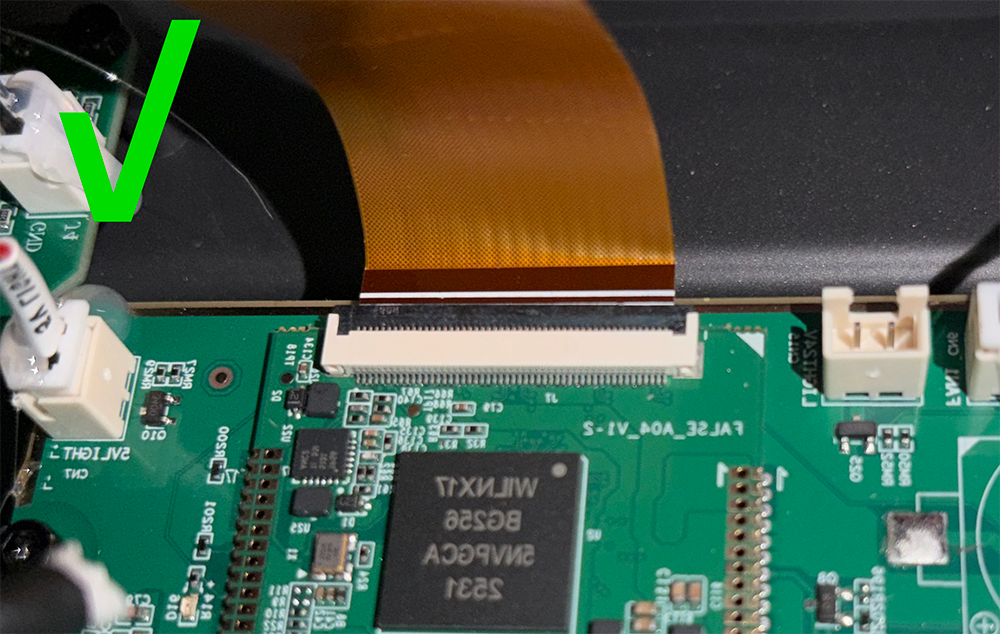
Ensure the white line side of the LCD ribbon cable faces upward
The LCD ribbon cable must remain parallel to the latch
The image below shows the appearance of the LCD ribbon cable when it is properly connected
¶ Inspect LCD Ribbon Cable Connector – LCD Side
1.Power off the printer and unplug the power cord.
2.Release the latch and disconnect the LCD ribbon cable from the mainboard side.
.png)
3.Lift the automatic feed assembly. To prevent resin leakage, seal the automatic feed assembly outlet with a sealing bag and zip tie.
.png)
4.Remove the two knurled handles.
.png)
5.Remove the resin vat.
.png)
6.Peel off the PET insulating film along the edge.
.png)
7.Use the 2.0 mm hex screwdriver to remove the ten screws securing the LCD.
.png)
8.Using the 2.0 mm hex screwdriver, gently lift the LCD screen from the upper-left corner.
.png)
9.Check whether the LCD-side ribbon cable is loose and reseat the LCD ribbon cable.
.png)
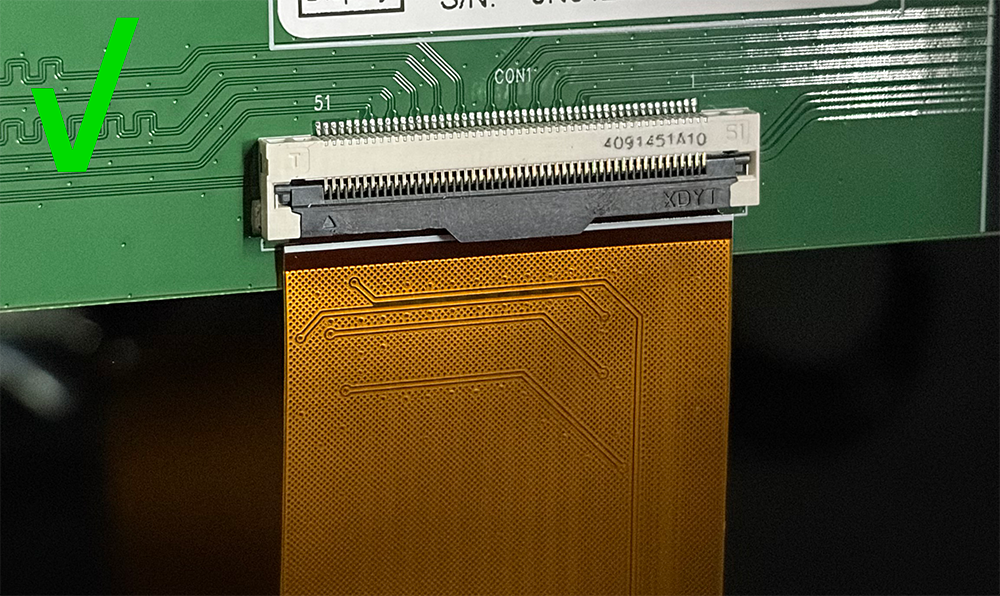
Ensure the white line side of the LCD ribbon cable faces upward
The LCD ribbon cable must remain parallel to the latch
The image below shows the appearance of the LCD ribbon cable when it is properly connected
¶ Contact Technical Support
If the LCD screen still cannot expose after completing the above troubleshooting steps, please provide the following information and contact Technical Support via email (3dp@elegoo.com):
- Take a photo of the LCD screen when it is not exposing and send the photo.
- Take a photo of the LCD screen during exposure and send the photo.
- Take a photo of the LCD screen ribbon cable on the motherboard side and send the photo.
- Take a photo of the ribbon cable on the LCD screen side and send the photo.
- Provide the printer order number (if the printer was purchased from an ELEGOO distributor, please provide the invoice instead of the order number).
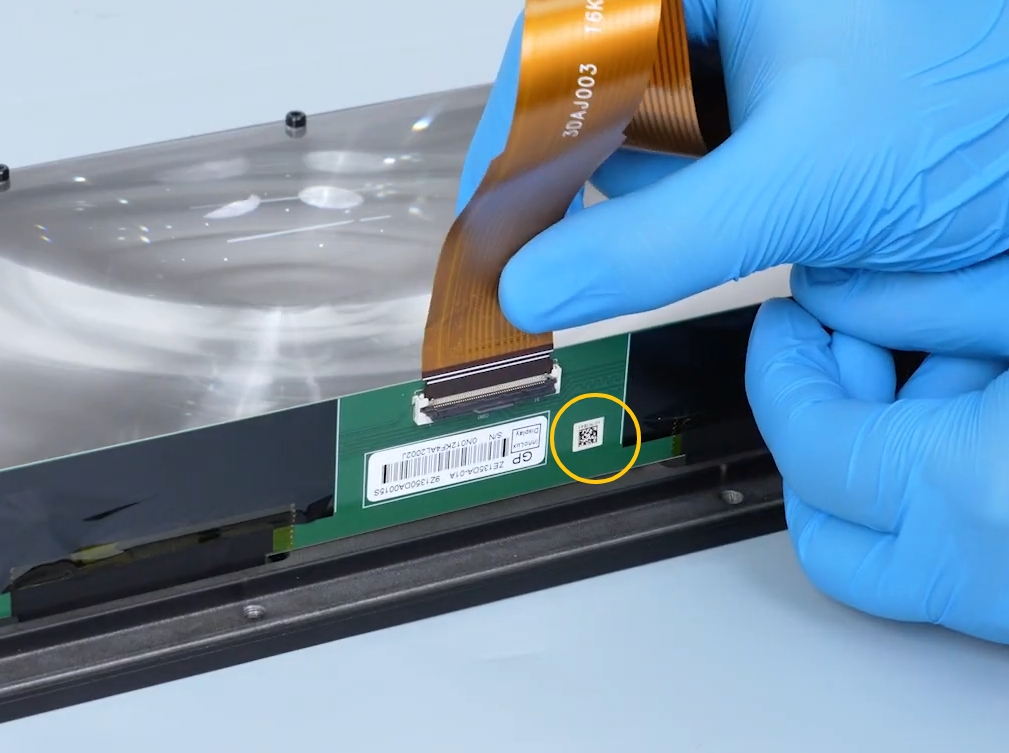
- Provide a photo of the QR code on the LCD screen side.The location and appearance of the QR code are shown in the image below.
Note: The LCD screen has a limited warranty. Resin leakage, damage to the scratch-resistant film, man-made damage, and collision damage are not covered under warranty. For detailed warranty terms, please refer to this link.
¶ Help Us Improve
If you have suggestions for improving this wiki article, submit them through the ELEGOO Official Feedback Channel.