¶ Signs of a Faulty Limit Switch
¶ Failure to Respond
The limit switch fails to respond promptly to the shutdown command when the moving parts of the Z-axis or X-axis reach a pre-set limit position.
It can result in the continuous movement of the moving parts, which will break through the normal stroke boundary, causing violent collisions between equipment parts and grinding sounds.
¶ Inconsistent Operation
The limit switch does not respond correctly to the forward motion command. It result in that the moving parts cannot continue to work according to the original operating procedure. For example, the moving parts can only perform the reverse retreat action.
¶ How to fix it
¶ Before printing
- Check the surface of the build plate and the inside of the resin tank and clean the dirt or excess cured resin.
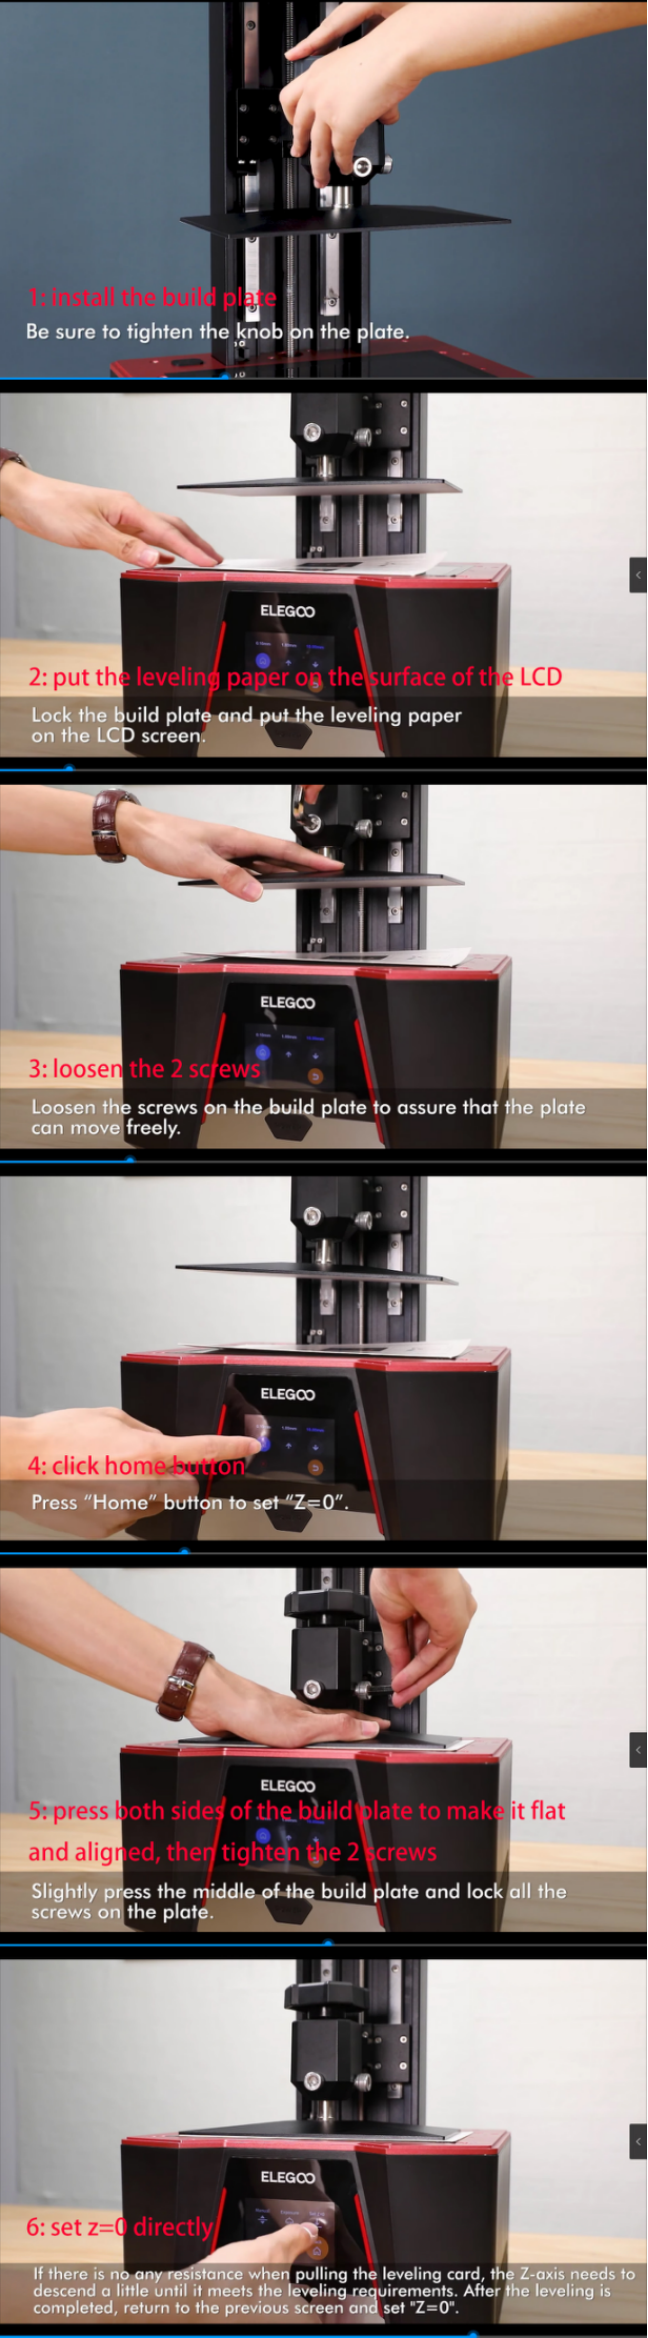
- Ensure that the leveling status of the build plate is in place.
¶ Firmware update
Update the firmware to the latest version. If the issue still occurs, try the following solutions.
¶ Check the connection cable between the photoelectric limit switch and the printer's motherboard
- Check whether the connection cable is damaged or broken, and if so, replace it with a new one.
- Re-plug the connection cable and check whether there is poor contact.
- Ensure that the connection cable is plugged in tightly and there is no loosening or oxidation.
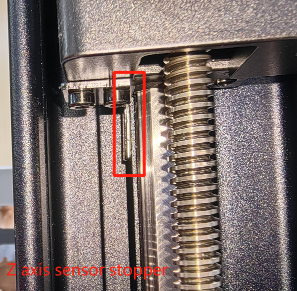
¶ Check the limit switch and the stop plate
If the positions are offset, the photoelectric limit switch may not be able to accurately sense the position of the build plate.
- Check whether the installation position of the limit switch and the stop plate of the limit switch is correct or deformed.
- Check whether the limit switch corresponds to the motion track of the build plate.
Make sure that the photoelectric limit switch is in the correct sensing position. Replace the old limit switch with a new one if the old one cannot be repaired.
¶ Check for obstructions
Check whether the sensing area of the photoelectric limit switch is blocked by the build plate, resin, sundries, etc. Clean the sensing area in time to ensure that it is unobstructed.
¶ Cleaning
If it is contaminated with dust or resin, the sensing sensitivity may be affected and the sensor will not be triggered.
- Visually inspect the If the sensing head of the photoelectric limit switch. Gently wipe the sensor head using a clean, soft cloth or cotton swab with a small amount of alcohol.
Note: Do not excert much force to the head. - Replace the old limit switch with a new one if there is a lot of resin leakage on the surface.
¶ Replacement test
- Use a suitable tool, such as an allen wrench to block the sensing area of the photoelectric limit switch.
- Observe whether the printer has a corresponding reaction, such as the printing platform stops moving, the indicator light lights up, etc.
If there is a reaction, it represents that the basic function of the photoelectric limit switch is normal. If there is no response, it may be that the photoelectric limit switch itself is faulty. It is necessary to replace the old photoelectric limit switch with a new one.
¶ Substitute test
If you have a spare photoelectric limit switch of the same model. You can replace it to the fault location and then test it.
If the photoelectric limit switch can be triggered normally after replacement, it represnets that the original photoelectric limit switch has been damaged. It is necessary to replace it with a new photoelectric limit switch.
If it still cannot be triggered after replacement, there may be a problem with the control board or other related parts.