¶ Issue Description
The touchscreen displays the following error:
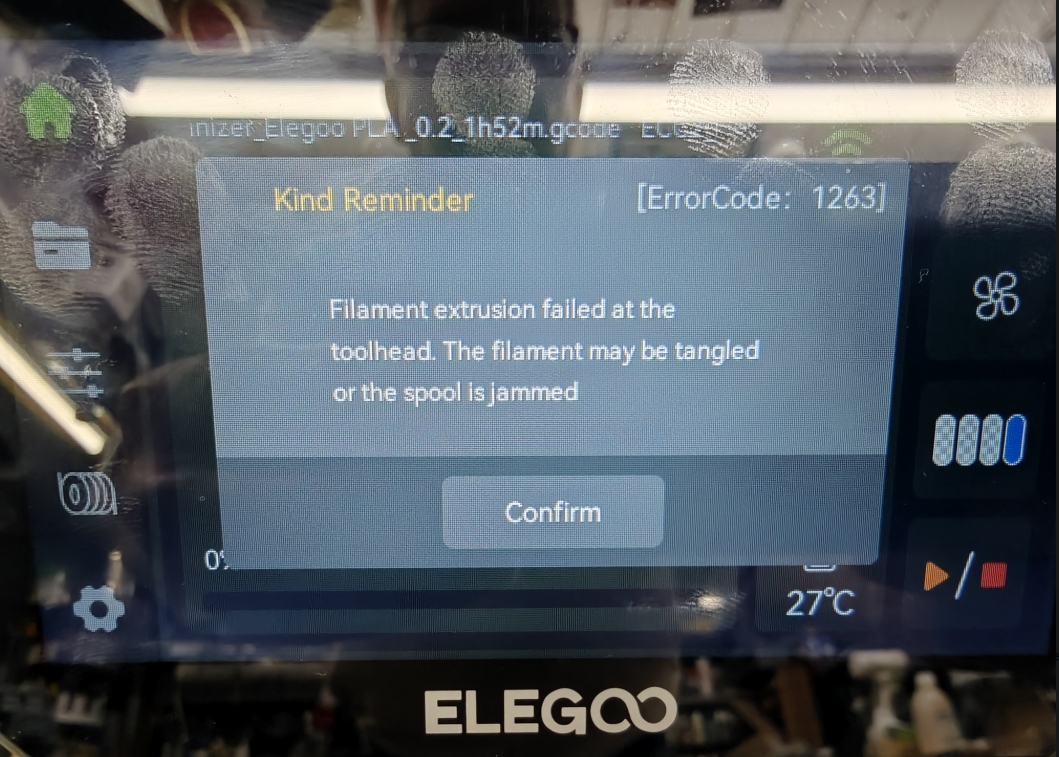
Error Code 1263: Filament extrusion failed at the toolhead. The filament may be tangled or the spool is jammed.
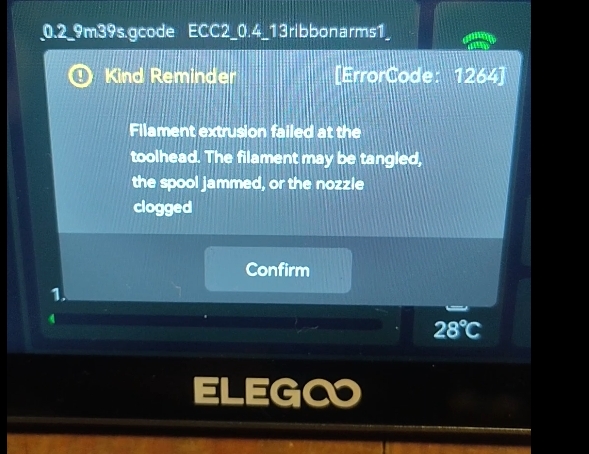
Error Code 1264: Filament extrusion failed at the toolhead. The filament may be tangled,the spool jammed, or the nozzle clogged.
¶ Possible Causes
- The filament is tangled or the spool cannot rotate freely.
- The filament diameter is outside the specified tolerance, causing it to jam in the feed channel.
- The CANVAS feed channel is obstructed.
- The CANVAS feeder assembly is incorrectly installed or misaligned.
- The toolhead gearbox tension is insufficient.
- Filament fragments are jammed inside the gearbox.
- The hotend filament path is blocked.
¶ Tools Required for Troubleshooting
- Digital caliper
- 2.0 mm hex screwdriver
- 2.5 mm hex screwdriver
- A nozzle cleaning needle
- A pair of heat-resistant gloves
¶ Troubleshooting Steps
¶ 1. Inspect the Filament and Spool
- Check whether the spool can rotate freely and whether the filament is tangled.
.png)
-
If the filament is tangled, hold the crossed section of the filament and carefully pass the filament end through the loop.
-
After resolving the tangle, reload the filament and test the printer again.
Always hold the filament end until it has been fully inserted into the CANVAS feed channel. Allowing the filament end to move freely may cause the filament to cross underneath another loop and become tangled.
- Measure the filament diameter using a digital caliper. If a caliper is unavailable, test the printer with another spool of filament.
How to Check the Filament Diameter
Straighten approximately 1 meter of filament and measure its diameter at at least five different points. Rotate the filament slightly between measurements because the filament may not be perfectly round.
All measurements should remain within the filament manufacturer’s specified tolerance. For example, ELEGOO PLA typically has a diameter tolerance of ±0.02 mm.
.png)
- If the filament diameter is outside the specified tolerance, replace the filament and test again.
- If the filament diameter is within the specified tolerance, proceed to Step 2.
¶ 2. Identify Where the Filament Is Stuck
- Release the PTFE tube as shown in the image.
.jpeg)
- Completely remove the filament from the feed channel.
.jpeg)
-
Reinsert the filament into the CANVAS feed channel and gently push it forward.
-
Check whether the filament can pass smoothly through the CANVAS feed channel and enter the PTFE tube.
.png)
- If the filament cannot pass through the CANVAS feed channel, proceed to Step 3.
- If the filament can pass through the CANVAS feed path but an error appears after you tap Load Filament on the touchscreen, proceed to Steps 4 and 5 for further troubleshooting.
Do not force the filament into the feed channel. Excessive force may break the filament inside the CANVAS unit and make the blockage more difficult to remove.
¶ 3. Check the CANVAS Feeder Assembly
- Refer to the following video from 00:00 to 01:19 to open the CANVAS enclosure:
https://www.youtube.com/watch?v=OLclADMW7Tc
-
Check whether there are any visible filament fragments or foreign objects inside the feed channel.
-
Ensure that the notches at the top of the feed/retract assembly are properly aligned.
-
Check that the feeder motor wiring is fully seated and correctly secured in the retaining clips, as shown in the reference images.
.png)
.png)
- Reinstall the CANVAS enclosure, reload the filament, and test the feed function again.
- If the filament can now pass through the CANVAS feed channel, but still fails at the toolhead, proceed to Step 4.
- If the filament still cannot pass through the CANVAS feed channel, do not force it forward. Record a video of the test result and contact Technical Support.
¶ 4. Test the Toolhead Gearbox and Adjust the Gear Tension
-
Power off the printer and unplug the power cord.
-
Using a 2.0 mm hex screwdriver, loosen the two screws at the marked locations.
.png)
- Remove the 4-in-1 filament hub.
.png)
- Open the toolhead front cover.
.png)
- Disconnect the model cooling fan connector.
.png)
- Using a 2.5 mm hex screwdriver, remove the screws securing the hotend.
.png)
- Carefully pull the hotend downward without pulling or damaging its wiring.
.png)
Support the hotend during the following test. Make sure the hotend and its wiring remain clear of the build plate, belts, and other moving components.
- Insert a straight piece of filament into the marked guide hole.
.png)
-
Make sure no tools or loose parts are inside the printer. Reconnect the power cord and power on the printer.
-
On the touchscreen, go to Control → Prepare, and then press the ▽ button to drive the extruder gears.
Do not use the Load/Unload Filament function in the Filament menu.
This function may trigger the toolhead homing sequence. Because the hotend is currently unsecured, toolhead movement may damage the hotend, its wiring, or the PEI build plate.
.png)
- Check whether the filament is successfully extruded from the opening below the gearbox.
.png)
¶ If the Filament Is Extruded Successfully
-
Set the heating of the hotend on the touch screen. The temperature should be slightly higher than the nozzle profile temperature.
-
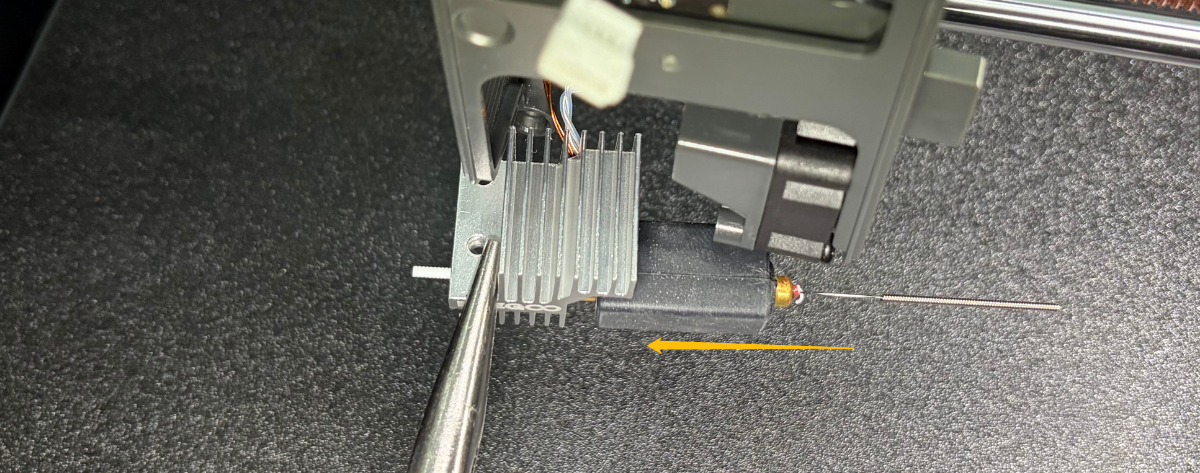
Once the set temperature has been reached, gently push the unclogging tool into the nozzle orifice in the filament feeding direction to dislodge any stuck filament from the hot end.
Warning: Always wear heat-resistant gloves to prevent burns.
¶ If the Filament Is Not Extruded
-
Power off the printer and unplug the power cord before continuing.
-
Remove the screw at the marked location and detach the toolhead frame.
.png)
-
Locate the spring tension adjustment screw.
-
For this gearbox mechanism, turn the adjustment screw counterclockwise slightly to increase the pressure applied to the drive gears.
.png)
.png)
Adjust the screw in small increments. Do not overtighten it. Excessive gear pressure may deform the filament, increase motor load, or cause additional feeding problems.
- Reinstall the toolhead frame temporarily and repeat the gearbox extrusion test.
- If the filament can now be extruded, power off the printer and fully reassemble the toolhead.
- If increasing the gearbox tension does not resolve the issue, filament may be jammed inside the gearbox. Proceed to Step 5.
¶ 5. Inspect the Gearbox Interior
This step continues from Step 4. If the hotend has already been lowered, do not repeat the same disassembly operation.
-
Power off the printer and unplug the power cord.
-
Disconnect the two connectors at the marked positions.
.png)
- If the hotend is still installed, remove the two screws securing it and carefully lower the hotend.
.png)
- Remove the two screws securing the five-way bracket.
.png)
- Remove the screws from both sides of the gearbox.
.png)
.png)
- Remove the screw securing the cutter and spring. Then carefully remove the spring and cutter.
The cutter contains a sharp blade. Keep your fingers away from the blade edge and handle the cutter by its non-sharp surfaces.
.png)
- Remove the three screws at the bottom of the gearbox and detach the gearbox rear cover.
.png)
-
Remove the gears.
-
If the gears are difficult to remove, slightly loosen the screw in the upper-left corner before trying again.
.png)
- Inspect the marked areas for filament debris, broken filament, or other material that may obstruct filament movement.
.png)
- Remove any loose filament fragments.
Do not scratch the feed channel or damage the gear teeth while removing debris. Do not use excessive force if a fragment cannot be removed easily.
-
Before fully reassembling the gearbox, reinstall the gears in their correct positions.
-
Insert a piece of filament and manually rotate the gears to confirm that the filament can move smoothly through the gearbox.
.gif)
- If the gears can move the filament smoothly, reassemble the gearbox and toolhead in the reverse order.
- If the gears remain stuck, cannot grip the filament, or have visible damage, stop using the printer and contact Technical Support.
Before powering on the printer, confirm that:
1.All screws have been reinstalled.
2.The cutter and spring are installed correctly.
3.All electrical connectors are fully seated.
5.The hotend is securely installed.
6. No tools or loose parts remain inside the printer.
After reassembly, reload the filament and test the printer again.
¶ Still Having Issues?
Please contact Technical Support at 3dp@elegoo.com and provide the following information:
- A video showing the complete process leading to the error.
- A video showing the filament feed test results.
- The printer firmware version.
- Photos of the CANVAS feeder assembly and toolhead gearbox, if they were inspected.
- The printer serial number—the code printed on the white label near the power button.
¶ Help Us Improve
If you have any suggestions for improving this wiki article, please submit them through the ELEGOO Official Feedback Channel.