¶ Introduction
In this chapter you will learn the principle of penguin bot playing music and how to program it to switch music.
¶ Principle of Penguin Bot Playing Music
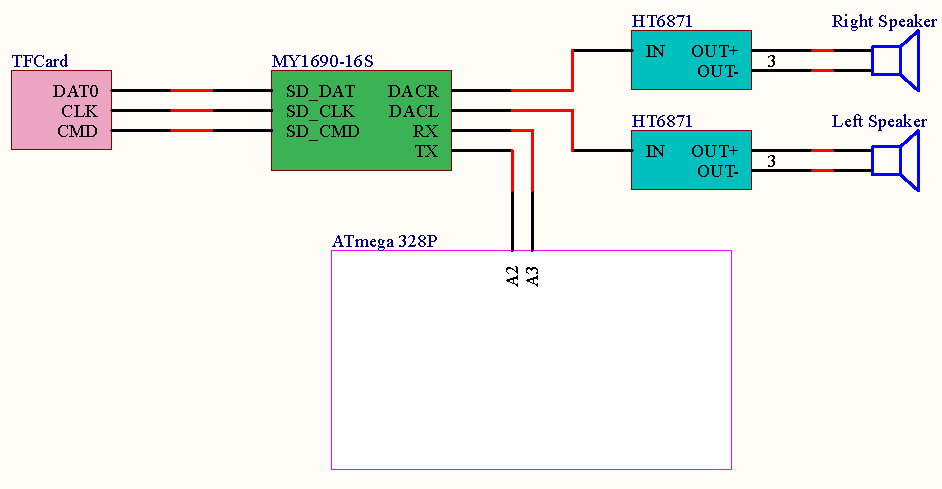
Schematic Diagram
¶ Components needed to play music
• TF Card: save music files
• MY1690-16S audio decoding chip: audio processing center, receive control signal of MCU and decode the audio files in SD card then output audio signal to the operational amplifier
• Atmega328P MCU: play music like switching music and control the volume
• Ht6871 power amplifier chip: receive signal of decoding chip then amplify and output it to the speaker
• Speaker: play the audio signal
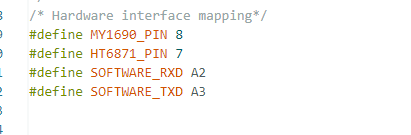
Now you have a basic understanding of each component’s function, what you need to do is to program Atmega328P MCU to control music playing. Atmega328P MCU connects to MY1690-16S Serial Port via Pin A2 and A3, which means you need to set A2 and A3 as software serial port as to communicate with MY1690-16S. Our program used NeoSWSerial libraries as software communication serial port to control music playing and since we’ve already written the underlying program for music playing so you only need to call in the function of MP3 class to play music.
Open the play music folder under the current path, then open the corresponding .ino file inside this folder
At the beginning of the code file are the included libraries, followed by the pin definition of the sound device, as shown in the picture below.
Scroll down the code, you will see several custom functions. Details are as follows:
First, the delays function is defined to implement millisecond-level delay by cyclically calling delay(1).
Next is the MY1690_16S class, the core driver class for MP3 playback. This class is instantiated and renamed as mp3 in the program. You can call various built-in methods of this class via mp3 later, such as mp3.playsong(1,20) used in the setup function.
Since the loop function is empty in this program, all MP3 playback operations are completed by calling member functions of the mp3 class inside the setup function.
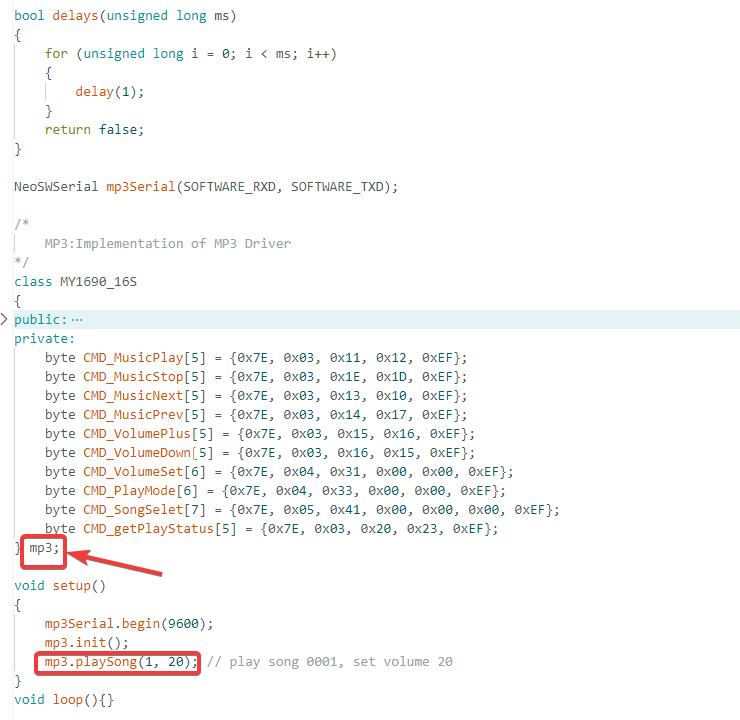
Next, check the internal definitions of the MY1690_16S class. This class encapsulates ten functional functions, among which playsong serves as the core playback function.
Its execution process is as follows:
- Set the playback volume
- Configure the playback mode
- Assign the serial number of the target audio file
- Calculate the checksum of the command
- Send the complete playback command via serial port
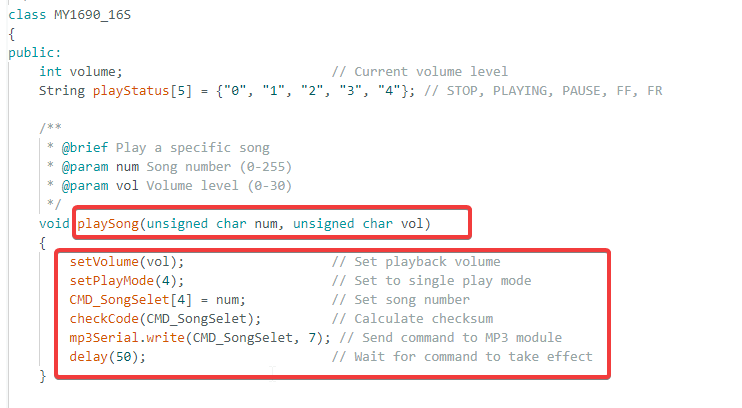
The specific definitions of each function are shown below. You can refer to the comments in the code to understand each function, or try to modify the code by yourself for debugging and testing different effects.
String getPlayStatus()
{
mp3Serial.write(CMD_getPlayStatus, 5); // Send status query command
delay(50); // Wait for response
return getStatus(); // Read and return status
}
String getStatus()
{
String statusMp3 = "";
while (mp3Serial.available()) // Read all available bytes
{
statusMp3 += (char)mp3Serial.read(); // Append each byte to string
}
return statusMp3;
}
void stopPlay()
{
setPlayMode(4); // Set to single play mode
mp3Serial.write(CMD_MusicStop, 5); // Send stop command
delay(50); // Wait for command to take effect
}
void setVolume(unsigned char vol)
{
CMD_VolumeSet[3] = vol; // Set volume value in command
checkCode(CMD_VolumeSet); // Calculate checksum
mp3Serial.write(CMD_VolumeSet, 6); // Send volume command
delay(50); // Wait for command to take effect
}
void volumePlus()
{
mp3Serial.write(CMD_VolumePlus, 5); // Send volume up command
delay(50); // Wait for command to take effect
}
void volumeDown()
{
mp3Serial.write(CMD_VolumeDown, 5); // Send volume down command
delay(50); // Wait for command to take effect
}
void setPlayMode(unsigned char mode)
{
CMD_PlayMode[3] = mode; // Set mode value in command
checkCode(CMD_PlayMode); // Calculate checksum
mp3Serial.write(CMD_PlayMode, 6); // Send mode command
delay(50); // Wait for command to take effect
}
void checkCode(unsigned char *vs)
{
int val = vs[1]; // Initialize with data length
int i;
for (i = 2; i < vs[1]; i++) // XOR all data bytes
{
val = val ^ vs[i];
}
vs[i] = val; // Store checksum in last position
}
void ampMode(int p, bool m)
{
pinMode(p, OUTPUT); // Set pin as output
if (m)
{
digitalWrite(p, HIGH); // Enable amplifier
}
else
{
digitalWrite(p, LOW); // Disable amplifier
}
}
void init()
{
ampMode(HT6871_PIN, HIGH); // Enable audio amplifier
stopPlay(); // Ensure stopped state
volume = 15; // Set default volume
}
Note that the following are the MY1690-16S communication commands, which are used to configure various playback statuses of the device.
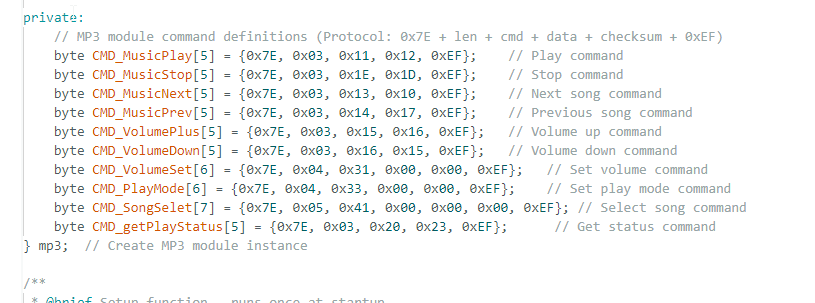
Since the underlying program has been written, the only program you need to write is”MP3.playSong(1, 20);”.
There are 2 parameters of Play Song. One is to select the serial number of music file from 1-1000,which needs to be preset in TF card like 0001 represents the first song and 0002 represents the second song and so on. The other parameter is volume which can be set from 0 to 30.
So if you want to play the second song at the highest volume, what should you would you need to do? Well, the answer is very simple.
- Copy a music file into TF card
- Name it as 0002.mp3
- then find ”MP3.playSong(1, 20); in above codes
- modify it as ”MP3.playSong(2, 30);