¶ Obstacle-avoidance-TB6612
In this lesson, we will teach you how to achieve the Obstacle-avoidanceMode of the Smart Robot Car and make it change the moving directionwhen encountering obstacles.
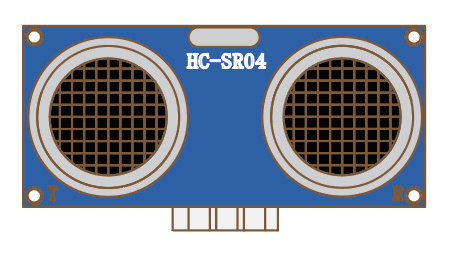
In our kit, the Obstacle-avoidance Mode is implemented with theultrasonic module. The principle of ultrasonic distance measurement is thatthe transmitter emits ultrasonic waves in a certain direction and startstiming at the same time of the launch moment. The ultrasonic waves travelthrough the air and returns immediately when encountering obstacles.Then the ultrasonic receiver stops timing immediately when receiving thereflected waves. According to the recorded time and the known conditionthat ultrasonic propagation speed in the air is 340m/s, the distance betweenthe ultrasonic module and the obstacle can be obtained.
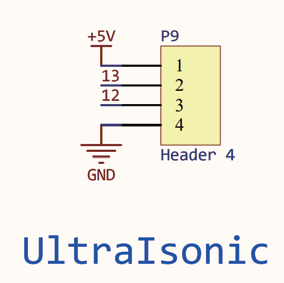
It can be seen from the figure that the ultrasonic moduleis connected to D12 and D13 on the UNO board.
Then please open Demo1:
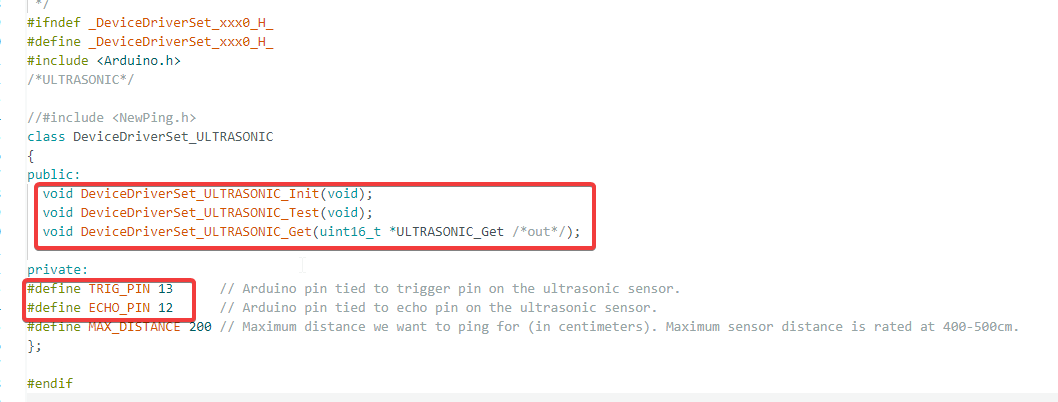
First, check the declarations in the header file (.h). As shown in the figure, this class declares three member functions and three member variables. The functions are used for initialization, testing and data acquisition. It also defines two pin interfaces of the ultrasonic sensor and the maximum detection distance.
After understanding the general function declarations, we will next look at the corresponding function definitions. First, let’s examine the initialization function to see which data it initializes.
As shown in the figure, this function configures the pin modes for the ultrasonic sensor: it sets the ECHO pin as INPUT and the TRIG pin as OUTPUT.

Next, let's examine the test function.
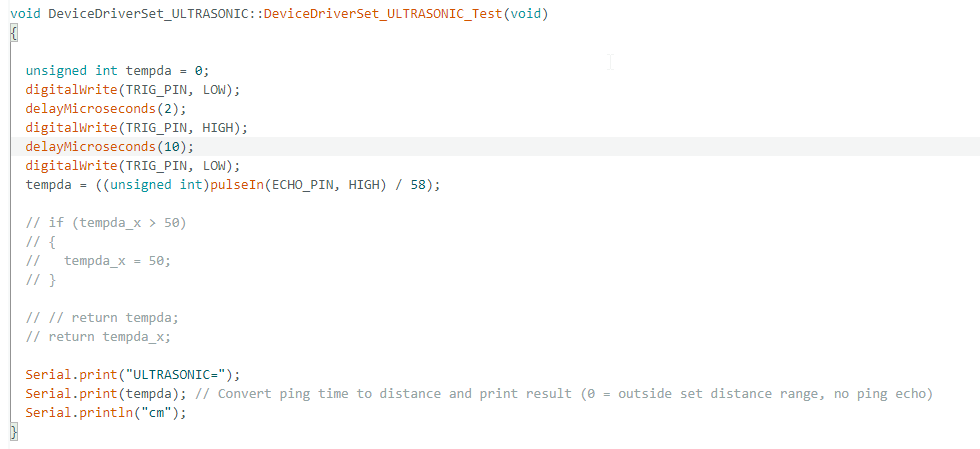
As shown in the figure:
-
first, pull the TRIG pin LOW to clear any residual signals and ensure reliable triggering.
-
Then pull the TRIG pin HIGH to start the measurement.
-
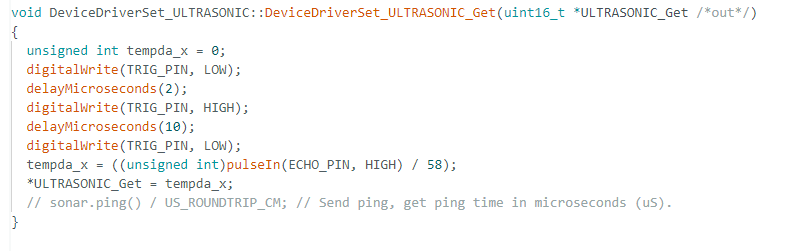
After that, pull it LOW again to finish the trigger pulse.Next, use the pulseIn function to measure the echo signal, calculate the actual distance, and print the final distance value to the serial console.
Next is the get()function.
Its core function is to obtain the distance value measured by the ultrasonic sensor and return the result to the caller via a pointer parameter.
It is similar to the test function but different in implementation: the get function accepts a pointer "*" as its parameter and passes the calculated value to the caller through the pointer, allowing the caller to use the value directly, instead of printing it directly to the serial console.
In the demo1.ino file, you can freely read the measured values of the ultrasonic sensor after initialization.
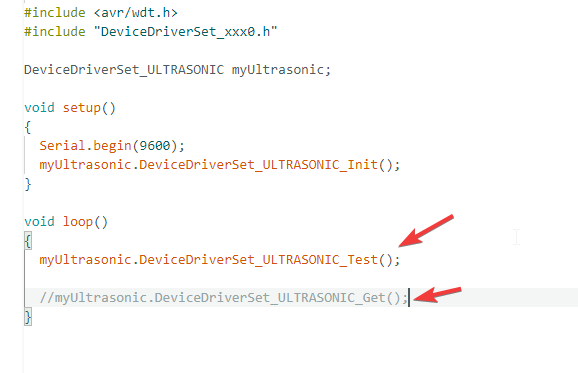
After fully understanding the demo1 program, you should now comprehend the working principle of the ultrasonic sensor and be able to obtain valid measurement data.
Next, we will further explore its principle with the help of the following diagram.
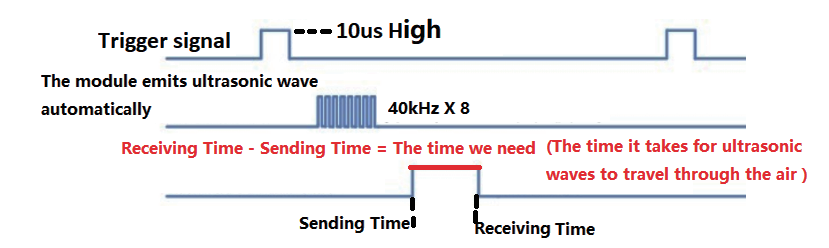
1.Use Arduino to employ digital pin to give at least 10us high level signal toTrig pin of SR04 to trigger the distance measurement function of SR04module.
2.After triggering, the module will automatically send eight 40KHzultrasonic pulses and detect whether there is a signal return. This step isdone internally by the module automatically.
3.If a signal returns, the Echo pin will output high level, and the duration ofthe high level is the time from launch to return of the ultrasound. At thispoint, we can use the pulseln() function to obtain the distance measurementdata, and calculate the actual distance from the object being measured.
pulseln(pin, value):
The pulse width used to detect the high and low leveloutput of the pin, i.e., the time we need.
-
Pin: The pin used to obtain the pulse.
-
Value: Type of pulse, HIGH or LOW
Since the default unit of the pulseln() function is "us", and thepropagation velocity of ultrasonic waves in the air is about 340m/s, unitconversions is needed。
Because,the distance traveled by the ultrasonic wave = the distance from the launchpoint to the end + the distance from the end back to the launch point.Therefore,
the distance traveled by the ultrasonic wave = pulseln()/29.15/2 ≈ pulseln()/58
Upload program.
(Please toggle the "Upload-Cam" button to "Upload"when uploading the program.) Please open the serial port after the programhas been uploaded successfully. If there is no obstacle in front, the ultrasonicdistance will be shown as more then 200. And if you try to put your hand infront of the ultrasonic module, it will show the distance between your handand the ultrasonic module.
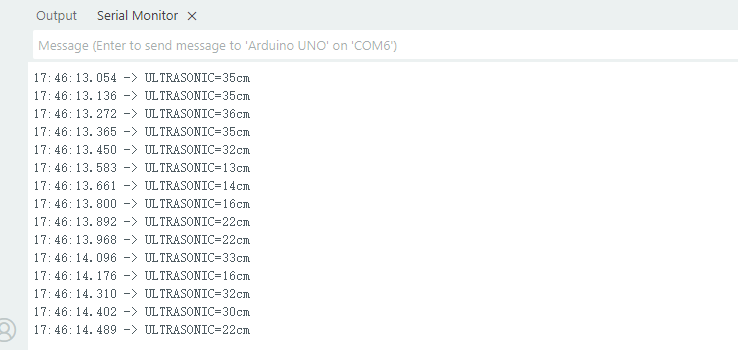
note:
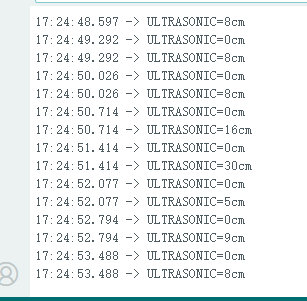
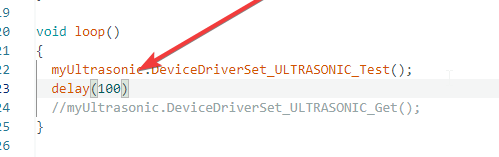
If you encounter the situation shown in the figure after uploading the sketch, don't panic. This is caused by the data reading speed being too fast, and it can be fixed simply by adding an appropriate delay in the code.
At this point, the ultrasonic module driver is completed.
Now, let' s take alook at the overall framework of the implementation principle of theObstacle-avoidance Mode using the ultrasonic module and then analyze theprogram:
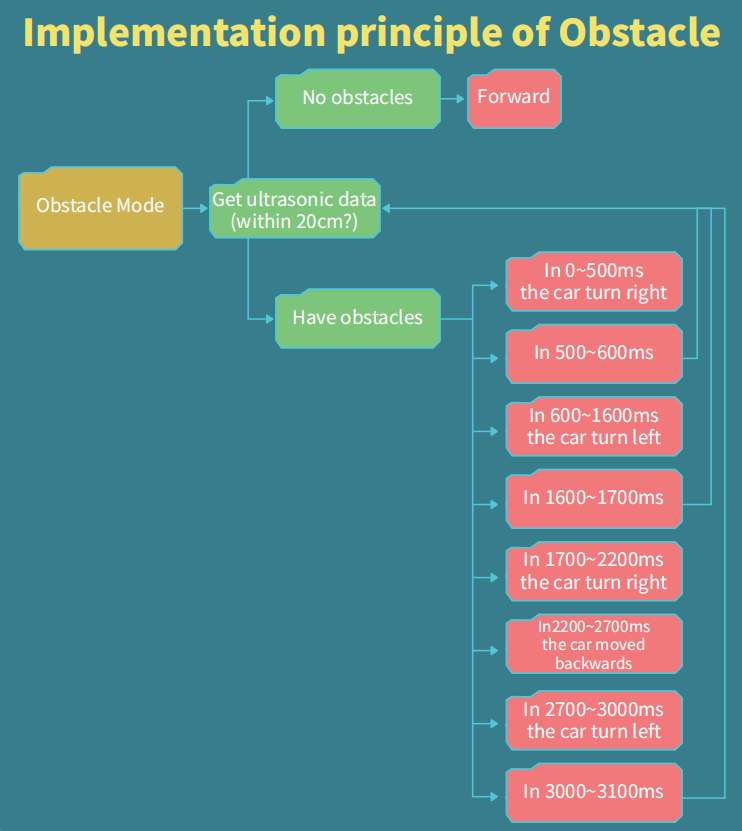
Please open Demo2 in the current folder:
In this section, for demo2, you only need to focus on the obstacle avoidance part, specifically the usage of obstacle avoidance implementation in the ApplicationFunctionSet_xxx0.cpp and ApplicationFunctionSet_xxx0.h files.
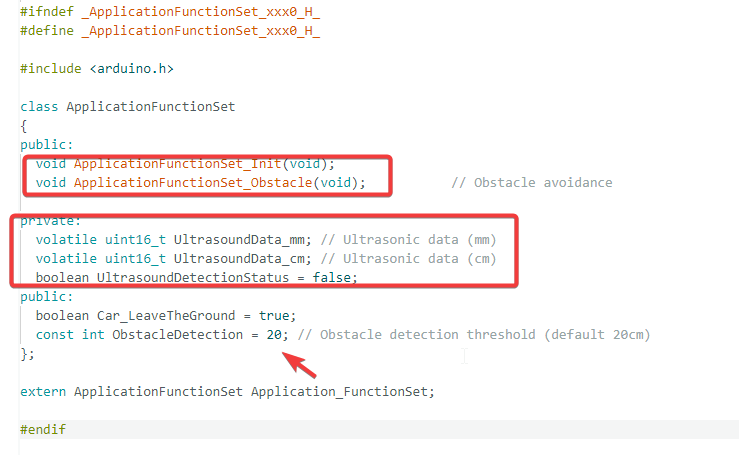
First, let's examine the header file. It defines an initialization function Init(), an obstacle avoidance function Obstacle(), and several variables related to ultrasonic ranging. The content of the entire header file is relatively concise and easy to understand, as shown in the figure below.
Next, let's check the corresponding function implementations in the .cpp file to understand their general working principles. Open the ApplicationFunctionSet_xxx0.cpp file, scroll down to approximately line 250, and you will find the function definitions.
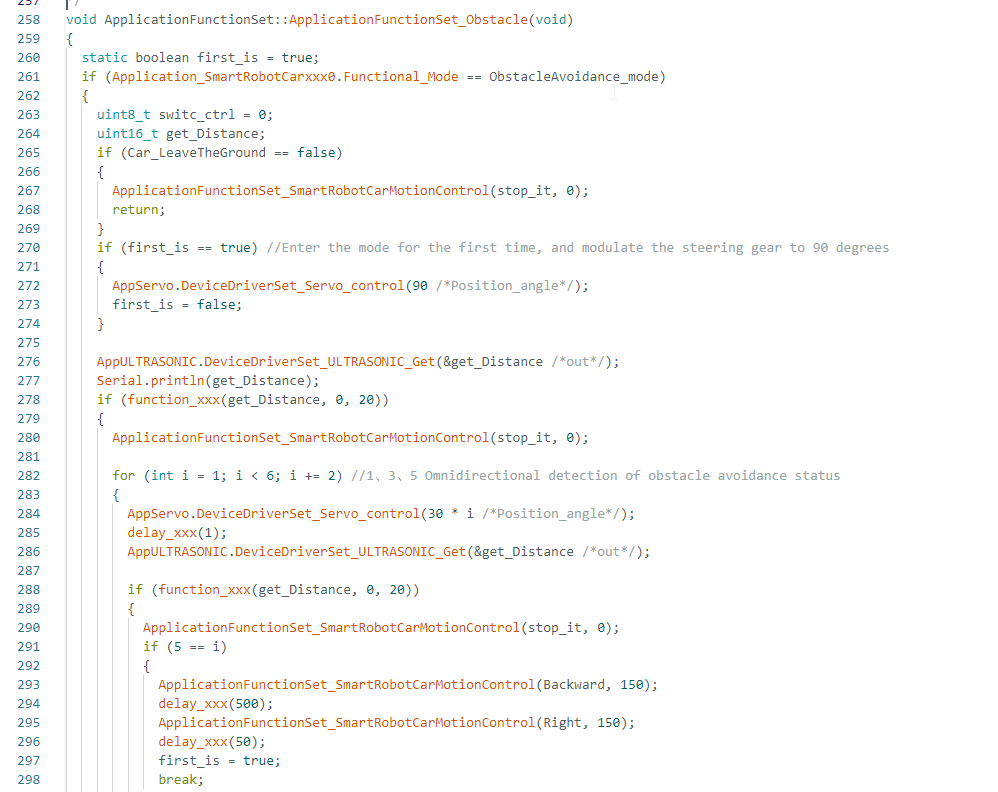
This code implements the core obstacle avoidance logic of the smart car, equipping it with sensitive "eyes" and an intelligent "brain", enabling it to automatically detect obstacles and make driving decisions.
How to quickly understand the structure of this function?
You can collapse the content inside the function to clearly view its outer framework.
As shown in the figure below, the core logic of this function is an if…else… conditional statement:
- When the condition is met, it enters the main execution flow of obstacle avoidance;
- When the condition is not met, it resets the corresponding variable values.
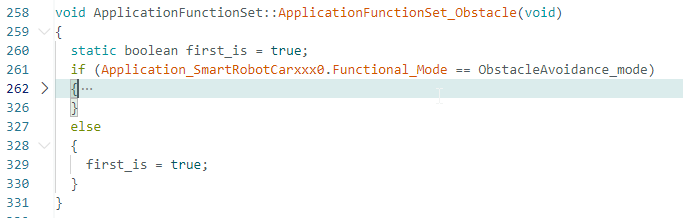
Next, we will enter the function and analyze the specific content step by step.
¶ State Initialization (Lines 258-259)
static boolean first_is = true;
Function: Records whether it is the first time to enter obstacle avoidance mode.
- static keyword: This variable retains its previous value and will not be reset on each function call.
- Purpose: Used to perform necessary initialization when entering obstacle avoidance for the first time.
¶ Security Check (Lines 260-269)
if (Application_SmartRobotCarxxx0.Functional_Mode == ObstacleAvoidance_mode)
{
uint8_t switc_ctrl = 0;
uint16_t get_Distance;
if (Car_LeaveTheGround == false)
{
ApplicationFunctionSet_SmartRobotCarMotionControl(stop_it, 0);
return;
}
Function: Ensure the trolley operates in a safe state
- Functional_Mode == ObstacleAvoidance_mode:Check if the current mode is obstacle avoidance mode
- Car_LeaveTheGround == false:Check if the car is on the ground (not lifted up)
- stop_it:If the car is lifted, stop all actions immediately to prevent motor damage from idling
¶ Servo Return to Home Position (Lines 270-274)
if (first_is == true)
{
AppServo.DeviceDriverSet_Servo_control(90);
first_is = false;
}
Function: Align the ultrasonic sensor to the front.
- Servo angle range: 0° ~ 180°
- 90° is the center position, making the sensor face directly forward
- Executed only once when entering obstacle avoidance mode for the first time
¶ Distance Detection (Lines 276-277)
AppULTRASONIC.DeviceDriverSet_ULTRASONIC_Get(&get_Distance);
Serial.println(get_Distance);
Function: Measure the distance to obstacles in front.
- The ultrasonic module emits sound waves and calculates the echo time to determine the distance.
- The result is in centimeters (cm).
- The data is printed via the serial port for easy debugging and monitoring.
¶ Core Obstacle Avoidance Decision (Lines 278-325)
This is the core brain of the entire function, determining what the car should do when it encounters an obstacle.
if (function_xxx(get_Distance, 0, 20))
{
ApplicationFunctionSet_SmartRobotCarMotionControl(stop_it, 0);for (int i = 1; i < 6; i += 2) //1、3、5 Omnidirectional detection of obstacle avoidance status { AppServo.DeviceDriverSet_Servo_control(30 * i /*Position_angle*/); delay_xxx(1); AppULTRASONIC.DeviceDriverSet_ULTRASONIC_Get(&get_Distance /*out*/); if (function_xxx(get_Distance, 0, 20)) { ApplicationFunctionSet_SmartRobotCarMotionControl(stop_it, 0); if (5 == i) { ApplicationFunctionSet_SmartRobotCarMotionControl(Backward, 150); delay_xxx(500); ApplicationFunctionSet_SmartRobotCarMotionControl(Right, 150); delay_xxx(50); first_is = true; break; } } else { switc_ctrl = 0; switch (i) { case 1: ApplicationFunctionSet_SmartRobotCarMotionControl(Right, 150); break; case 3: ApplicationFunctionSet_SmartRobotCarMotionControl(Forward, 150); break; case 5: ApplicationFunctionSet_SmartRobotCarMotionControl(Left, 150); break; } delay_xxx(50); first_is = true; break; } } } else //if (function_xxx(get_Distance, 20, 50)) { ApplicationFunctionSet_SmartRobotCarMotionControl(Forward, 150); }
Do you think this section contains a lot of content? Don't worry. Using the code folding method we learned earlier, you can easily understand its overall structure after collapsing this section.
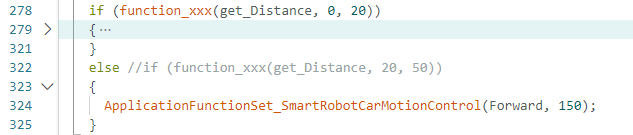
The system compares the measured distance with the threshold of 20cm:
1. Case 1: Obstacle detected if (distance ≤ 20cm)
- Result: Obstacle detected ahead
- Action: The car stops immediately and prepares for direction detection
2. Case 2: No obstacle else (distance > 20cm)
- Result: The path ahead is clear
- Action: The car continues moving forward at speed 150
Next, we will enter the if statement to examine the internal logic. First is the stop command when an obstacle is detected: when an obstacle is encountered, the car will stop first.
ApplicationFunctionSet_SmartRobotCarMotionControl(stop_it, 0);
¶ Omnidirectional scanning (lines 282-286)
for (int i = 1; i < 6; i += 2) //1、3、5 Omnidirectional detection of obstacle avoidance status
{
AppServo.DeviceDriverSet_Servo_control(30 * i /Position_angle/);
delay_xxx(1);
AppULTRASONIC.DeviceDriverSet_ULTRASONIC_Get(&get_Distance /out/);
Loop Variable i |
Servo Angle | Detection Direction |
|---|---|---|
| 1 | 30° | Right |
| 3 | 90° | Front |
| 5 | 150° | Left |
¶ Directional Decision (Lines 302-318)
Scenario A: Obstacles in all directions
If (function_xxx(get_Distance, 0, 20)) // There is an obstacle in the current direction
{
if (5 == i) // All directions have been detected
{
ApplicationFunctionSet_SmartRobotCarMotionControl(Backward, 150);
delay_xxx(500);
ApplicationFunctionSet_SmartRobotCarMotionControl(Right, 150);
delay_xxx(50);
first_is = true;
break;
}
}
Scenario B: There is no obstacle in a certain direction
if (!function_xxx(get_Distance, 0, 20)) // There is no obstacle in the current direction
{
switch (i)
{
case 1: // Right side barrier-free → Turn right
ApplicationFunctionSet_SmartRobotCarMotionControl(Right, 150);
break;
case 3: // No obstacles ahead → Move forward
ApplicationFunctionSet_SmartRobotCarMotionControl(Forward, 150);
break;
case 5: // Left side accessible → Turn left
ApplicationFunctionSet_SmartRobotCarMotionControl(Left, 150);
break;
}
delay_xxx(50);
first_is = true;
break;
}