¶ Possible Causes
- The ambient temperature is too high, causing the filament to undergo thermal creep.
- The filament is tangled or the filament feed path is obstructed.
- The filament diameter deviates excessively from the specified value.
- The filament profile selected in the slicer does not match the actual filament.
- The extruder gear tension is insufficient.
- Filament debris or foreign objects are present inside the gear box, or the gears are damaged.
- The nozzle or hotend is clogged.
¶ Required Tools
- Cleaning needle
- 1.5 mm Allen key
- 2.0 mm Allen key
- 2.5 mm Allen key
- A length of known-good filament
- Heat-resistant gloves
- Tweezers
¶ Troubleshooting Steps
¶ 1. Check the Ambient Temperature
- The normal operating ambient temperature of the printer is 5–40°C. If the ambient temperature is close to or exceeds the maximum operating temperature of the printer, move the printer to a well-ventilated environment where the temperature is within the specified range.
- When printing with low-temperature filaments such as PLA, it is recommended to open the top cover or front door of the printer to prevent the chamber temperature from continuously increasing. Excessive chamber temperature may cause the filament to soften prematurely above the hotend, resulting in thermal creep and extrusion issues.
¶ 2. Check for Filament Tangling, Diameter, and Slicer Profile
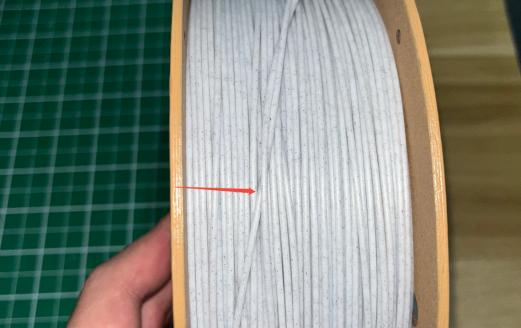
- Check whether the filament is tangled. If the filament is tangled, pull the filament end through the tangled section to untangle it. After doing so, the filament can continue to be used normally afterward.
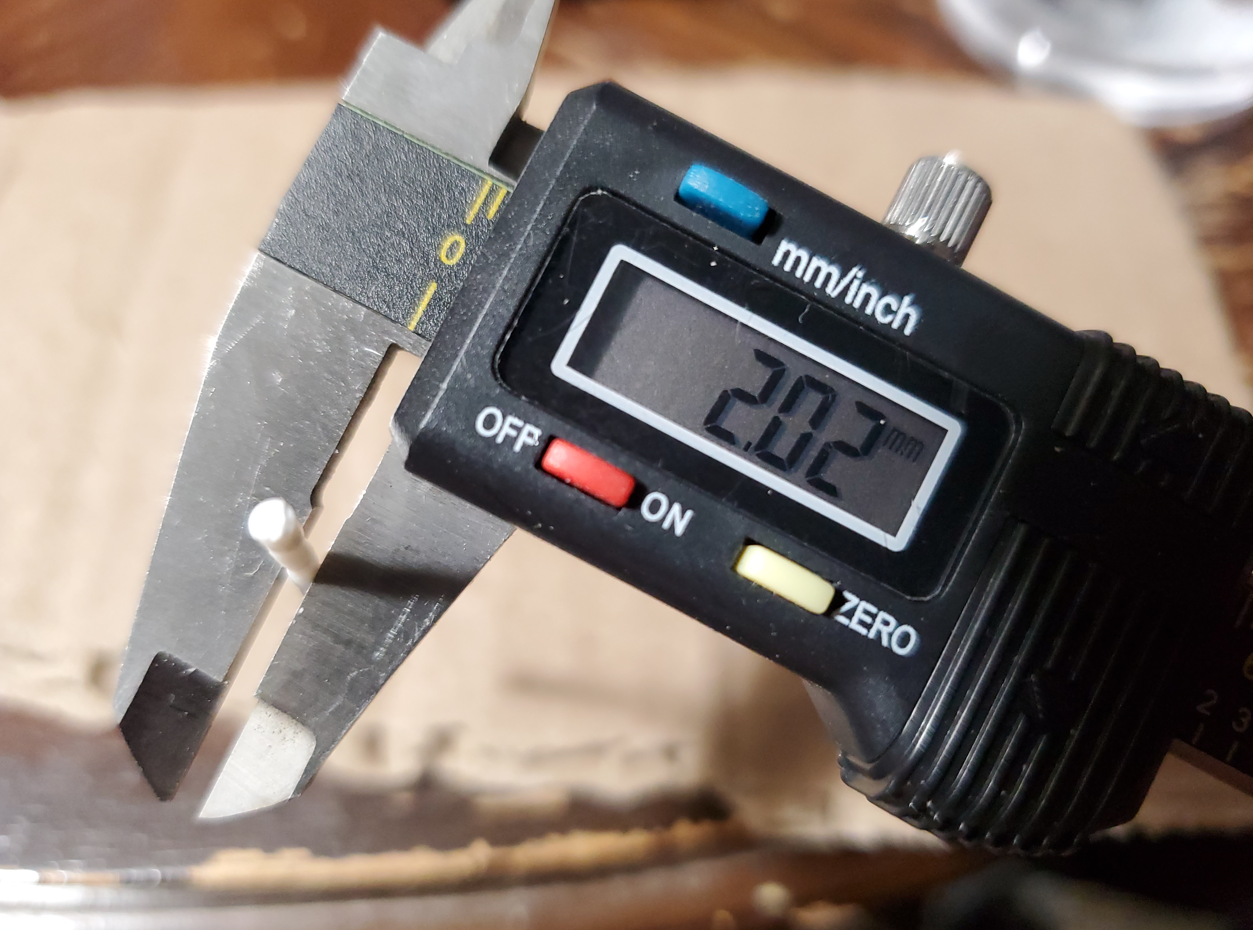
- Use a vernier caliper to check whether the filament diameter is within the acceptable range. For example, ELEGOO PLA has a diameter of 1.75 mm with a normal tolerance of ±0.02 mm. The image below shows an example of abnormal filament diameter.
- If the filament diameter is abnormal, perform further troubleshooting according to Unstable FDM Filament Diameter Solution.
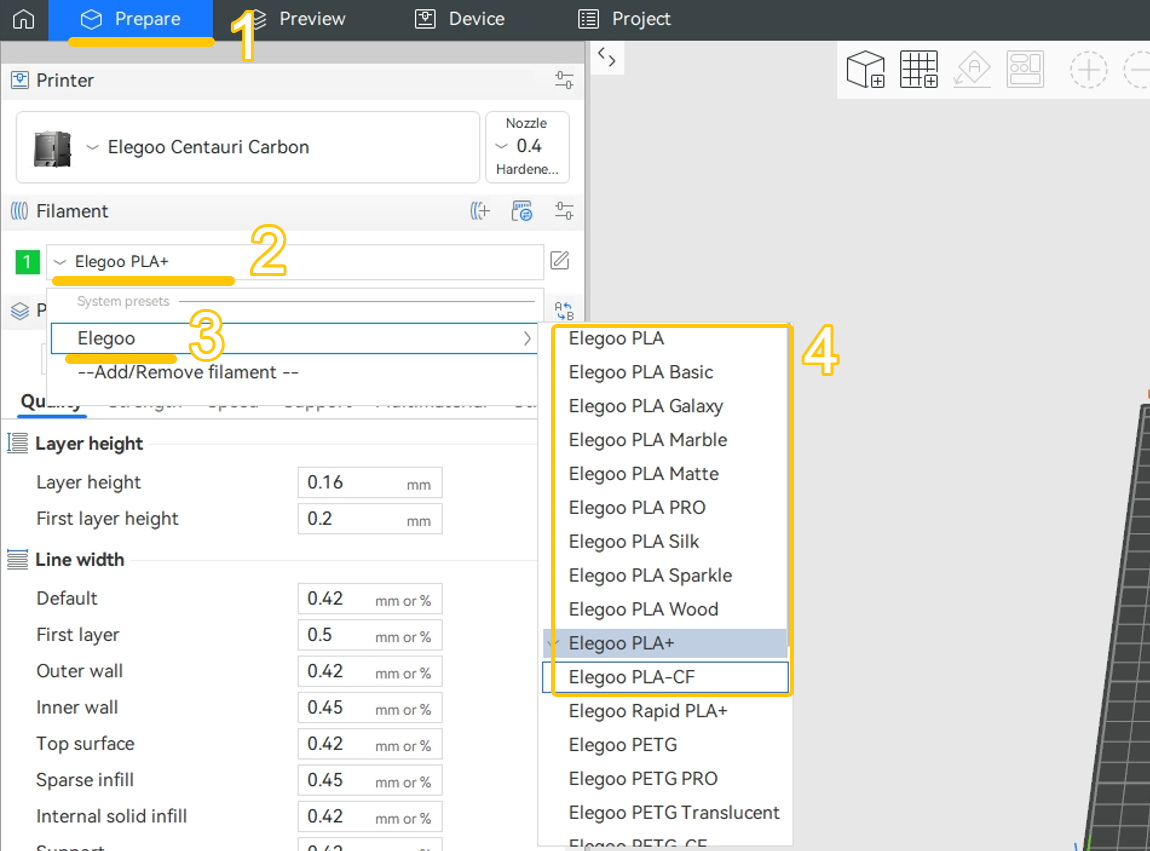
- If the filament type and profile are configured correctly, replace the filament with a roll of known-good filament for a cross-test.
- If extrusion returns to normal after replacing the filament, the original filament may have an abnormal diameter, impurities, or other quality issues.
Note: Composite filaments such as PLA-CF should not use the standard PLA filament profile directly. Select the appropriate filament profile in the slicer according to the actual filament type being used.
¶ 3. Heat the Nozzle and Perform a Manual Extrusion Test
Note: During heating and manual extrusion, hot molten filament may flow out of the nozzle. Close the front door and keep your hands, face, and other body parts away from the nozzle and the tool head movement area.
- Heat the nozzle to the recommended printing temperature for the filament currently being used. For example, when using PLA, heat the nozzle to approximately 220–230°C.
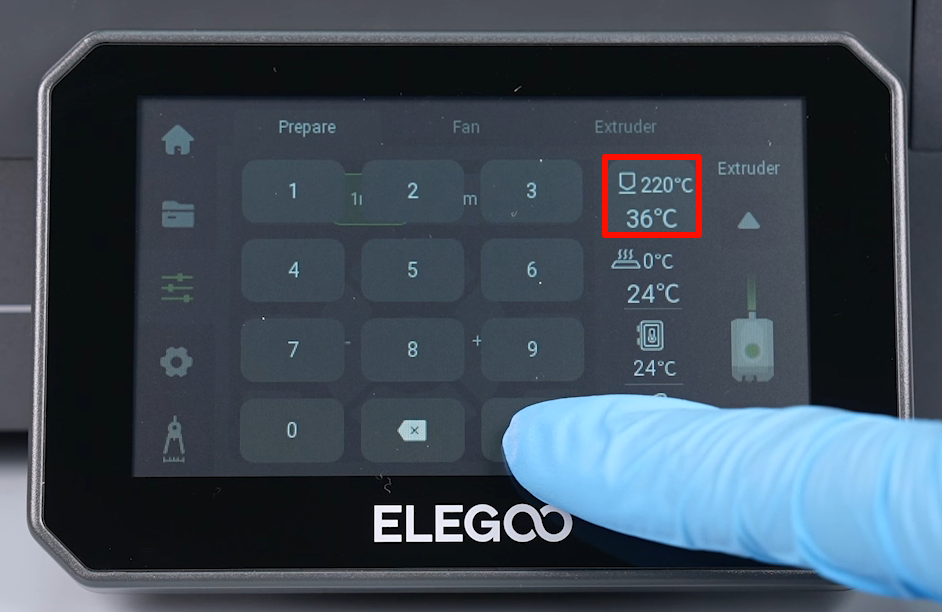
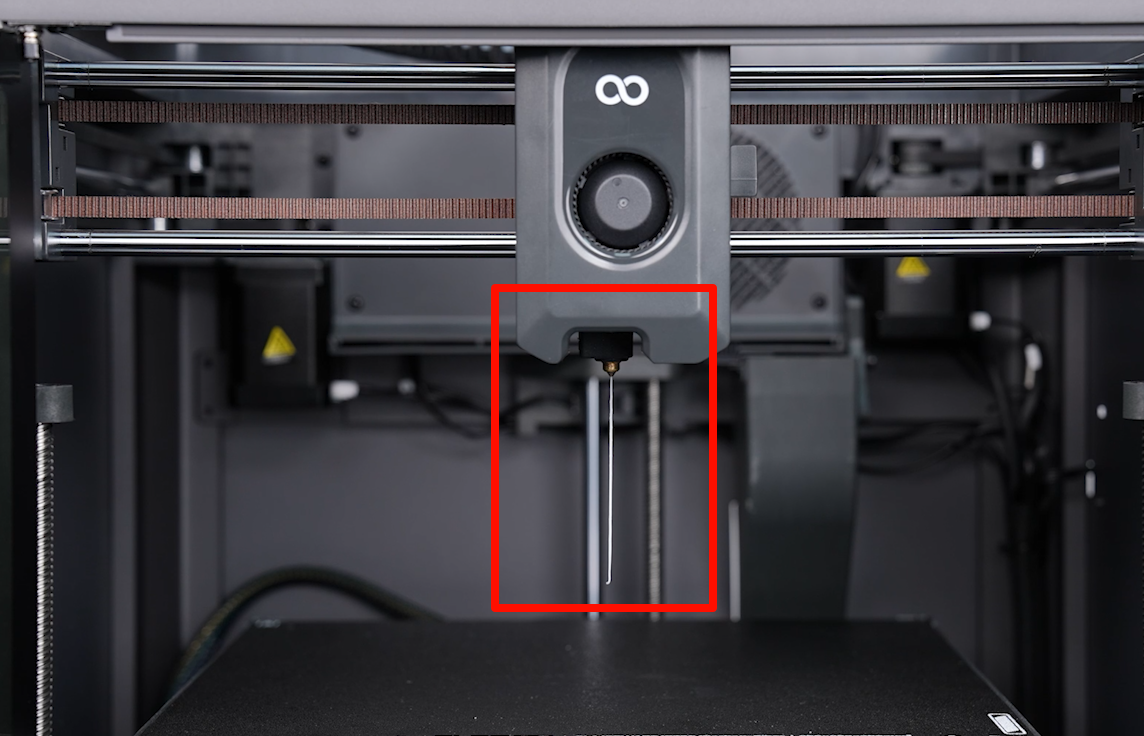
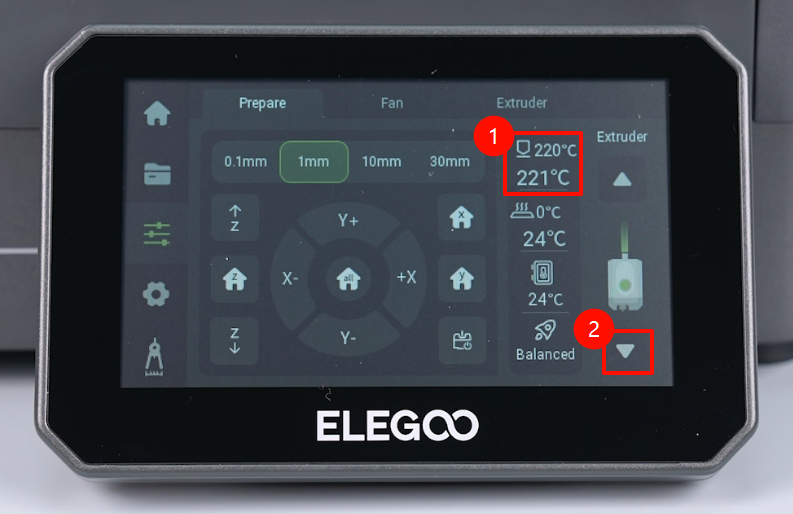
- Wait until the nozzle reaches the set temperature. Set the extrusion distance to 30 mm, then tap the ▽ button to extrude the filament.
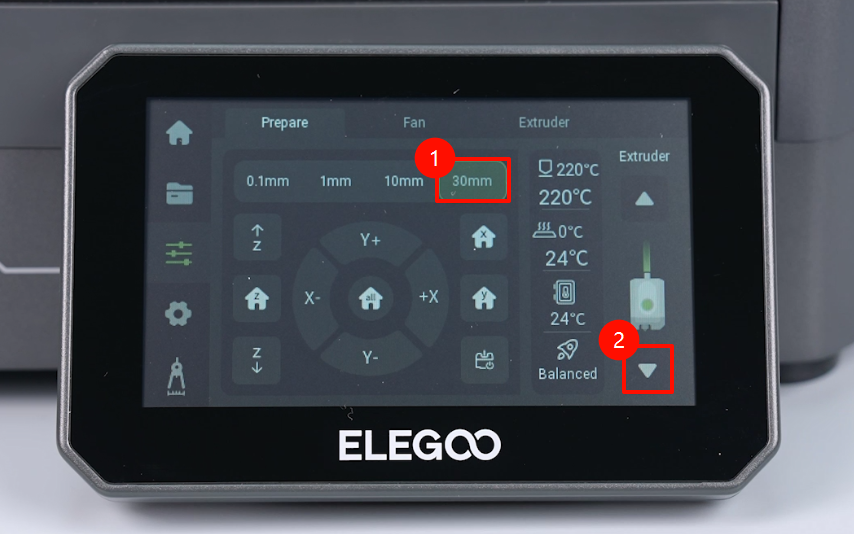
- If the filament extrudes normally, the issue is resolved.
- If the filament still cannot be extruded, continue with the following troubleshooting steps.
¶ 4. Locate the Fault
Warning: The following tests require the printer to be powered on and the hotend to be heated while the hotend is separated from the tool head. The heated hotend reaches a very high temperature. Do not touch the nozzle, heating block, or other hot components. Make sure the hotend and its cables do not come into contact with the printer's metal structure, fans, or moving parts to prevent burns, short circuits, or cable damage. Wear heat-resistant gloves when necessary.
- Turn off the printer and unplug the power cord.
- Open the tool head housing and disconnect the model cooling fan cable.
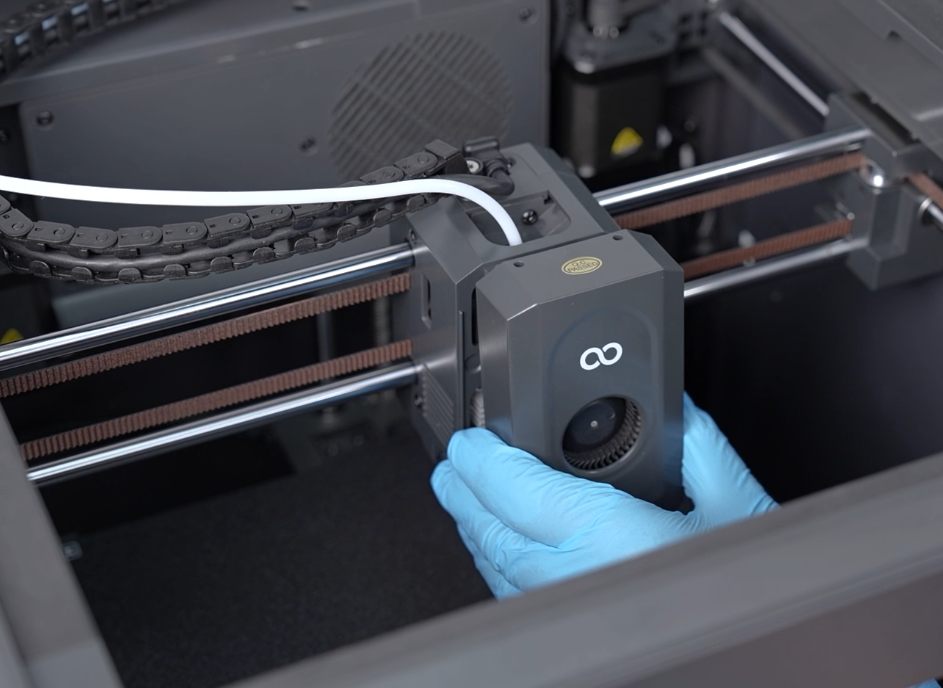
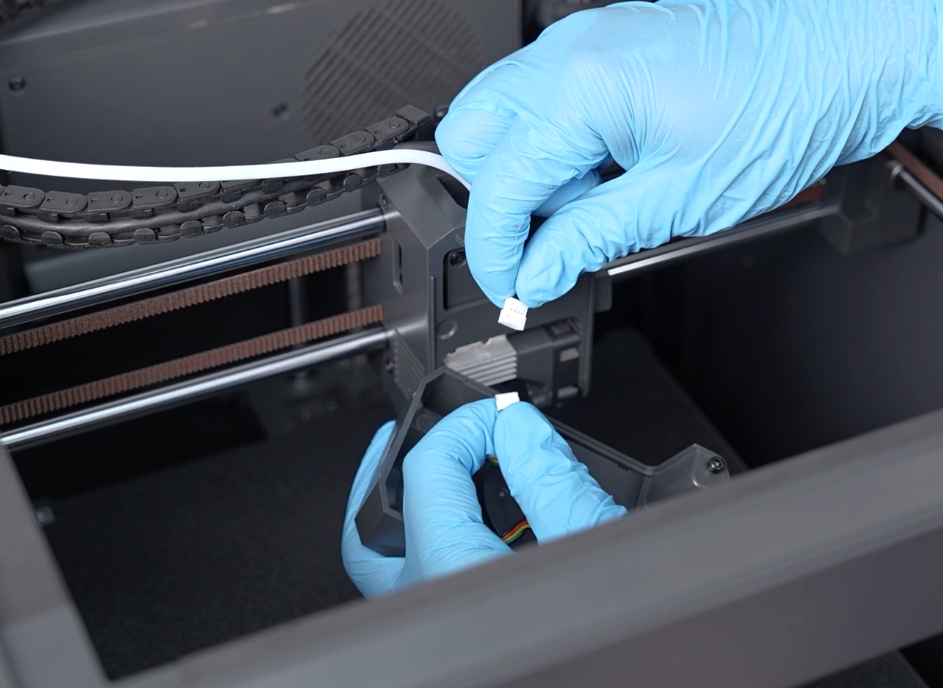
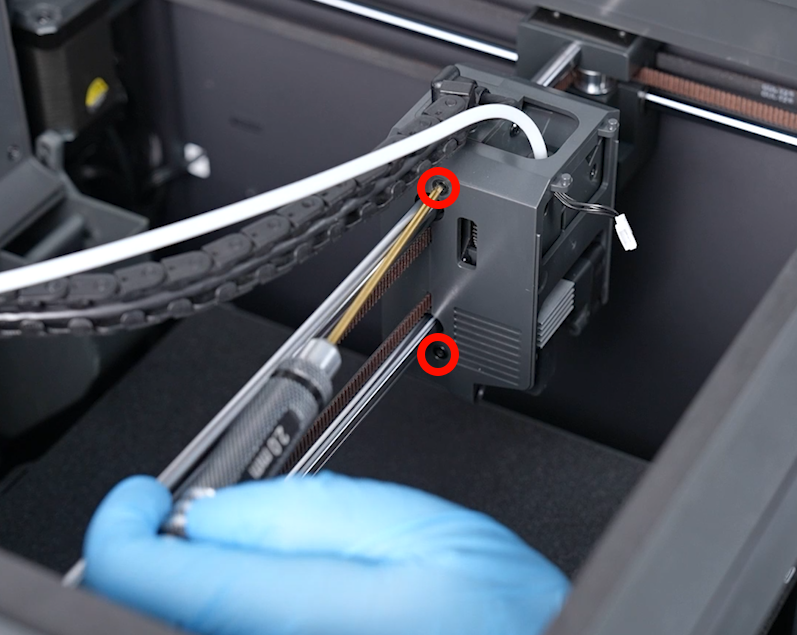
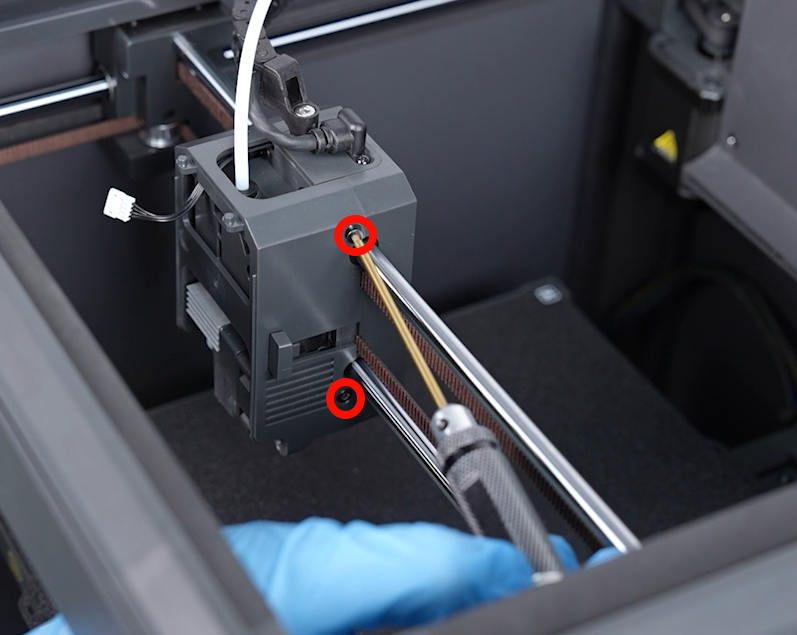
- Use a 2.0 mm Allen key to remove the four screws securing the tool head housing, then remove the tool head housing.
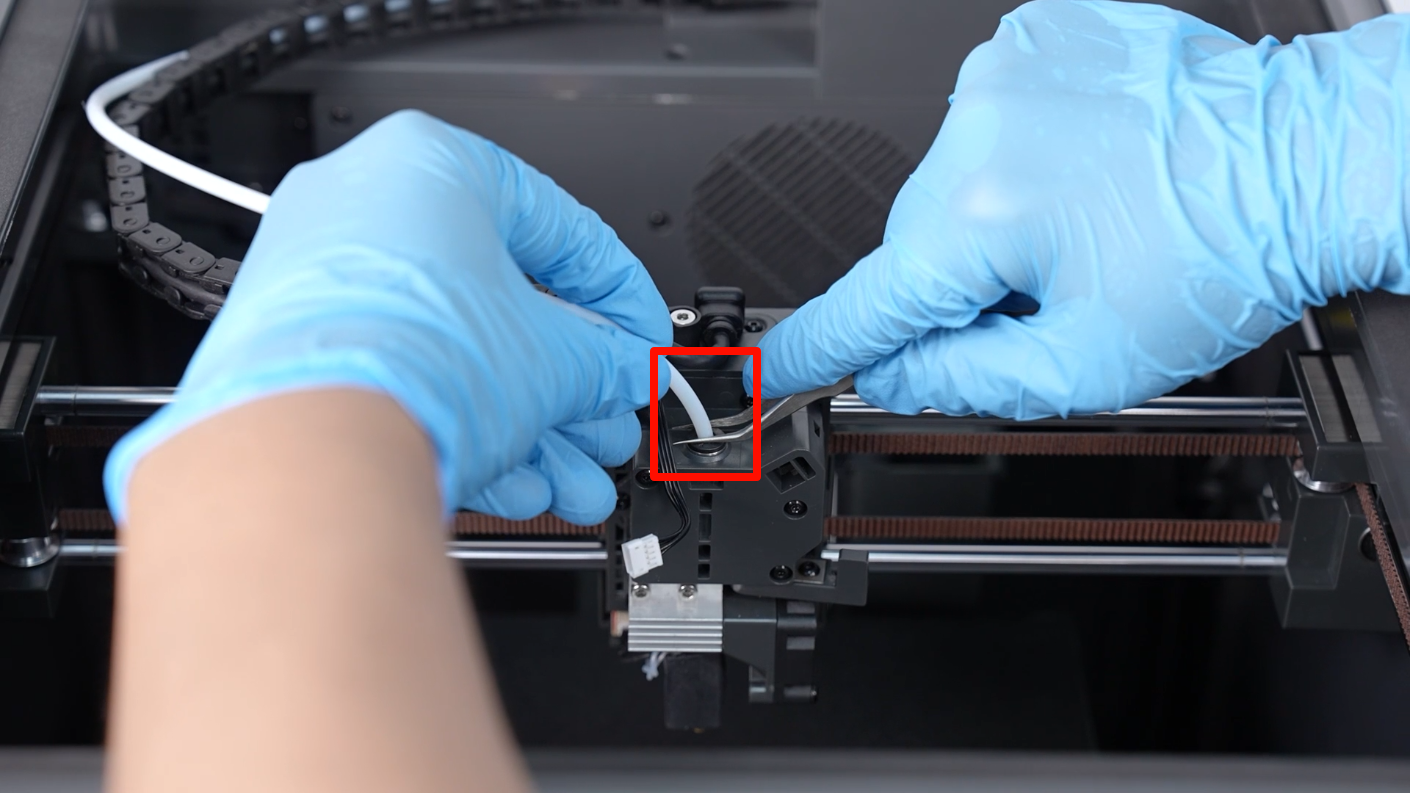
- Use tweezers to press down on the quick connector, then pull out the PTFE tube.
- Use a 2.5 mm Allen key to remove the two screws securing the hotend.
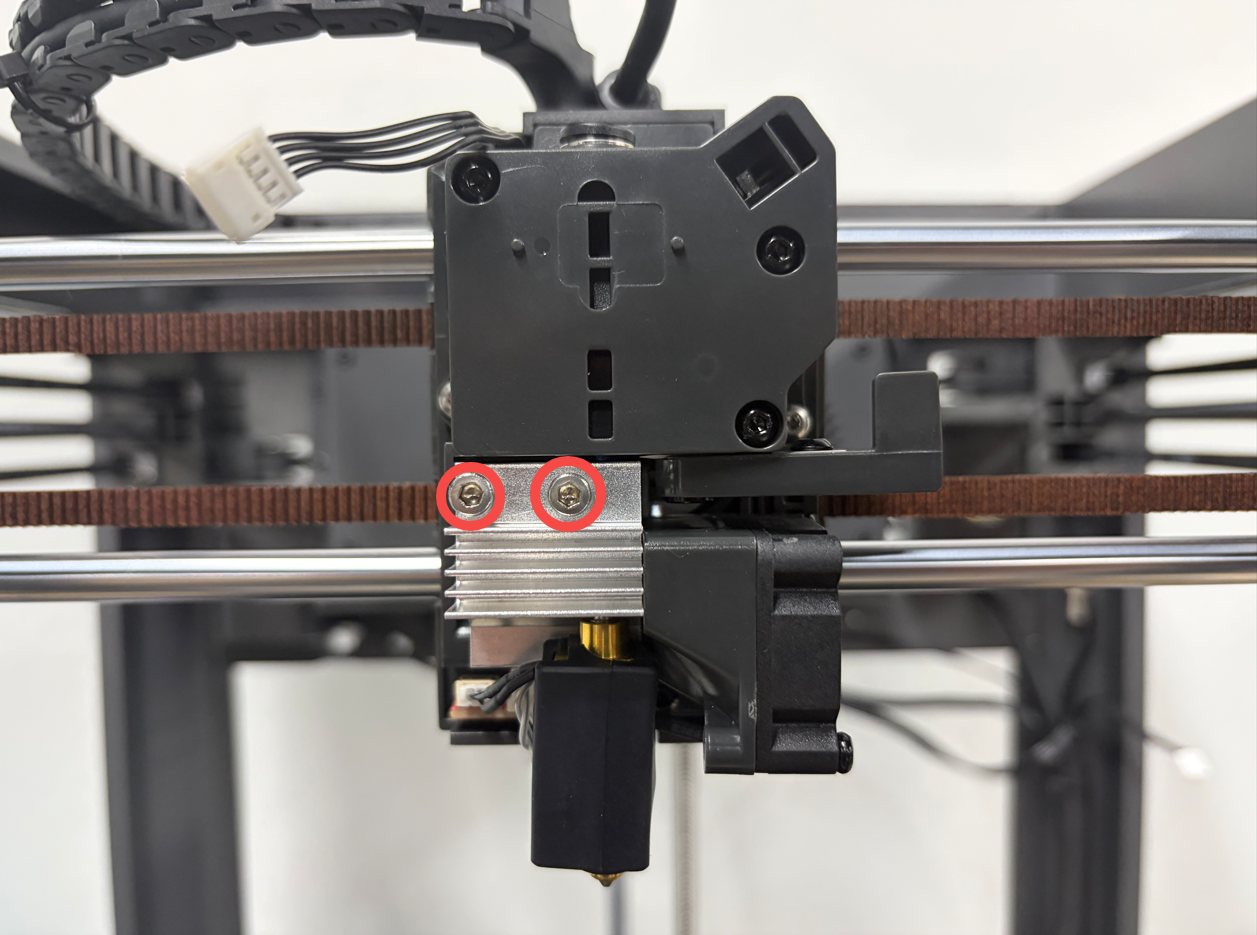
- Remove the hotend without disconnecting its two connectors.
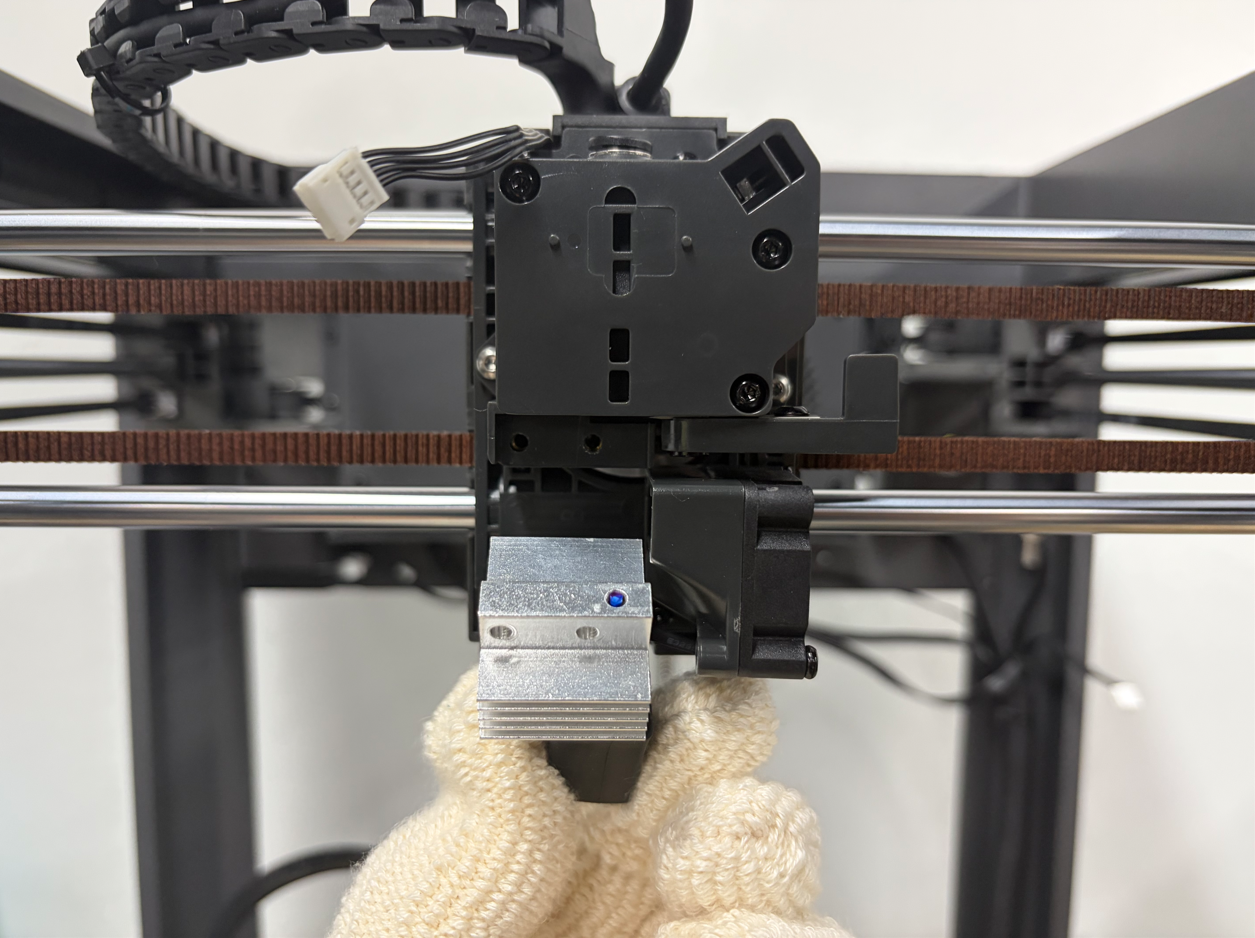
- Power on the printer again.
- Insert a length of filament into the upper opening of the gear box and push it down until it reaches the bottom.
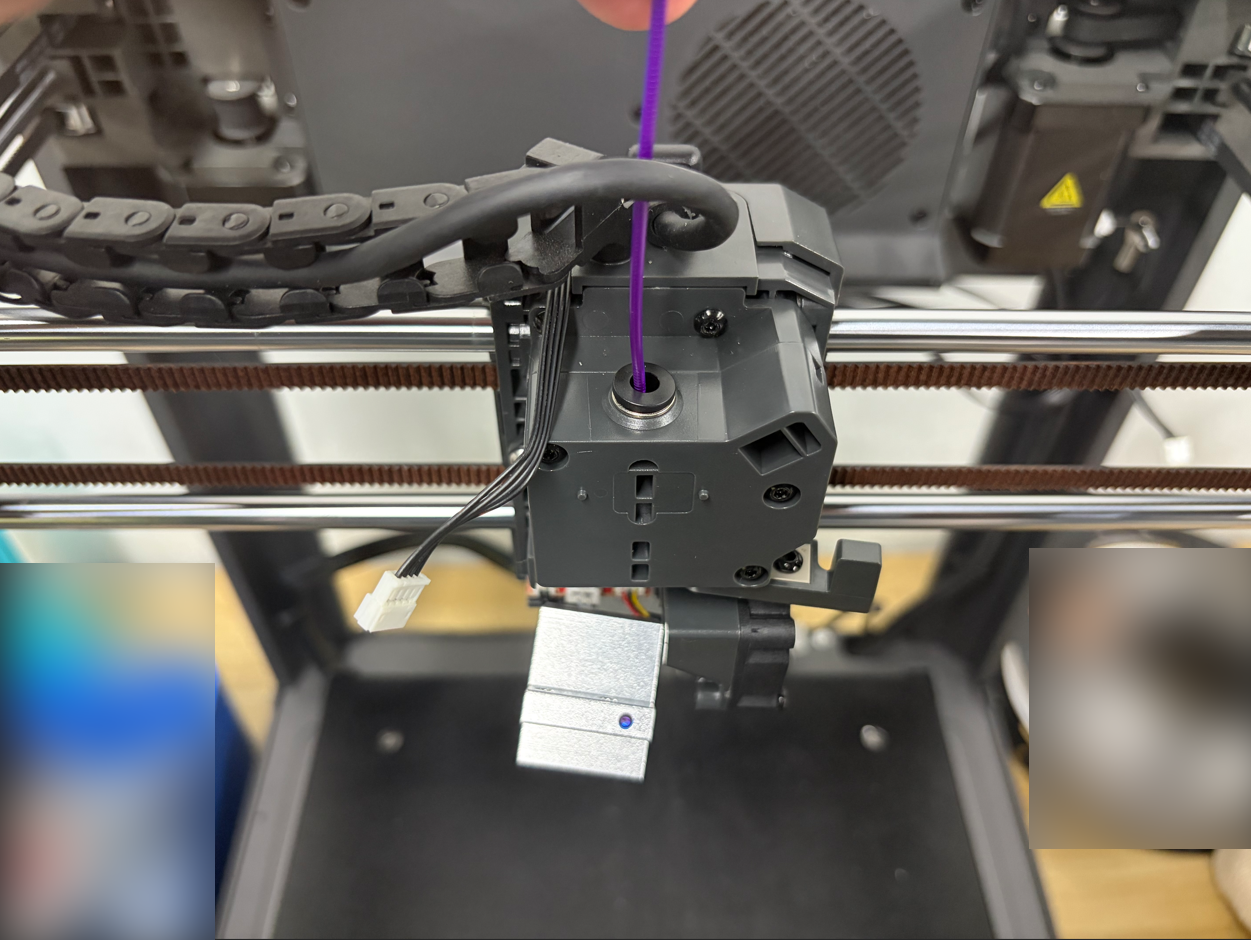
- Set the nozzle temperature to above 170°C to disable the printer's cold extrusion protection, then tap the ▽ button on the touch screen to extrude the filament.
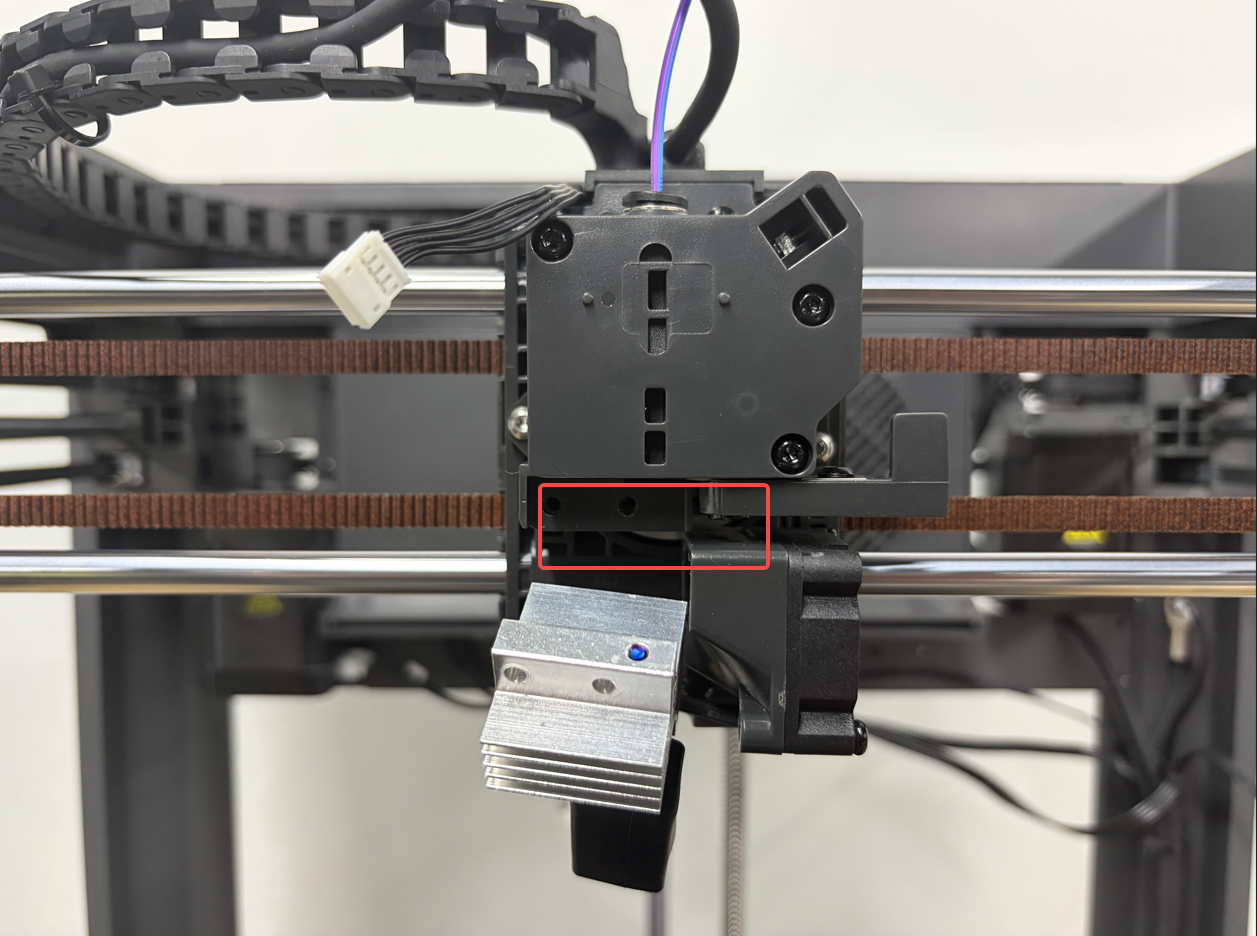
- Check whether the filament can be extruded from the lower opening of the gear box.
-
If the filament can be pushed out normally from the bottom of the gear box: The gear box can basically feed filament normally. The fault is more likely to be located in the hotend or nozzle. Continue checking for nozzle clogging (Step 7).
-
If the filament cannot be pushed out from the bottom of the gear box: The issue is more likely related to the extruder gear or the inside of the gear box. Continue with Adjust the Extruder Gear Tension and Check / Clean / Replace the Reduction Gear (Steps 5–6).
¶ 5. Adjust the Extruder Gear Tension
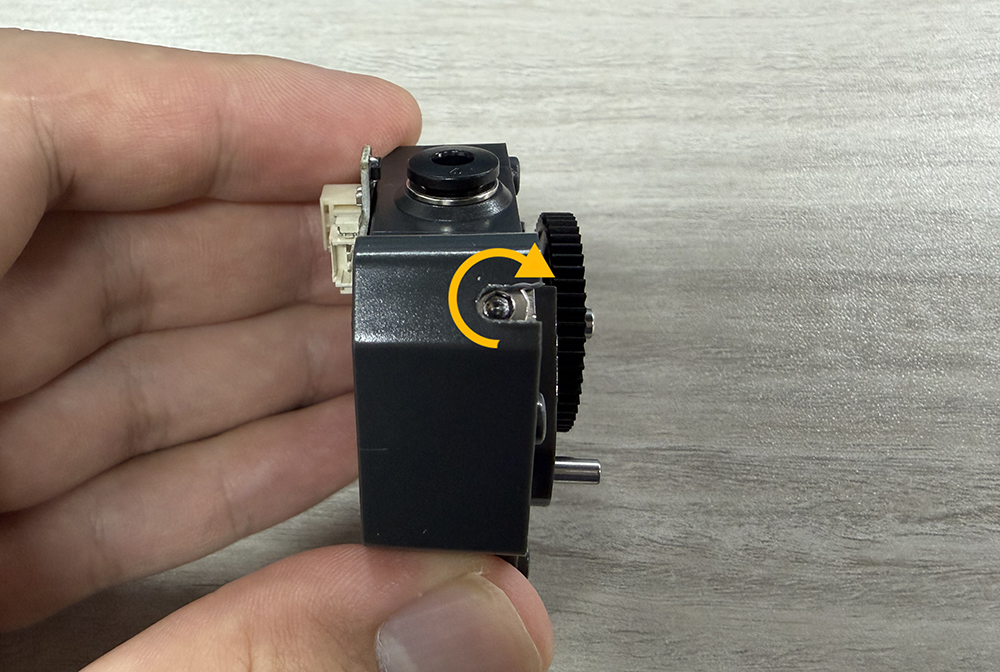
- Use a 1.5 mm Allen key to slightly turn the adjustment screw counterclockwise, as shown in the image below, to increase the extruder gear tension. It is recommended to adjust approximately 1/4 turn at a time and retest the extrusion after each adjustment.
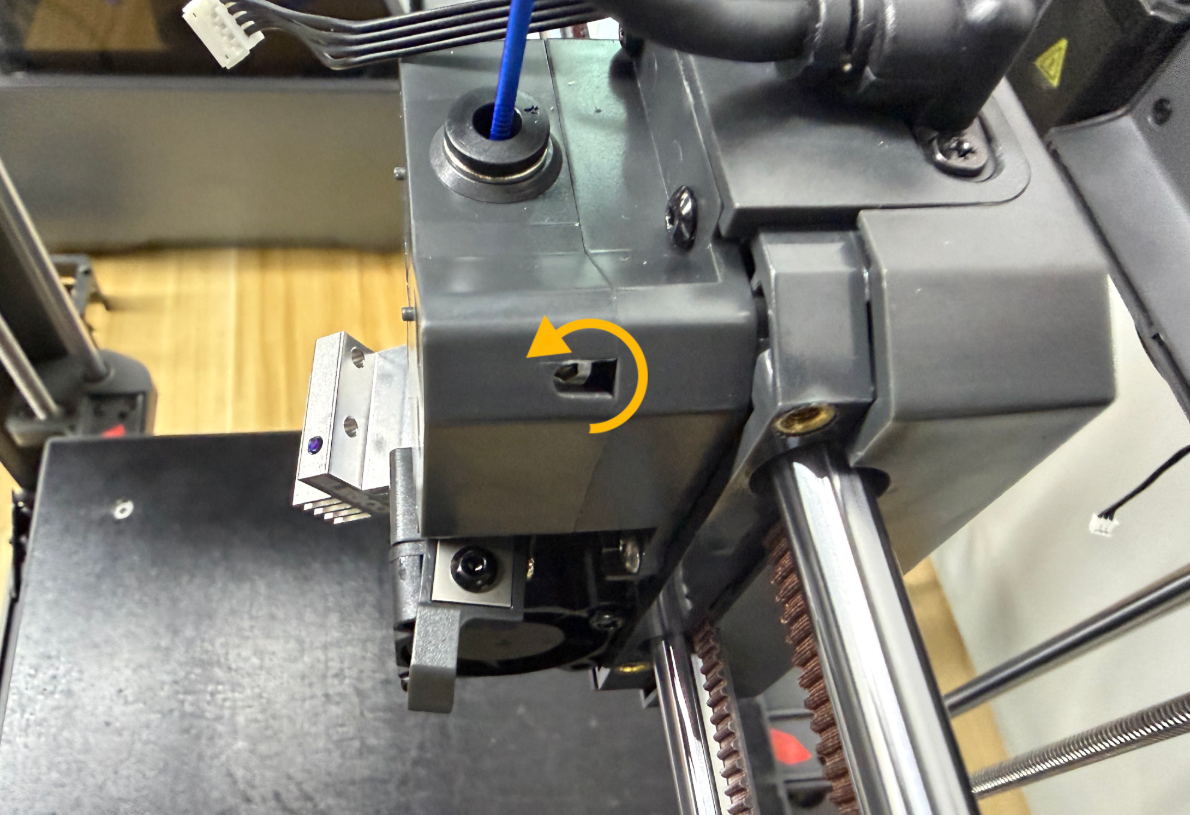
- Tap the ▽ button on the touch screen again to extrude the filament.
- If the filament can be extruded, the troubleshooting is complete.
- If the filament cannot be extruded, check the inside of the gear box.
¶ 6. Check / Clean / Replace the Reduction Gear
- Use a 2.0 mm Allen key to remove the four screws securing the gear box, then remove the gear box.
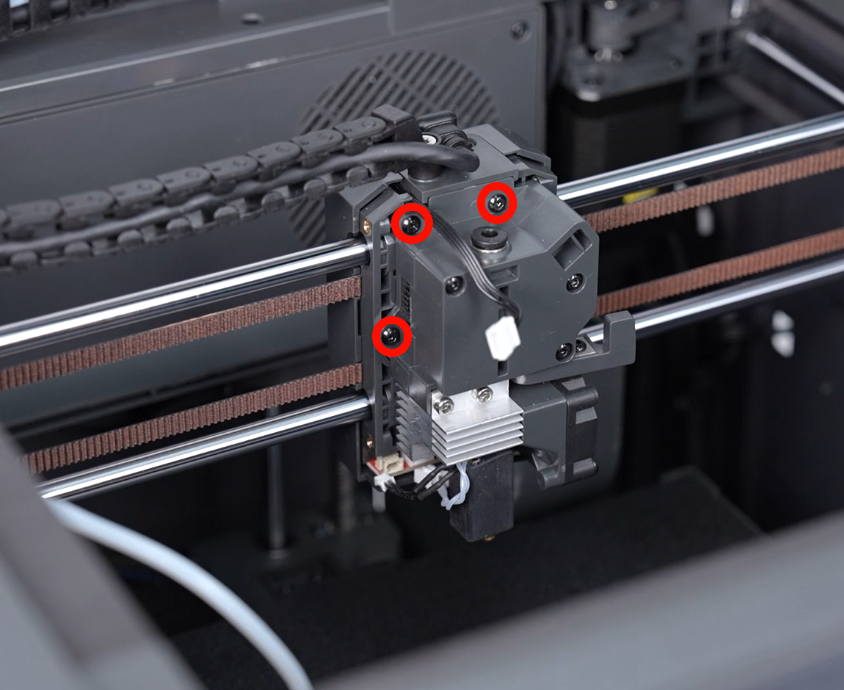
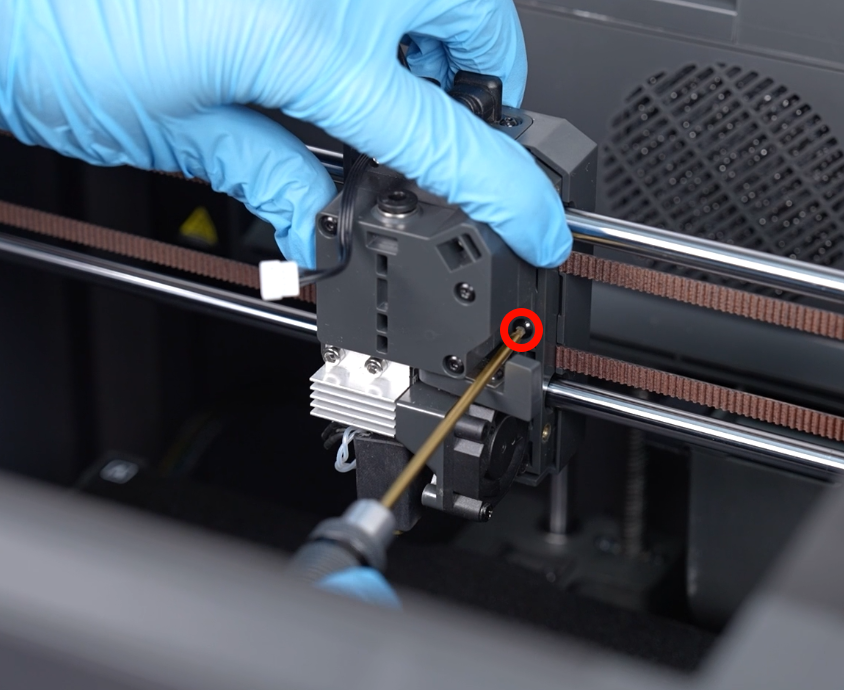
- Use a 2.0 mm Allen key to remove the screws securing the spring and cutter, then remove the spring and cutter.
Note: Be careful not to cut your fingers during the operation.
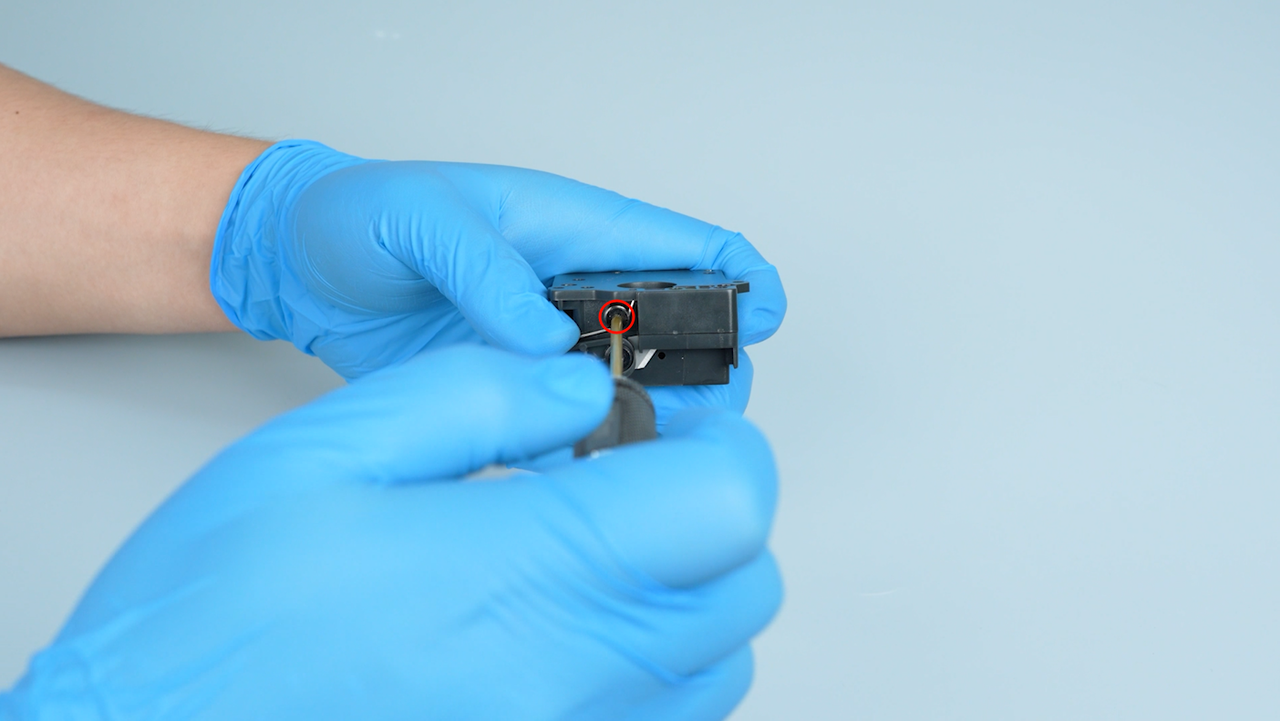
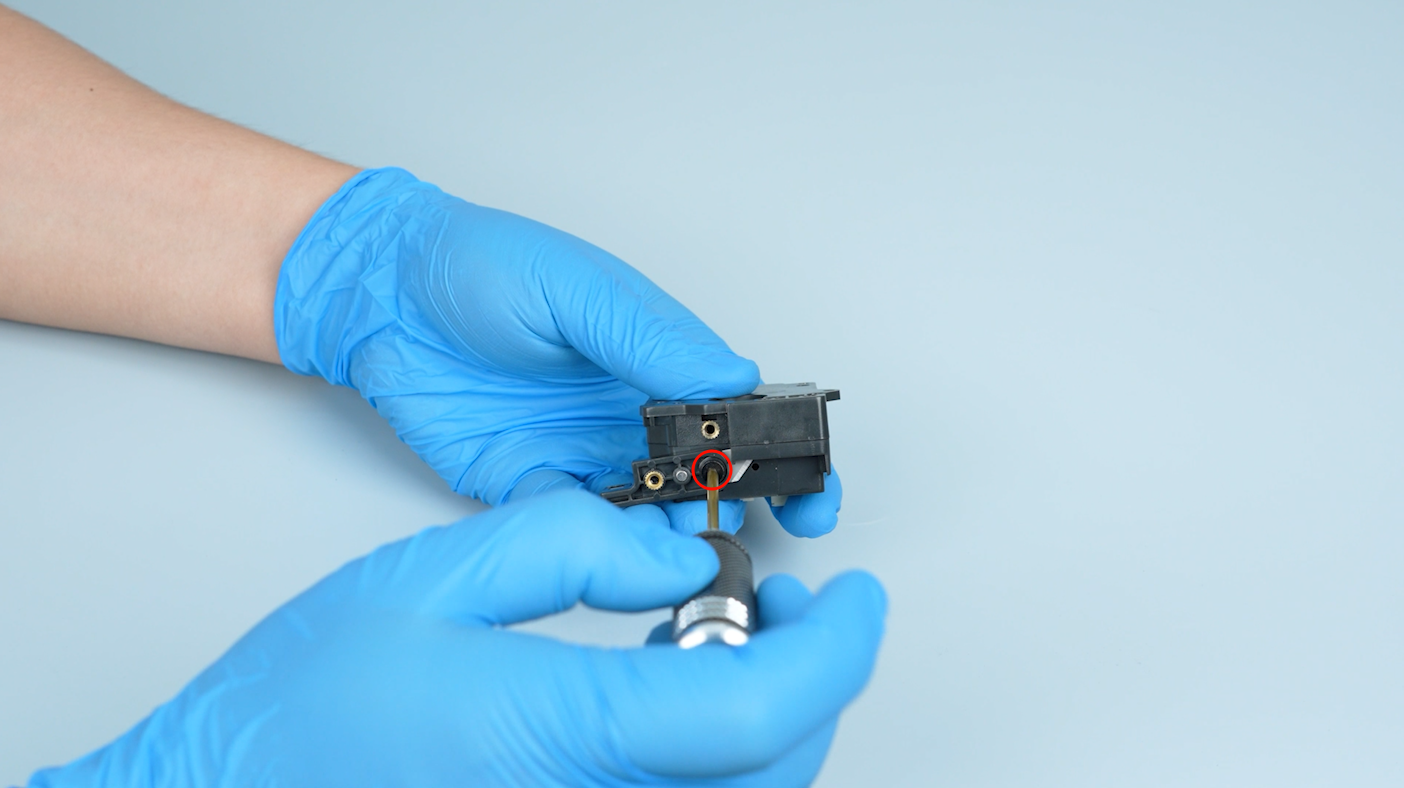
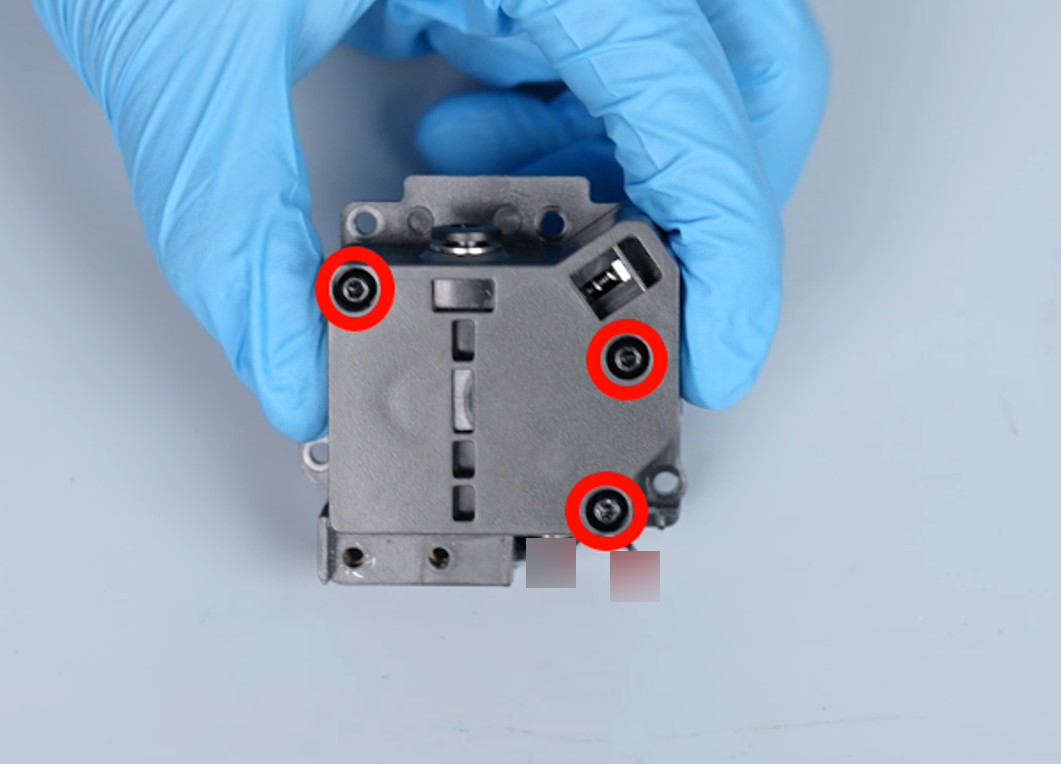
- Use a 2.0 mm Allen key to remove the three screws securing the gear box housing.
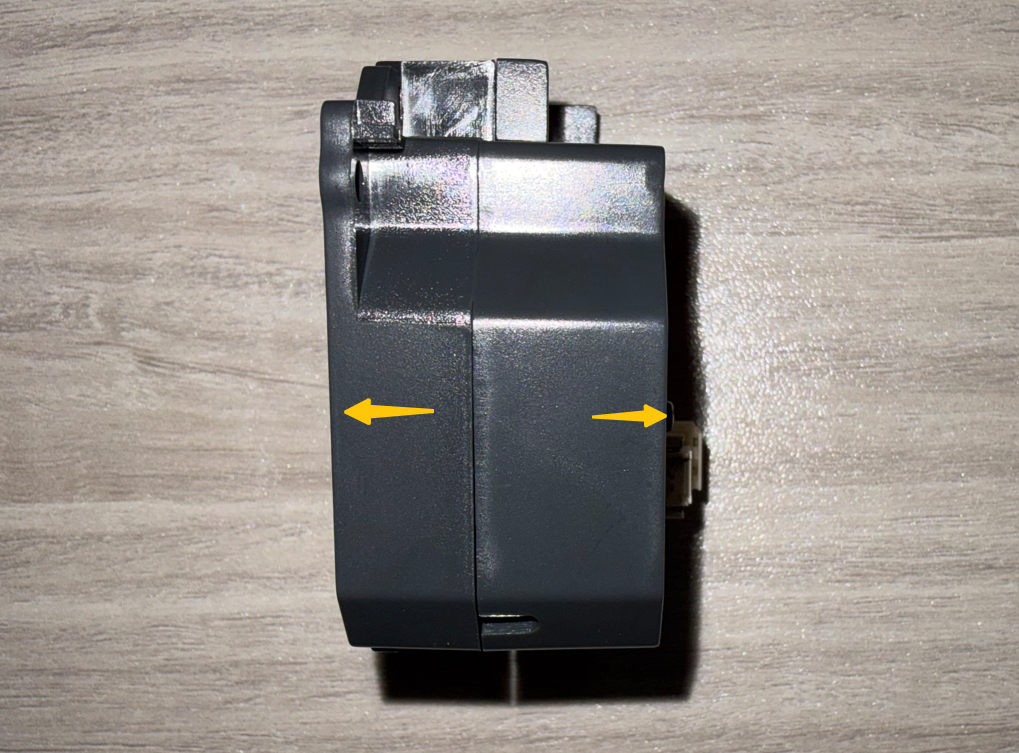
- Open the gear box.
- Remove the reduction gear.
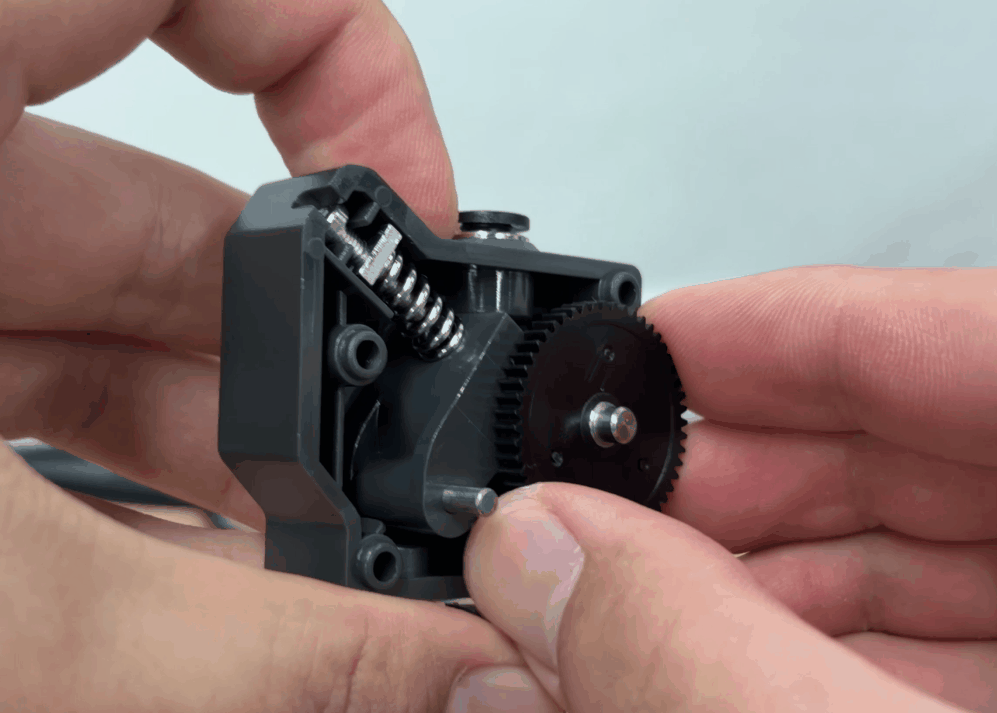
- Check the gear for wear and the filament path for any filament fragments that may prevent proper filament loading. Clean any filament fragments and dust around the gear.
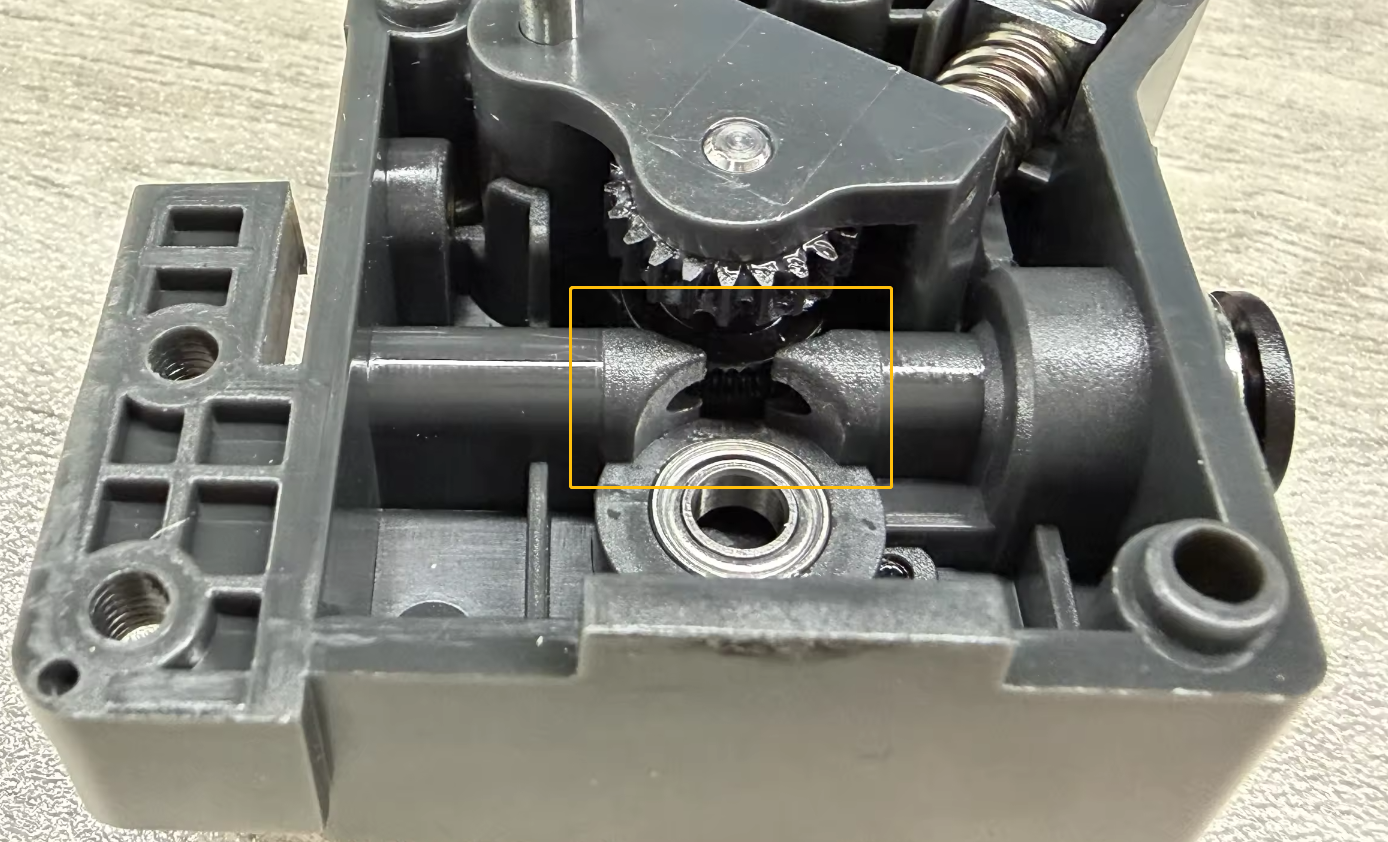
- Reinstall the reduction gear.
- Manually insert a length of filament into the gear box inlet and check whether the filament can be fed normally.
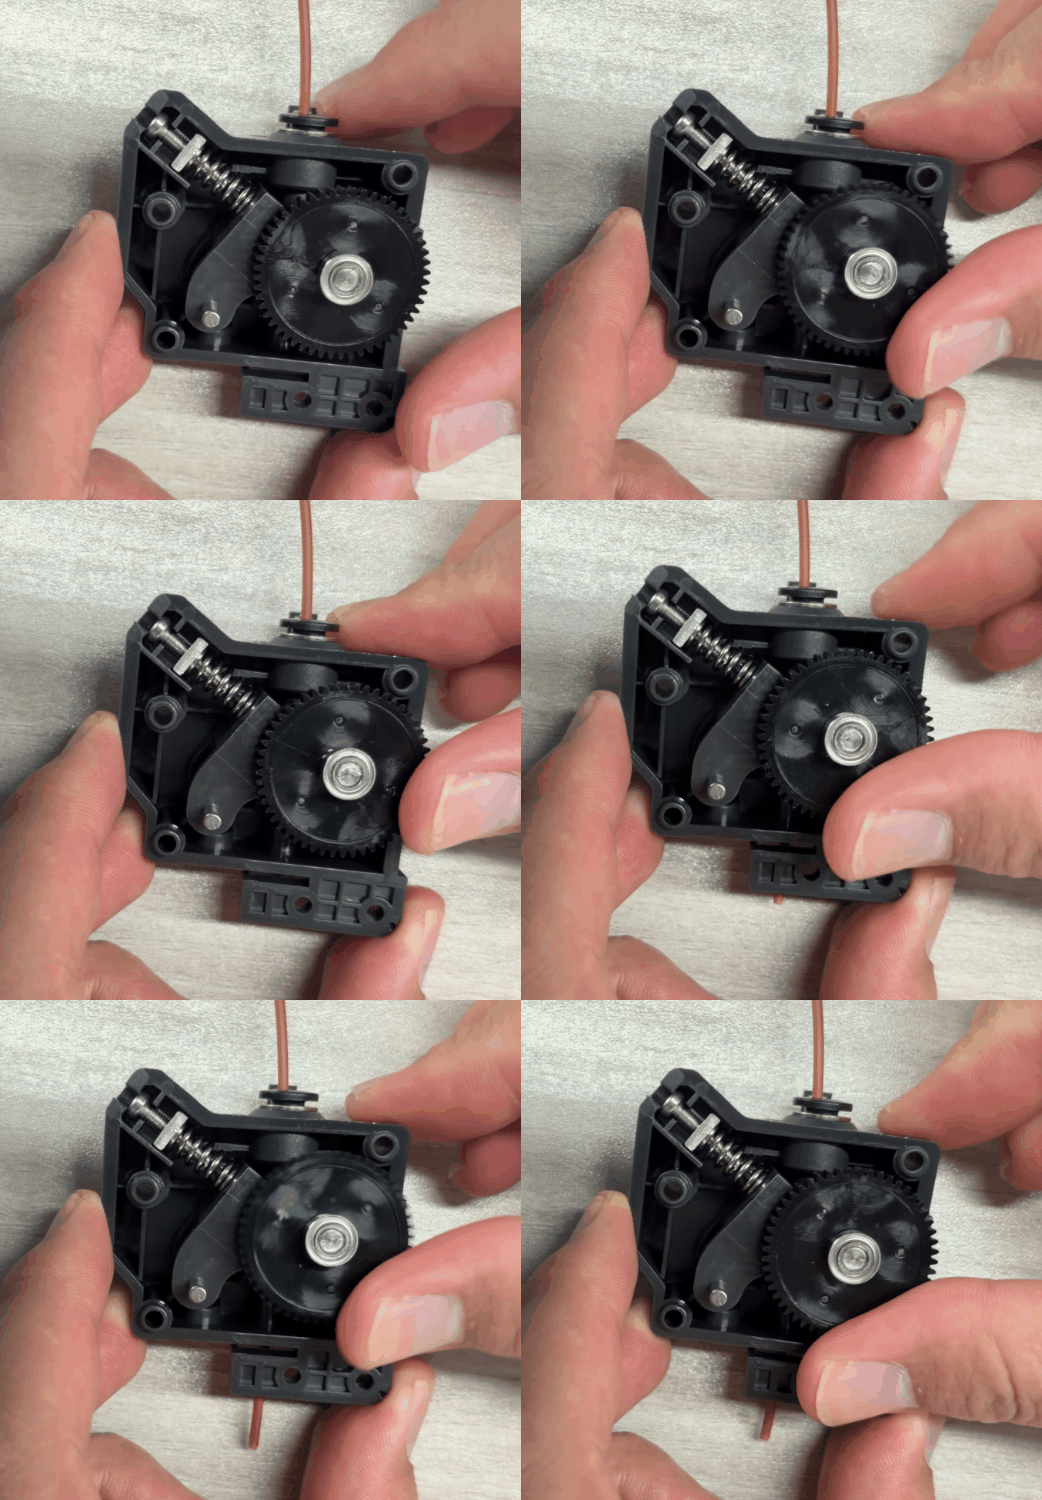
- If the gear cannot feed the filament through, adjust the gear tension.
- If tightening the gear does not improve the issue, the gear may be damaged and needs to be replaced.
¶ 7. Clear the Nozzle with a Cleaning needle
Note: Always wear heat-resistant gloves to prevent burns.
- Set the nozzle temperature slightly higher than the recommended temperature for the filament. For example, if PLA is currently being used, set the nozzle temperature to 220–230°C.
- Insert the cleaning needle vertically through the nozzle outlet and slowly move the needle up and down to clear any residual filament inside the nozzle.
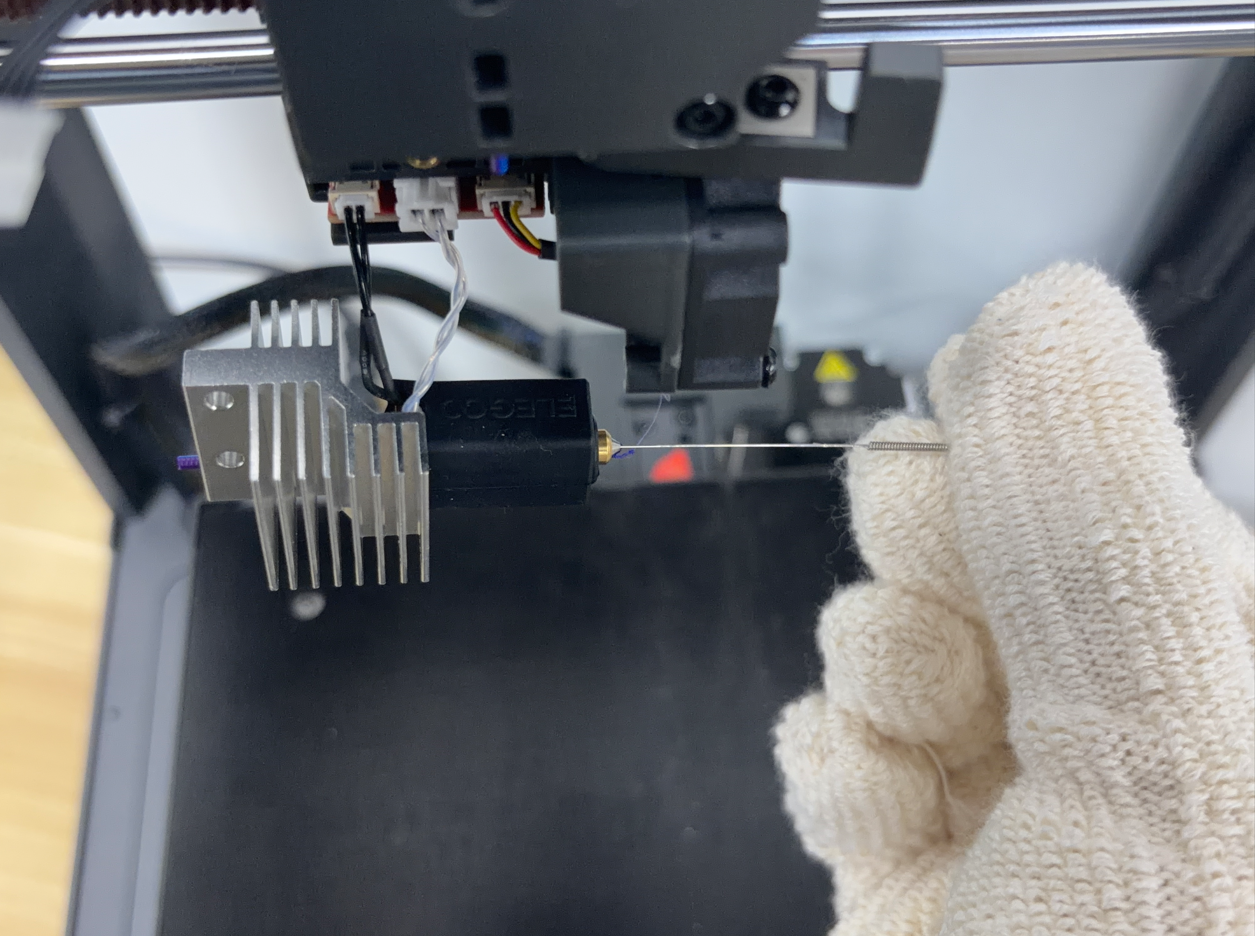
- Repeat the nozzle cleaning process.
Note: Do not move the cleaning needle significantly from side to side, as this may damage the nozzle orifice.
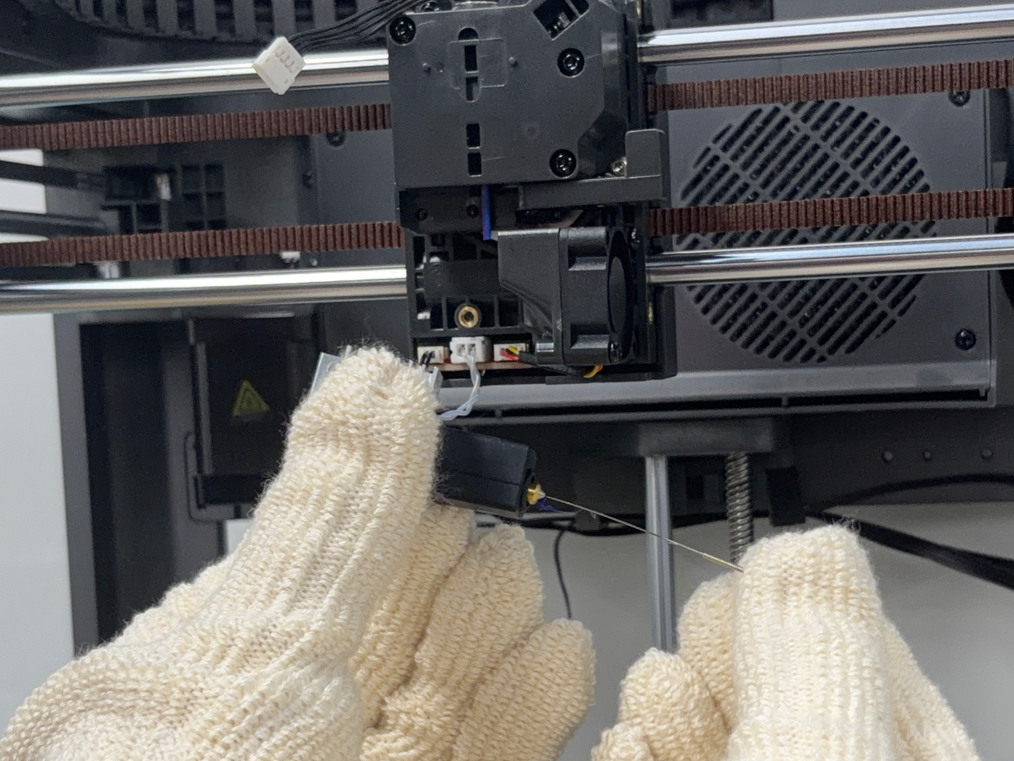
- If the nozzle has reached the appropriate cleaning temperature for the current filament but the cleaning needle still cannot enter the nozzle, or extrusion does not return to normal after repeated cleaning, the nozzle may be severely clogged. It is recommended to replace the nozzle.
¶ 8. Reinstall the Components and Perform a Test
- Reinstall the tool head components by following the instructions below:
- Power on the printer again.
- Set the nozzle temperature to the recommended temperature, then tap the ▽ button to extrude the filament.
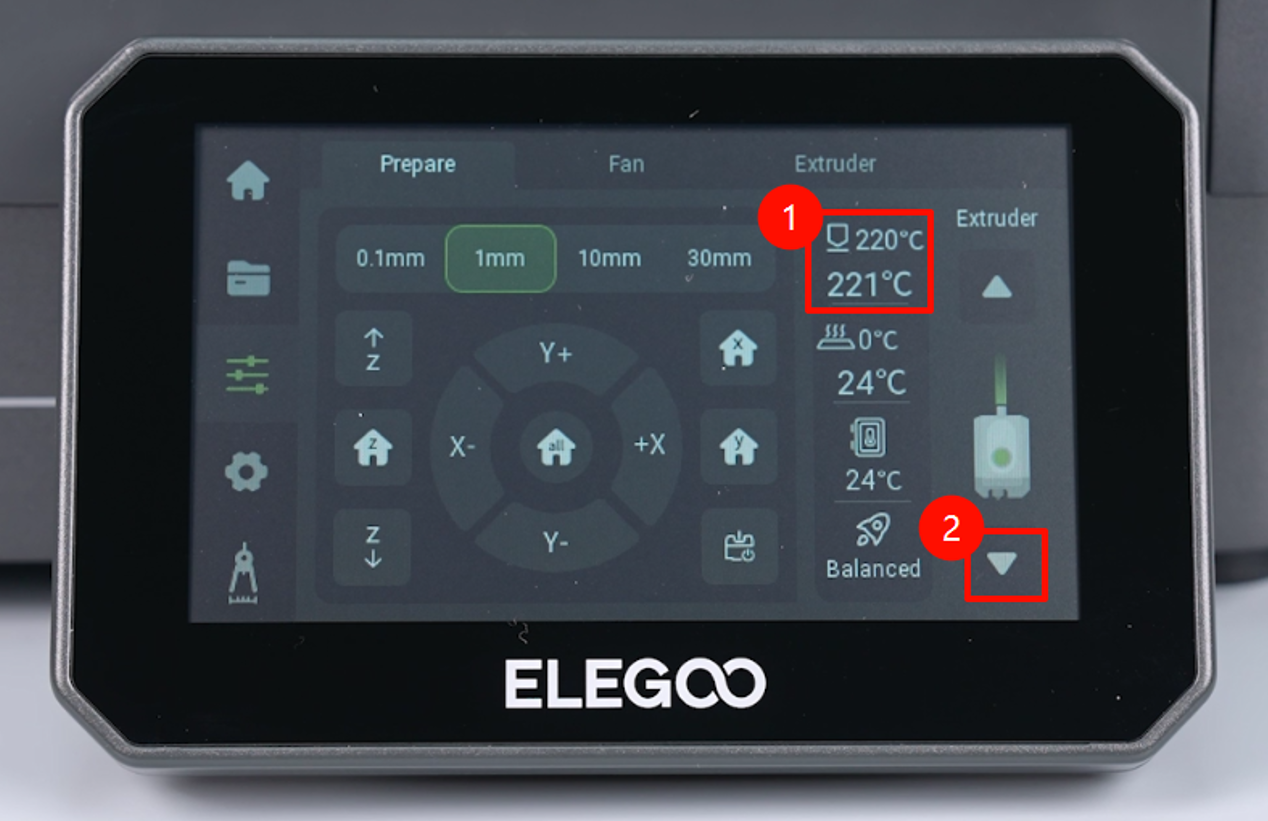
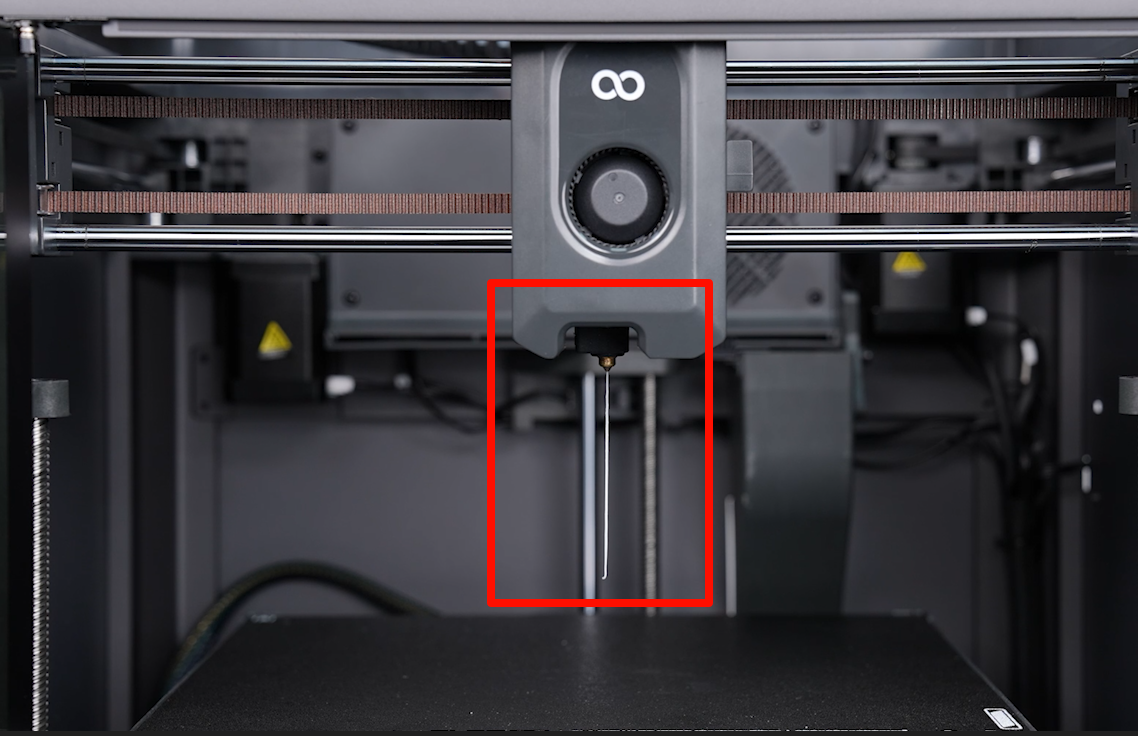
- Confirm that the filament is extruded normally.
- Tap Settings > Calibration > Auto Leveling Calibration. After calibration is complete, the printer is ready for use.
¶ Contact Technical Support
If the issue persists after completing the troubleshooting steps, please provide the following information when contacting technical support:
- A video showing the extruder failing to extrude filament normally.
- A photo of the filament label on the side of the spool, including the filament specifications and recommended printing temperature.
- The G-code file of the printed model.
- The printer's serial number (SN), which can be found on the white sticker near the power switch. The format is usually CC.XXXX. XXX.
- The printer firmware version (Touch Screen > Settings > Check for Updates).
¶ Help us improve
If you have any ideas about the wiki pages, please let us know via ELEGOO official feedback channel